2htdp/image toolkit,
which provides a collection of utilities for constructing images in
code.
Please note there have been several edits to this web page since its original presentation on 9/29. Look for the word EDIT in the text below.
Chicago, Illinois
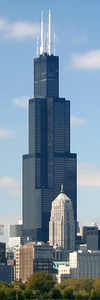
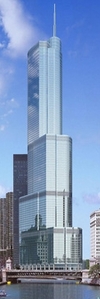
Chicago is full of landmark skyscrapers, some of which are pictured on this page. For this lab exercise, you will construct a simple model of the John Hancock Center (third from left below) from a given set of parts, modify the model to be scalable, and then build a second model of the Chicago skyscraper of your choice.
 |
 |
 |
 |
 |
 |
The process of modeling a complex (i.e., not dead simple) shape, like the profile of Chicago's John Hancock Center, consists of decomposing that shape into simple constituents, and assembling them together into a whole. We've deconstructed the Hancock Center for you; you'll do a second building on your own.
Getting Started
Start DrRacket.
Set the language level to Beginning Student with List
Abbreviations. (It's under Language > Choose Language... >
Teaching Languages > How to Design Programs.)
The 2htdp/image teachpack provides functions such as
rectangle, circle, ellipse,
etc. You build images out of these elemental parts and sticking them
together, stacking them up, and stretching and squeezing them in
various ways. For example, images can put together vertically and
horizontally using the image operators above
and beside, respectively. The use of common image
operators like above and beside will be
discussed briefly at the beginning of the lab session.
The documentation for 2htdp/image is available on the
web at
http://docs.racket-lang.org/teachpack/2htdpimage.htmlIt is also available on your local computer (see next paragraph). Be careful: there are several image libraries to choose from, including the very similarly named
htdp/image. In
this lab and all throughout the course, you need to work
with 2htdp/image.
You can find local documentation on the available functions by searching DrRacket's help system for "2htdp/image". You will want to keep the documentation close at hand through this exercise.
On colors: DrRacket understands HTML's named colors, a huge assortment
including darksalmon, papayawhip
and blanchedalmond, as well as the
usual red, blue, etc. These color
names can be used, as strings, with image functions, as
in
(Colors can also be constructed out three RGB integers using (for
example) (make-color 100 200 100). Use this form if you
need colors that aren't available through names.)
Part 1
Download this
file: jhc-components.rkt.
It includes definitions of individual image components that can be
glued together into a simple scale model of the JHC.
Having downloaded the file, you can look at the individual components
(jhc-middle, jhc-rside, etc.) by
typing their names at the prompt in the lower half of the DrRacket
window.
To complete Part 1, define the image jhc by assembling
a model of the John Hancock Center out of the given parts.
The pieces fit together like this:

The given components will yield a scale model if assembled correctly, at 1 pixel = 1 meter.
EDIT [9/30/10] Note that aliasing errors in the display may cause your model to appear slightly asymmetrical or distorted. This is not your fault, so ignore it and move on.
Part 2
The images jhc-middle, etc. are all of fixed
size. In Part 2, you must write function definitions to scale those
images automatically.
The function names for Part 2 will start with s- for
scalable. To begin, write s-jhc-middle, based
on jhc-middle. The function s-jhc-middle
must have type num -> img. The argument to the function
must be a number specifying meters per pixel. Therefore the
call (s-jhc-middle 1) should yield a 339-pixel-tall
rectangle, as it does prior to modification, while (s-jhc-middle
3) should be 113 pixels tall.
Write a function corresponding to each image part given
in jhc-components. Finish Part 2 by writing
s-jhc : num -> img
to produce models of the JHC at the desired scale.
EDIT [9/30/10] Do not use the
built-in scale operator, which basically accomplishes the
whole Part 2 task for you. We'd like you to scale the model from
scratch.
Part 3
Choose a Chicago skyscraper and build your own scale model of it in the manner of the JHC model. Your model need not be too detailed but it must be more than a plain rectangle. The skyscrapers above are all fair game, but you are not limited to them. Whichever building you choose, take care that the scale is true. The dimensions of all of Chicago's landmark buildings are easily available through Google, Wikipedia and the usual sources. Use meters instead of feet, and include comments giving the dimension information you found.
EDIT [9/30/10] By popular demand, you may model a non-Chicago building if you prefer. (Burj Dubai and Notre Dame de Paris have been requested.)
When your work is complete, if we put your model of, say, the Willis Tower next to the JHC from Part 2 (at the same scale, of course), the ratio between their heights should be correct.
For the sake of uniformity, name the main drawing function (analogous
to s-jhc above) part3-building (so your those
evaluating your work know in advance how to refer to it). Its type
must be num -> img and its argument must represent, once
again, meters per pixel.
How to hand in your work.
Your work is finished when jhc, s-jhc
and part3-building are all written and working.
Submit your work by clicking the CS151 Handin button on
the DrRacket toolbar. Make sure your work is submitted
as Lab1. Throughout the quarter, you will need to take
care to submit the right work in the right place; homework
assignments, labs and projects may, at some point, all be in the play
at the same time.
As questions arise, please feel free to send mail to your lab instructors with specific questions. If our answer is relevant to the whole group (it most often is), we will respond to the course mailing list to try to spread our wisdom as efficiently as possible.