Each lab will consist of a small problem and details of how to proceed. You need to submit labs to the TAs for grading--see submission instructions below. Generally, unless otherwise specified, you will have one week to complete each assigned lab.
See the syllabus for information on grading. Turning in lab assignments is required. Submit your assignments as a tarball to the subversion repository according to the directions on the syllabus page.
ALL CODING in the remainder of the class will be in Java only.
Lab 5 Due: 5:00 pm, Tuesday, May 13, 2014
Problem
(Software Setup and Validation):
For this assignment you will make sure that your environment is set up for proper execution during the remainder of the class. This will involve making sure you have successfully configured the following tools:
Java 1.6.0_65
Apache Camel 2.10.3
Apache ActiveMQ 5.9.1
maven 3.0.5
Eclipse Standard/SDK: Kepler Service Release 2 (Build id:
20140224-0627) (you may try other build id's but your mileage may
vary...)
Your
ultimate goal, and the submission for this lab, will be an eclipse
version of this maven project.
Throughout this setup, you will
verify that your development environment is sane and functioning, then
you
will compile and execute the maven project to make sure you can build
the camel code. You will then convert the maven project to an
eclipse project, and then you will run and build the eclipse project
and execute the program, again verifying that the program (now running
within eclipse) executes successfully. When it all works fine,
you will
submit the eclipse project (as a tarball) as decribed below. You
will not need to write or modify any code. The code is
provided for
you. All you need to do is get it to compile and execute from
within eclipse. That's not going to be as easy as it sounds.
First things first, hit your browser refresh button on this page in case there are any late-breaking changes, and you've had this page up for a while.
The remainder of this Lab assumes that you are using remote access via RDP to access a particular machine on the cluster that has been prepared for our class. The name of the machine you are to use will be given during class. We would prefer that you use a remote desktop program, but we wrote these instructions to allow you to still follow along if you're limited to an ssh connection, so if you cannot use a remote access program right now, the following instructions will still work for you via ssh to that same machine; you just won't be able to do the final step where you use Eclipse.
If you do not already have an RDP program on your laptop, you should get one now:
MacOS: If your laptop is a Mac, one relatively popular RDP program is called Cord: http://cord.sourceforge.net/.
Cord by default does not go full screen, so make sure to set Main Menu:Preferences:Defaults:Full Screen, and see this for more info if you have are having issues getting the full-screen mode to work.
If you do not like Cord you can also try Microsoft's own RDP client: RDC for Mac OS by Microsoft. Finally, Royal TSX is non-free but has a free trial.
Linux: If you have a Linux laptop, again multiple options, but just to take a random pick the one they have pre-installed on the cluster computers is called Remmina: http://remmina.sourceforge.net/
Windows: If you have Windows, just use the built-in RDP client: Start Menu:type "remote" (no quotes) and you should see "Remote Desktop Connection." Click that.
With all of these programs, connect simply by specifying the machine name. The program should then fill up your screen and you will be prompted for more information. Select "sesman-any" for Module and "localhost" for IP address, then enter your username and password. If "sesman-Xvnc" works for you use that instead to make this a little quicker.
The first
thing you need to do is to gather some files that you will need.
Run the following commands to retrieve these into your home directory:
cd ~
curl -O http://www.classes.cs.uchicago.edu/archive/2014/spring/51050-1/LABS/mpcs.51050.sh
curl -O http://www.classes.cs.uchicago.edu/archive/2014/spring/51050-1/LABS/install.51050.sh
Next you need to make sure you have your environment file loading in your .bashrc file. The environment file is mpcs.51050.sh. You already saved this file to your home directory; now, add the following line to the END of your current .bashrc file:
. ~/mpcs.51050.sh
Now you want to ensure that the bashrc file is utilized in the context of either a login session (like an ssh session) or an interactive session (like an Xterm window in Ubuntu):
ln -s ~/.bashrc ~/.bash_profile
You will need to log out and log back in for these changes to take effect. After you've done that, you should execute the following two commands:
cd ~
sh ~/install.51050.sh
Once you've done this, you should execute the following commands to verify that your environment is set up correctly:
At the command line, execute:
java -version (should see java version "1.6.0_60")
Then, execute:
ls ~/mpcs.51050/local/51050
You should see listed under ~/mpcs.51050/local/51050 the following directories:
apache-activemq-5.9.1If you see those, that's a good thing. Now, try and run maven:
mvn -version (should see Apache Maven 3.0.5)
Now, execute:
ant -version (should see Apache Ant(TM) version 1.9.3)
Now type:
echo $ANT_HOME
and you should see /home/[yourloginid]/mpcs.51050/local/51050/apache-ant-1.9.3
Now type:
echo $M3_HOME
and you should see /home/[yourloginid]/mpcs.51050/local/51050/apache-maven-3.0.5
So far, if
you see all this, that's very very good. Now, we've got a little
configuration to do.
Now that the environmnet looks sane, let's configure a bit and then launch ActiveMQ, our enterprise message queue system. Change to the directory shown below:
cd ~/mpcs.51050/local/51050/apache-activemq-5.9.1
ActiveMQ uses three ports by default, 61616 and 5672 for the message queue itself and 8161 for the admin http port. We want to change these so that different students using the same machine do not conflict. You should have three port numbers that were assigned to you by the TAs. You can find these in a file named myports.txt in your Subversion repository. Use the following commands now to view the ports you must use to run activemq on this shared machine:
cd [yoursvnrepolocation]
svn up
cat myports.txt
Please use those port numbers as you edit the following files:
Now, execute the following command:
DO NOT RUN THIS DURING AN SSH SESSION: ./bin/activemq console
Why does it say do not run from SSH above? Because SSH sessions get automatically disconnected based on keyboard activity, and when this happens, the activemq server may continue to run. So please run this only from your remote desktop sessions, not SSH. (If you do end up getting into a problem with stray instances, "ps -Af | grep java | grep [yourloginid]" should help you find processes that you need to clean up.)
You will see a lot of things launching, and after a few seconds the terminal will appear to hang right around this output:
ACTIVEMQ_HOME: /mpcs./apache-activemq-5.9.1
ACTIVEMQ_BASE: /mpcs./apache-activemq-5.9.1
ACTIVEMQ_CONF: /mpcs./apache-activemq-5.9.1/conf
ACTIVEMQ_DATA: /mpcs./apache-activemq-5.9.1/data
Loading message broker from: xbean:activemq.xml
INFO |
Refreshing org.apache.activemq.xbean.XBeanBrokerFactory$1@1cb8deef:
startup date [Fri Mar 28 13:48:13 CDT 2014]; root of context hierarchy
INFO | PListStore:[/mpcs./apache-activemq-5.9.1/data/localhost/tmp_storage] started
INFO | Using Persistence Adapter: KahaDBPersistenceAdapter[/mpcs./apache-activemq-5.9.1/data/kahadb]
INFO | KahaDB is version 4
INFO | Recovering from the journal ...
INFO | Recovery replayed 1 operations from the journal in 0.029 seconds.
INFO | Apache ActiveMQ 5.9.1 (localhost, ID:cheiron.local-61622-1396032495551-0:1) is starting
INFO |
Listening for connections at:
tcp://cheiron.local:61616?maximumConnections=1000&wireformat.maxFrameSize=104857600
INFO | Connector openwire Started
INFO |
Listening for connections at:
amqp://cheiron.local:5672?maximumConnections=1000&wireformat.maxFrameSize=104857600
INFO | Connector amqp Started
INFO | Apache ActiveMQ 5.9.1 (localhost, ID:cheiron.local-61622-1396032495551-0:1) started
INFO | For help or more information please see: http://activemq.apache.org
INFO | Web console type: embedded
INFO | ActiveMQ WebConsole initialized.
INFO | Initializing Spring FrameworkServlet 'dispatcher'
INFO | jolokia-agent: No access restrictor found at classpath:/jolokia-access.xml, access to all MBeans is allowed
What you are looking for is the line towards the bottom that says something like:
INFO | Apache ActiveMQ 5.9.1 (localhost, ID:cheiron.local-61622-1396032495551-0:1) started
and the line:
INFO | ActiveMQ WebConsole initialized.
These lines tell you that ActiveMQ has launched successfully and is running. The "hanging" is normal and simply means that ActiveMQ is running in console mode in the foreground. Don't do this now, but when you want to shut ActiveMQ down, you can just press "Ctrl-C" in this window to get your prompt back. Once ActiveMQ is running, let's understand what's happening. ActiveMQ has launched and is listening on port 62*** of the localhost you ran it from, where 62*** represents the port number you received from the TAs. You can verify this by typing:
netstat -an |grep 62***
Remember that you will need to replace the 62*** above with the port number you received from the TAs.
You will want to see something like:
tcp6 0 0 [::]:62034 [::]:* LISTEN
This is all good. You should also be able to execute the following:
ps aux |grep console
You should see something like the following:
mark
25828 0.0 0.0 2445652 1144
s000 S+ 1:48PM 0:00.01 /bin/sh
./bin/activemq console
This shows you that activemq has been launched in console mode and is running in process 25828. All good.
Now, you get to launch the console itself and attach to the ActiveMQ server. Bring up a browser, and enter the following URL:
http://localhost:82**/admin/
Again, remember that you will need to replace the 82** above with the port number you received from the TAs. Also, if you are using ssh, you can use "links" to emulate a browser.
If you are presented with a login prompt, your user id is "admin" and the password
is "admin". It is not advisable to change these values. We
can't help you remember your changes.
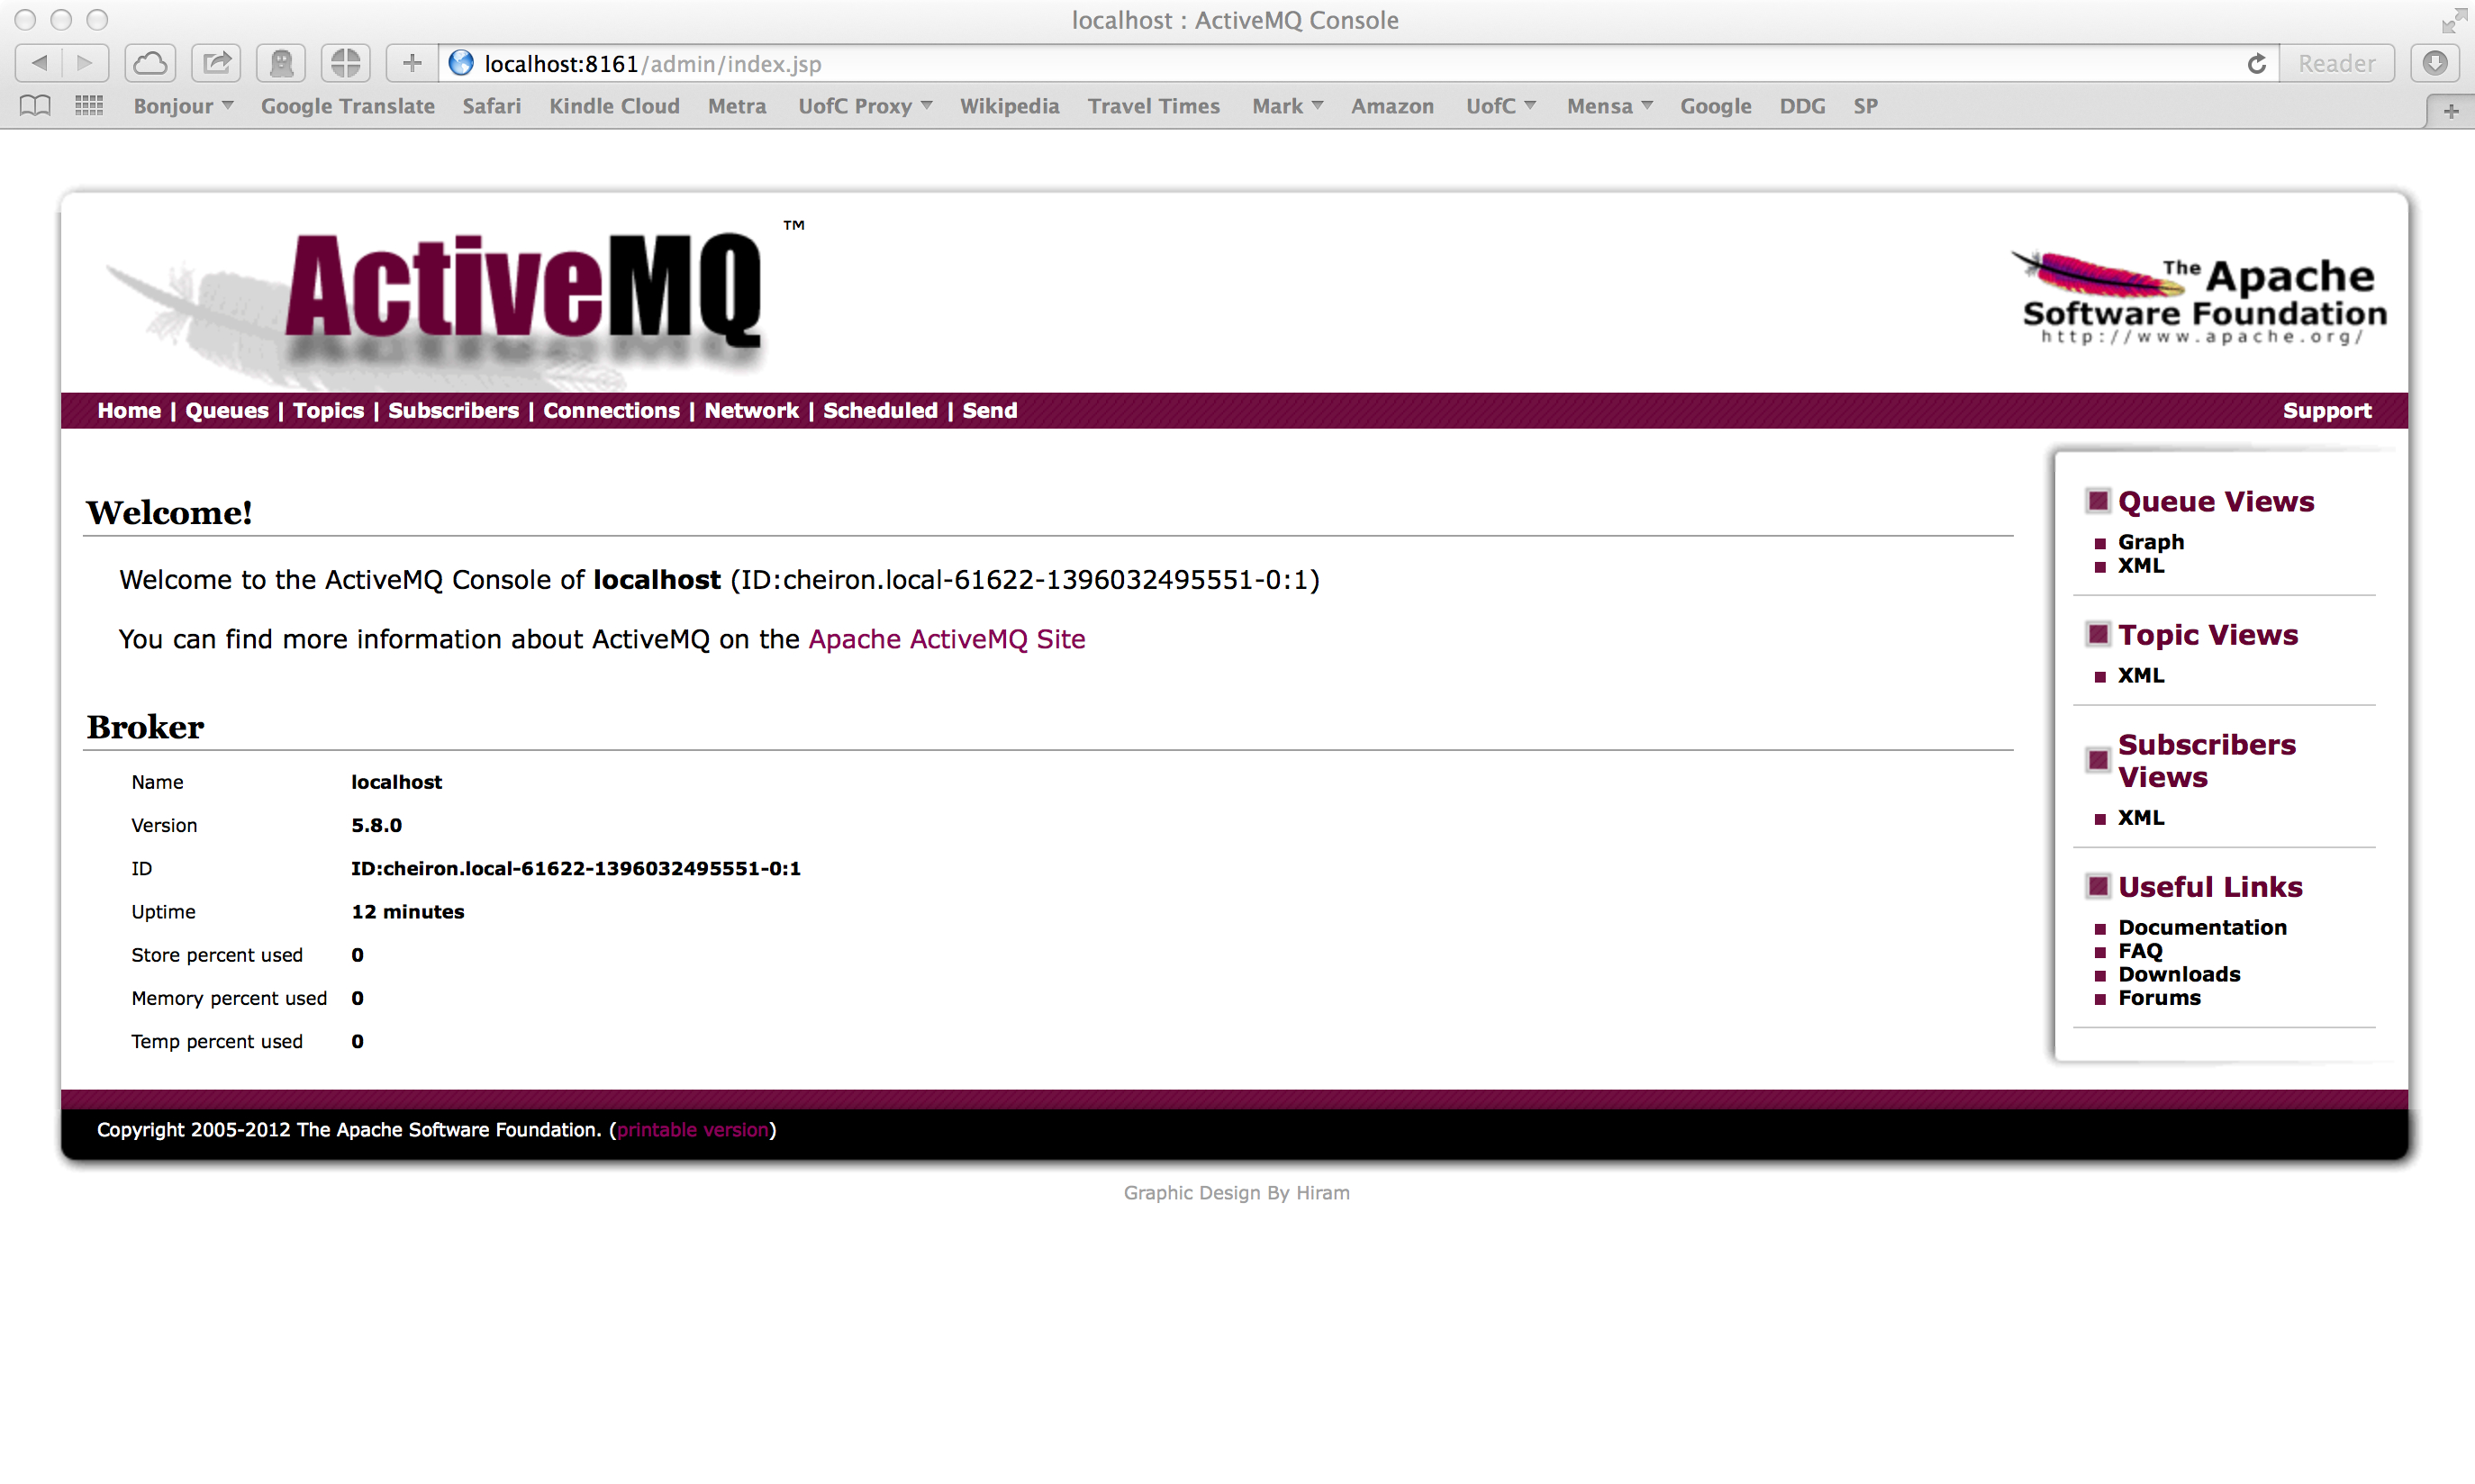
Once you've launched the console, you should see something like this (NOTE: The graphics mention version "5.8.0" whereas your version will display "5.9.1", and the port number shown below shows the standard port, not the 82** port number you need to use):
We will not belabor this now, but you will see that you can click on several tabs, including Queues and Topics, to see the messages that are going to be put on the ActiveMQ broker. We will see a little of this in a minute. For right now, go ahead and click on "Queues" and you will see that you don't currently have any queues defined.
Now, we want you to set up your maven repository for the sample code from Snyder et. al. ActiveMQ in Action and Ibsen & Anstey, Camel in Action. The zipped source code for ActiveMQ can be found here. The zipped source code for Camel can be found here. Change into your ~/mpcs.51050 directory, and create a new subdirectory in there called "src". Then, unzip the two source code zips in that subdirectory. You will wind up with two new subdirectories:
amq-in-action-example-src
camelinaction-source
In order to set up your local maven repository (which will be created by maven and stored in a directory called ".m2" under your home directory), simply change into the amq-in-action-example-src directory and type the following command:
mvn compile
You will see a lot of activity as maven downloads repository files and compiles code. You should see toward the end of the output the following lines:
[INFO] Compiling 68 source files to /home/[yourloginid]/mpcs.51050/src/amq-in-action-example-src/target/classes
[INFO] ------------------------------------------------------------------------
[INFO] BUILD SUCCESS
[INFO] ------------------------------------------------------------------------
. . .
At this point, issue the following command:
ls ~/.m2/repository
You should see numerous directories under your repository directory.
Now change into the camel src code directory which is in camelinaction-source which you created above, and type the same command again:
mvn compile
You will again see a lot of activity as maven downlodas repository files and compiles code. You should see toward the end of the output something like the following lines:
[INFO] Camel in Action :: Appendix C ..................... SUCCESS [0.001s]
[INFO] Camel in Action :: Appendix C :: Producer Template SUCCESS [0.270s]
[INFO] Camel in Action :: Appendix C :: Consumer Template SUCCESS [0.230s]
[INFO] ------------------------------------------------------------------------
[INFO] BUILD SUCCESS
[INFO] ------------------------------------------------------------------------
. . .
Now issue the following command (that is the number "1" in the command below, not the letter "l"):
ls -1 ~/.m2/repository/org/apache
You should see output similary to the following:
activemq
ant
apache
camel
commons
cxf
felix
ftpserver
geronimo
maven
mina
neethi
openjpa
servicemix
velocity
ws
xbean
The repository files for activemq are now in your ~/.m2/repository/org/apache/activemq directory and your repository files for camel are now in your ~/.m2/repository/org/apache/camel directory.
Now that you have ActiveMQ up and running (make sure it is still running and you haven't shut it down), obtain and untar this tarball. You can put it anywhere you'd like, such as in your ~/mpcs.51050/src subdirectory. What you will see is the following directory and file structure:
$ tar tzvf file-copy.tgz
drwx------ pbossi/guest 0 2014-04-09 14:58 file-copy/
drwx------ pbossi/guest 0 2014-04-09 14:58 file-copy/data/
drwx------ pbossi/guest 0 2014-04-09 14:58 file-copy/data/inbox/
-rwx------ pbossi/guest 89 2014-03-28 10:56 file-copy/data/inbox/message1.xml
-rwx------ pbossi/guest 6711 2014-03-28 11:42 file-copy/pom.xml
-rwx------ pbossi/guest 389 2014-03-28 10:56 file-copy/readme.md
drwx------ pbossi/guest 0 2014-04-09 14:58 file-copy/src/
drwx------ pbossi/guest 0 2014-04-09 14:58 file-copy/src/main/
drwx------ pbossi/guest 0 2014-04-09 14:58 file-copy/src/main/java/
drwx------ pbossi/guest 0 2014-04-09 14:58 file-copy/src/main/java/camelinaction/
-rw------- pbossi/guest 2189 2014-03-28 11:37 file-copy/src/main/java/camelinaction/FileCopierWithCamel.java
drwx------ pbossi/guest 0 2014-04-09 14:58 file-copy/src/main/resources/
-rwx------ pbossi/guest 1738 2014-03-28 10:56 file-copy/src/main/resources/log4j.properties
These files are taken and modified from the simple file-copy example provided in Chapter 1 of the text Camel in Action by Ibsen and Anstey (pp. 10ff). The code has been modified because we are not only trying to validate that Camel is set up and ready for business but also that your ActiveMQ environment is up and running. The modified file-copy program accomplishes just that. cd into your new file-copy subdirectory.
Before we do anything else though, we need to change the Java code a tiny bit to use the ActiveMQ port number given to you by the TAs instead of the default port. This is the port number that starts with 62***.
Change to the file-copy directory which you just untarred, and you are going to make a small edit to a java file:
Now we are ready to use maven to compile our example program.
mvn compile
You should see a TON of files downloading, but if things go well, you should also see something like this at the end:
...
[INFO] Building Camel in Action :: Chapter 1 :: File Copy Example 1.0.0
[INFO] ------------------------------------------------------------------------
[INFO]
[INFO] --- maven-resources-plugin:2.5:resources (default-resources) @ chapter1-file-copy ---
[debug] execute contextualize
[INFO] Using 'UTF-8' encoding to copy filtered resources.
[INFO] Copying 1 resource
[INFO]
[INFO] --- maven-compiler-plugin:2.3.2:compile (default-compile) @ chapter1-file-copy ---
[INFO] Compiling 1 source file to /private/tmp/file-copy/target/classes
[INFO] ------------------------------------------------------------------------
[INFO] BUILD SUCCESS
[INFO] ------------------------------------------------------------------------
[INFO] Total time: 2.877s
[INFO] Finished at: Fri Mar 28 12:44:21 CDT 2014
[INFO] Final Memory: 20M/81M
[INFO] ------------------------------------------------------------------------
What you're looking for is that happily capitalized "BUILD SUCCESS". if you see that, that's a good thing. If you see errors, that's of course a bad thing. You should not see any errors if you've set up your environment correctly. If you do encounter errors, start posting to the Piazza site for help from any and all.
Once you've got your maven project compiled, you can then execute it by typing the following command:
mvn exec:java -Dexec.mainClass=camelinaction.FileCopierWithCamel
You should see a lot of activity, hopefully no errors, and after completion, you should see something like this:
...
[ion.FileCopierWithCamel.main()]
IntrospectionSupport
DEBUG Clearing cache[size=0, hits=57, misses=58, evicted=0]
[ion.FileCopierWithCamel.main()]
DefaultCamelContext
INFO Apache Camel 2.12.3 (CamelContext: camel-1) uptime 2.529
seconds
[ion.FileCopierWithCamel.main()]
DefaultCamelContext
INFO Apache Camel 2.12.3 (CamelContext: camel-1) is shutdown in
0.015 seconds
[INFO] ------------------------------------------------------------------------
[INFO] BUILD SUCCESS
[INFO] ------------------------------------------------------------------------
[INFO] Total time: 6.041s
[INFO] Finished at: Fri Mar 28 14:10:20 CDT 2014
[INFO] Final Memory: 13M/81M
[INFO] ------------------------------------------------------------------------
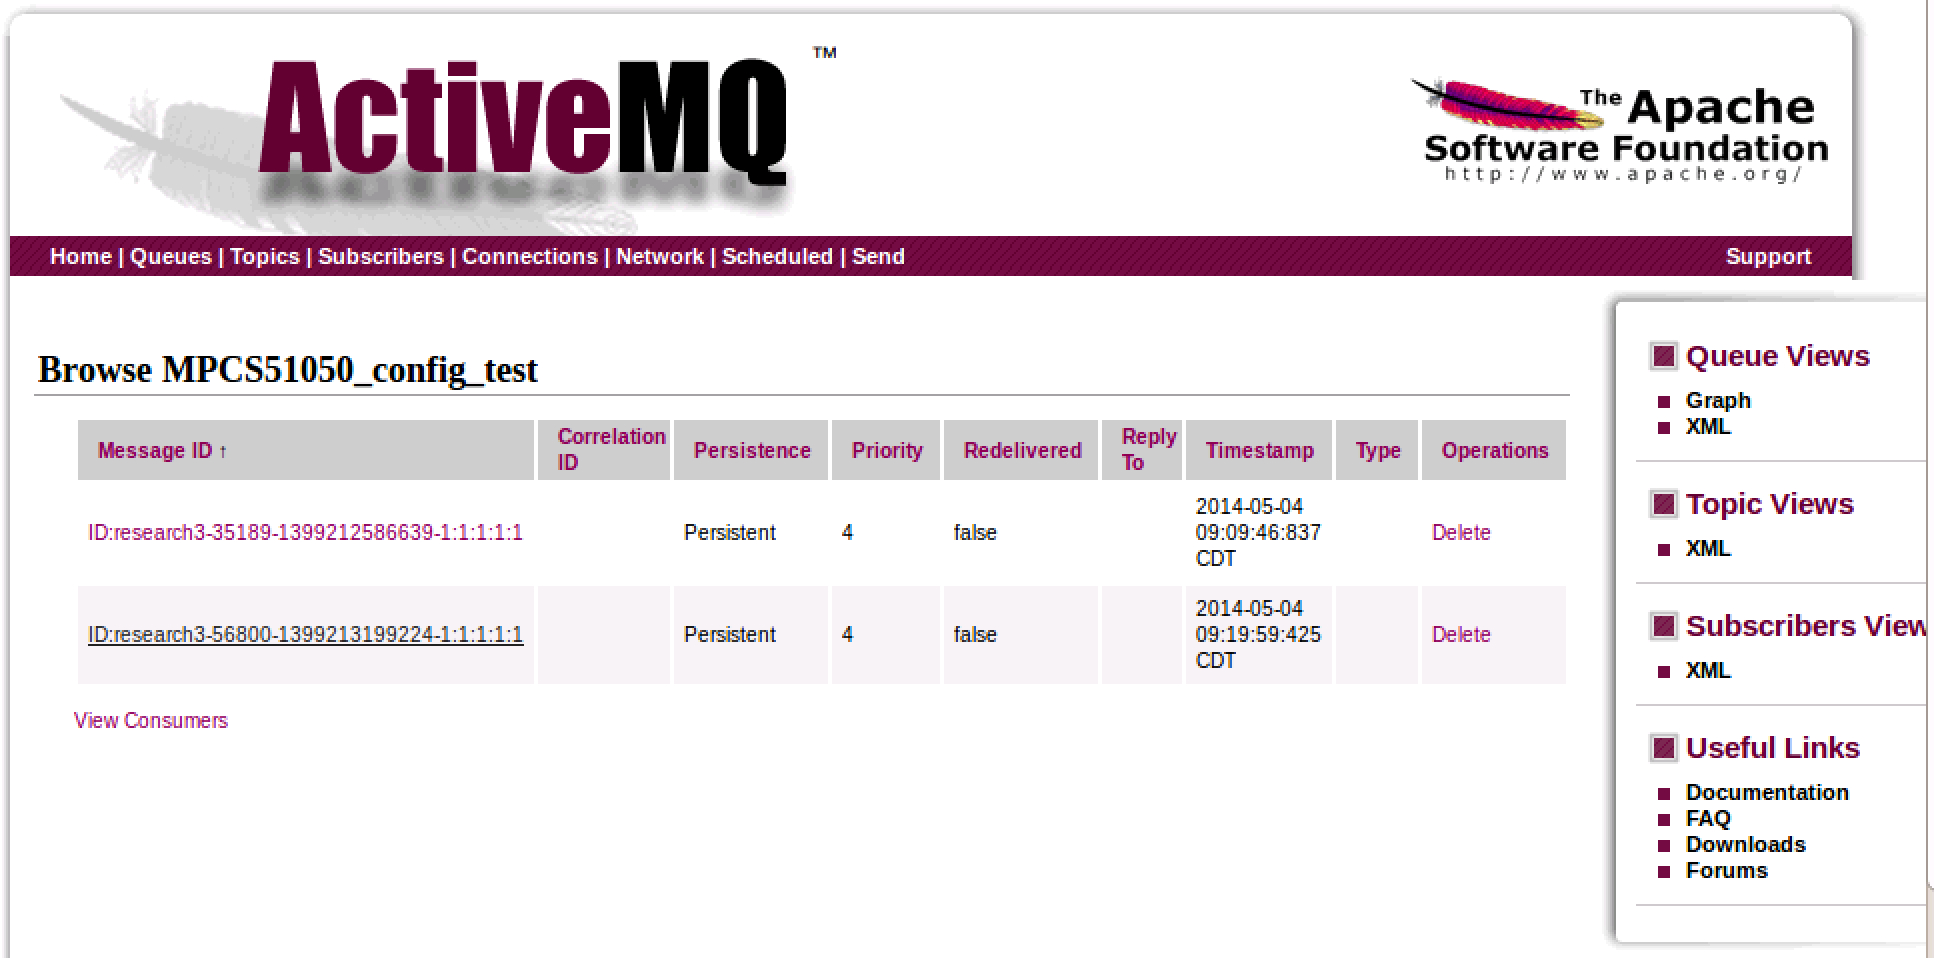
After running the above, you should be able to refresh your browser (or click on Queues from the home screen) and you should see something like this:
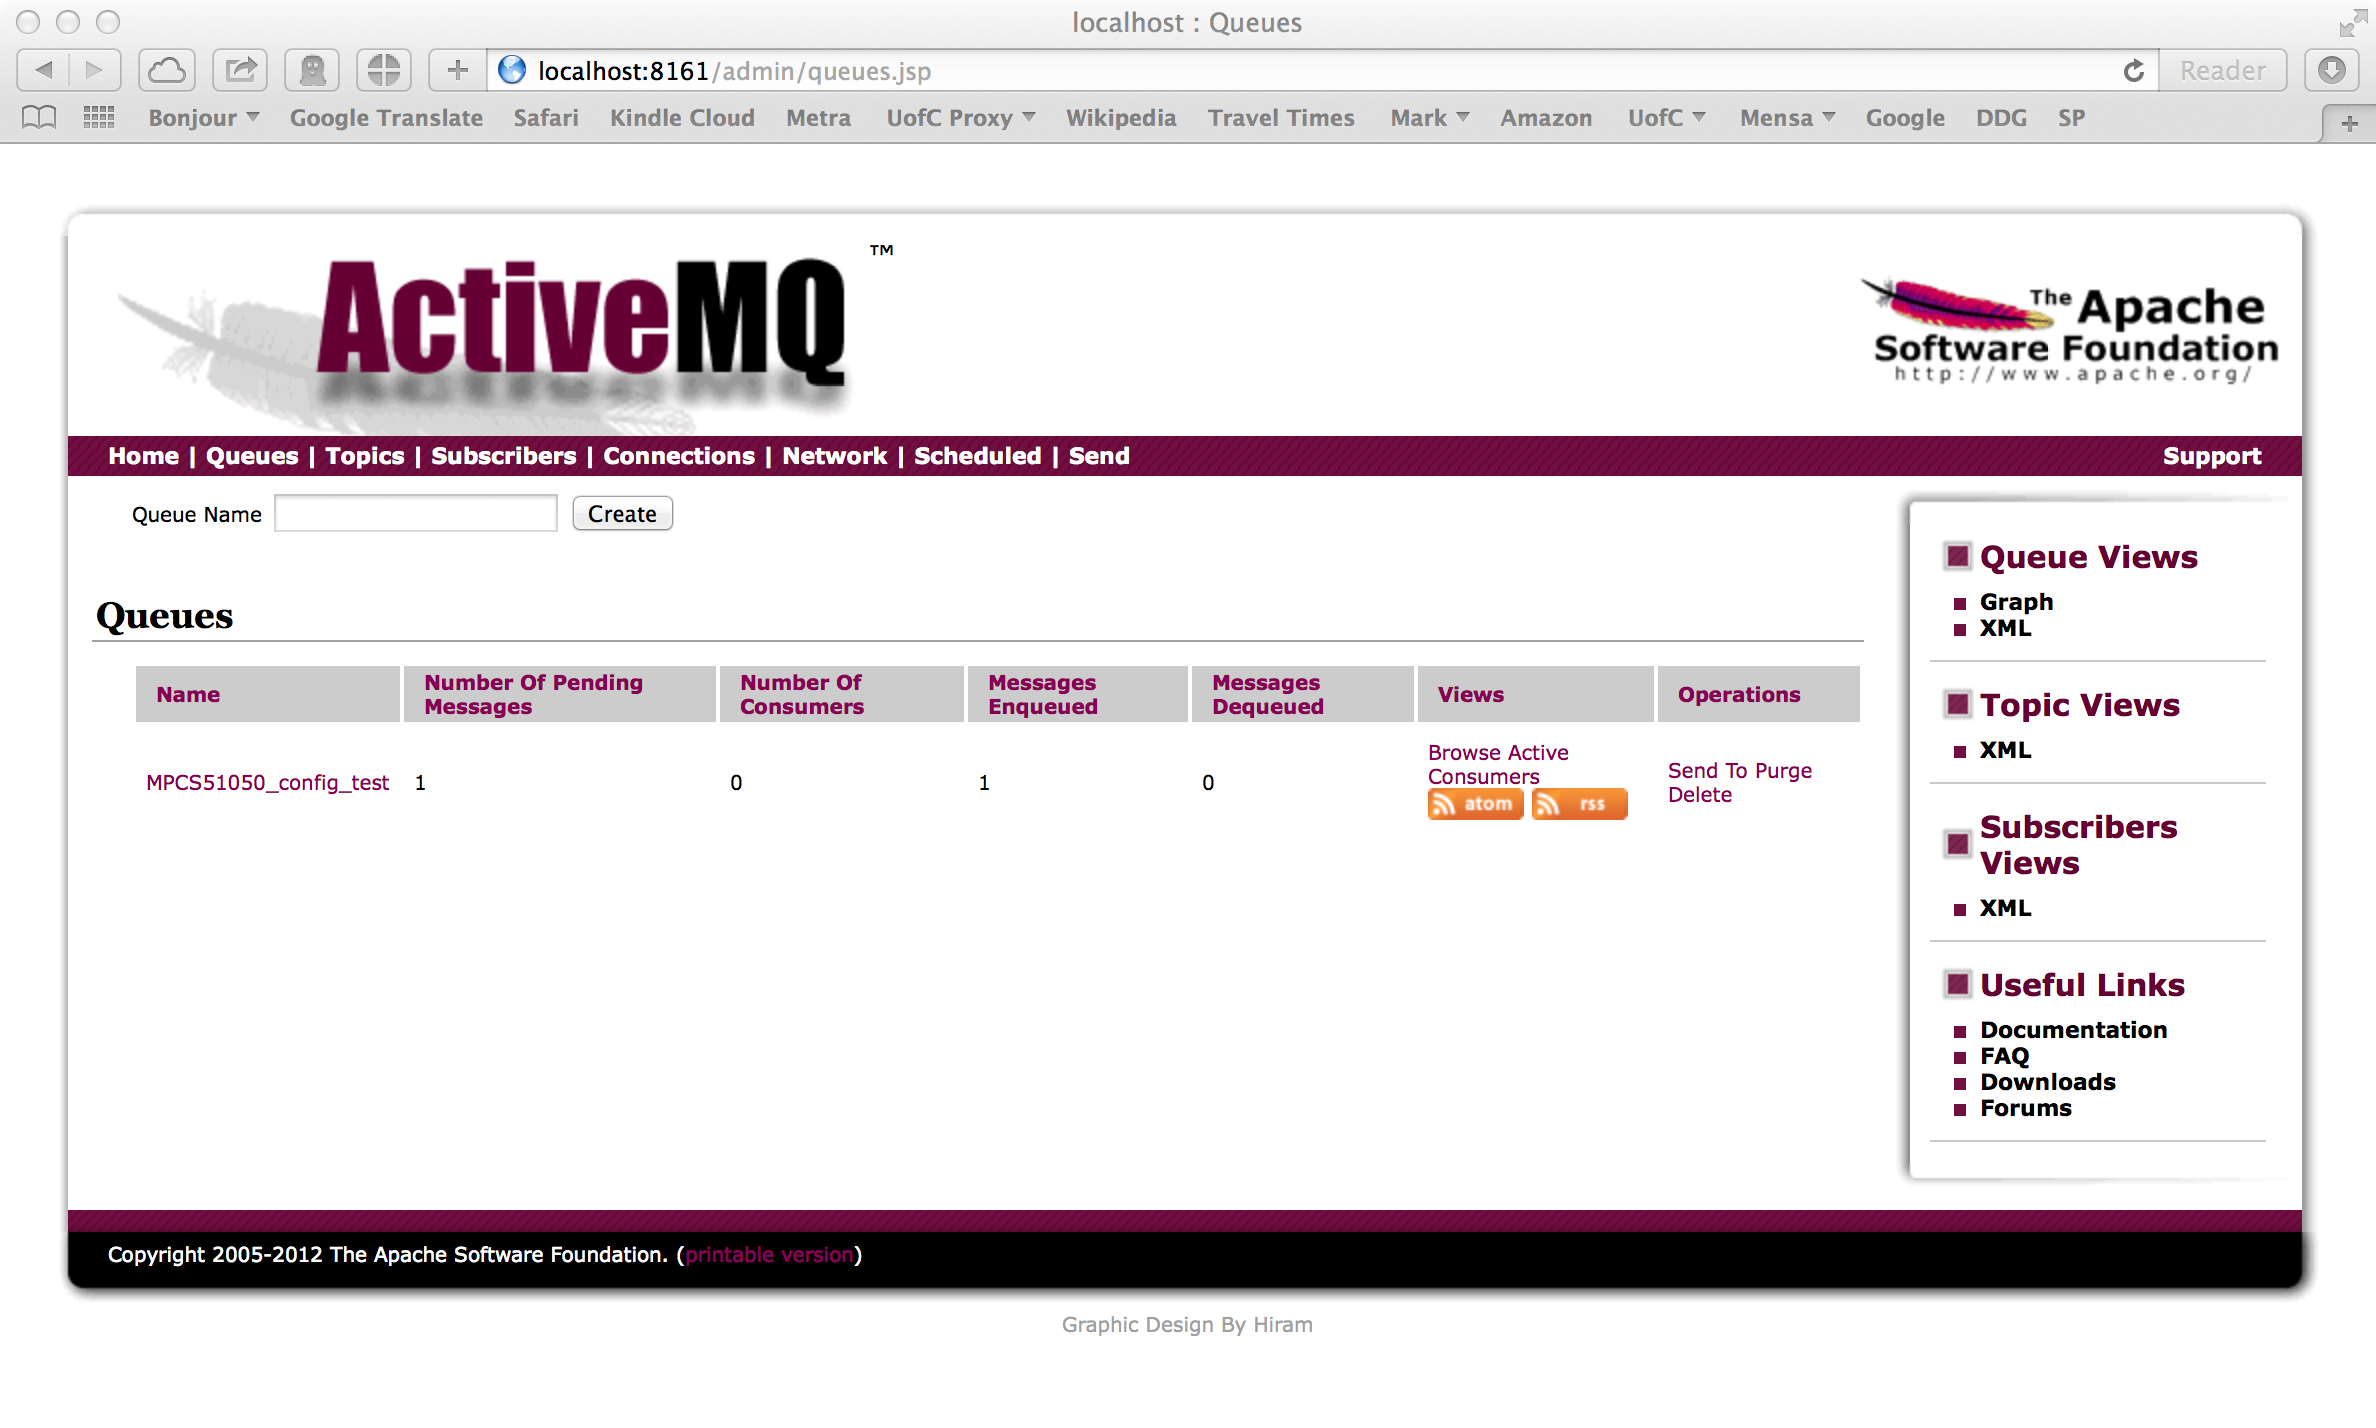
Seeing that you now have a new queue (created by your file-copy program) called MPCS51050_config_test, and that it has one message on the queue (Number of Pending Messages) is a GREAT THING. You're almost done. You can even click on the queue name and on the next screen click on the message identifier to investigate the actual message:
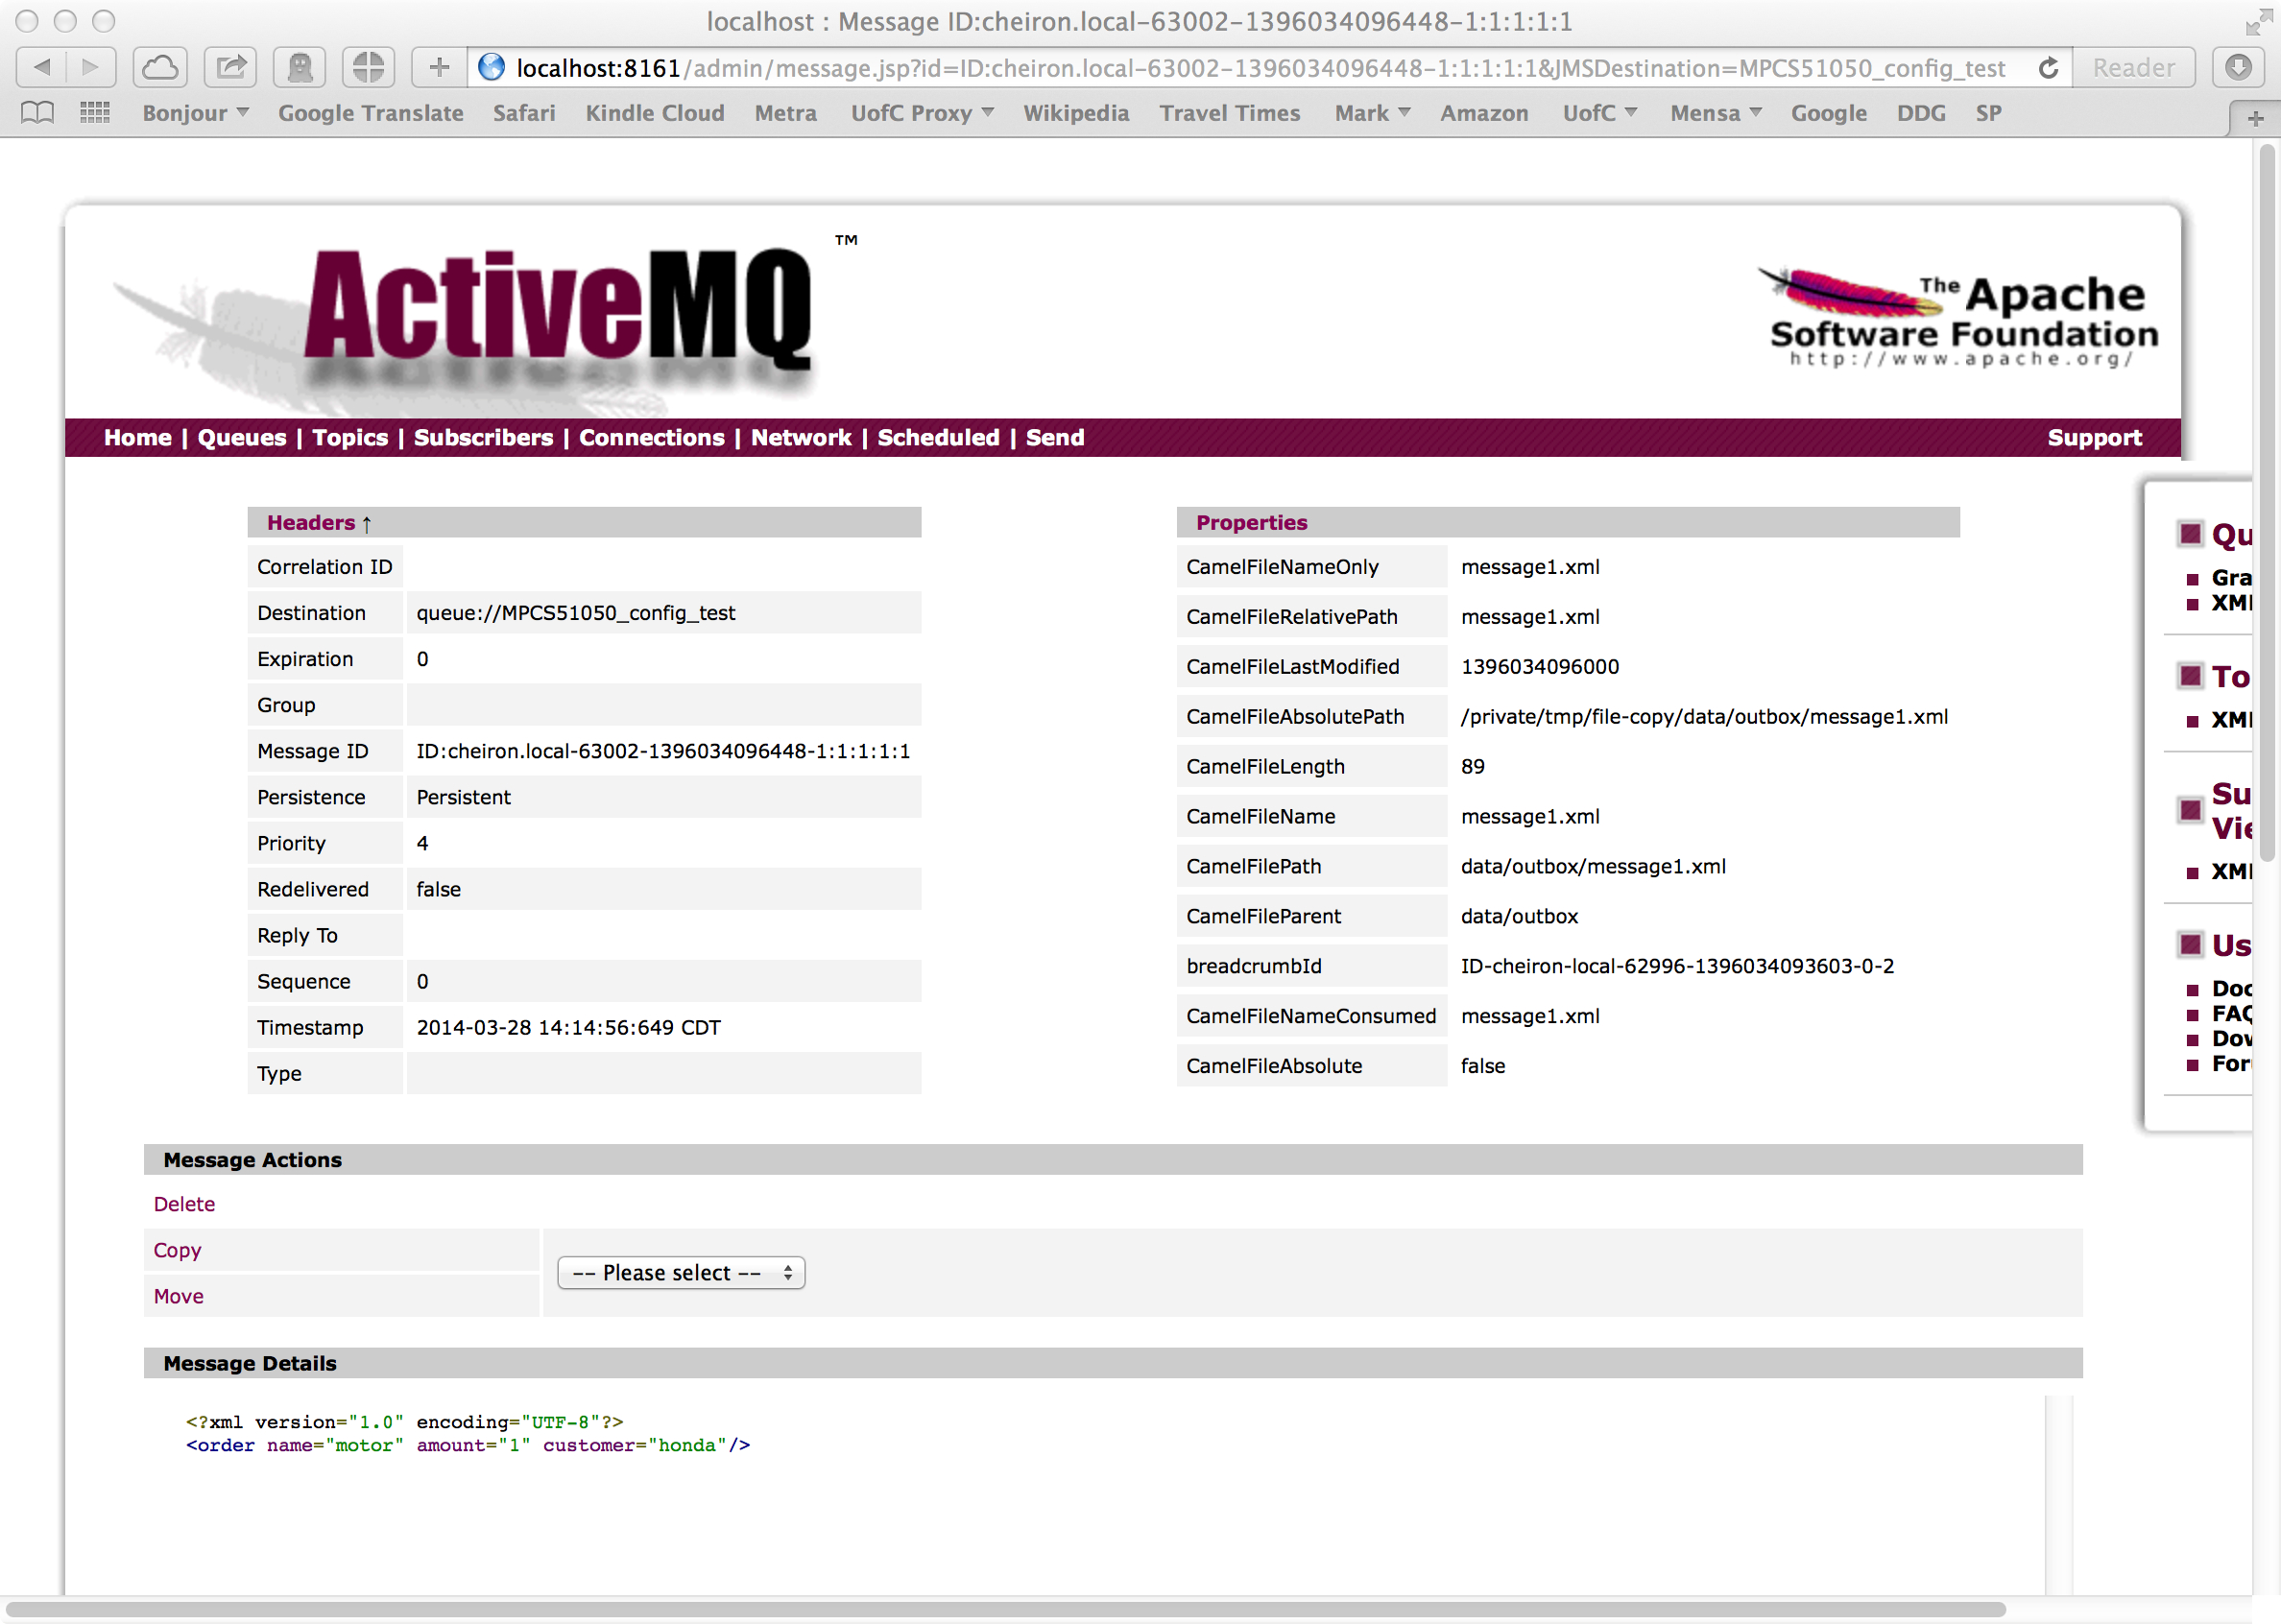
Here you can see the details of your message, including, at the bottom, the actual text of the message itself. You can compare this to the text in your maven build directory in the file:
[mark@cheiron]/tmp/file-copy
$ cat data/inbox/message1.xml
<?xml version="1.0" encoding="UTF-8"?>
<order name="motor" amount="1" customer="honda"/>
If you've made it this far, you're are almost done. Now we need to get eclipse up and running. Type the following command to launch eclipse and please verify that you see "Kepler" as Eclipse launches:
$ eclipse
You will be prompted with a dialog that looks like this:
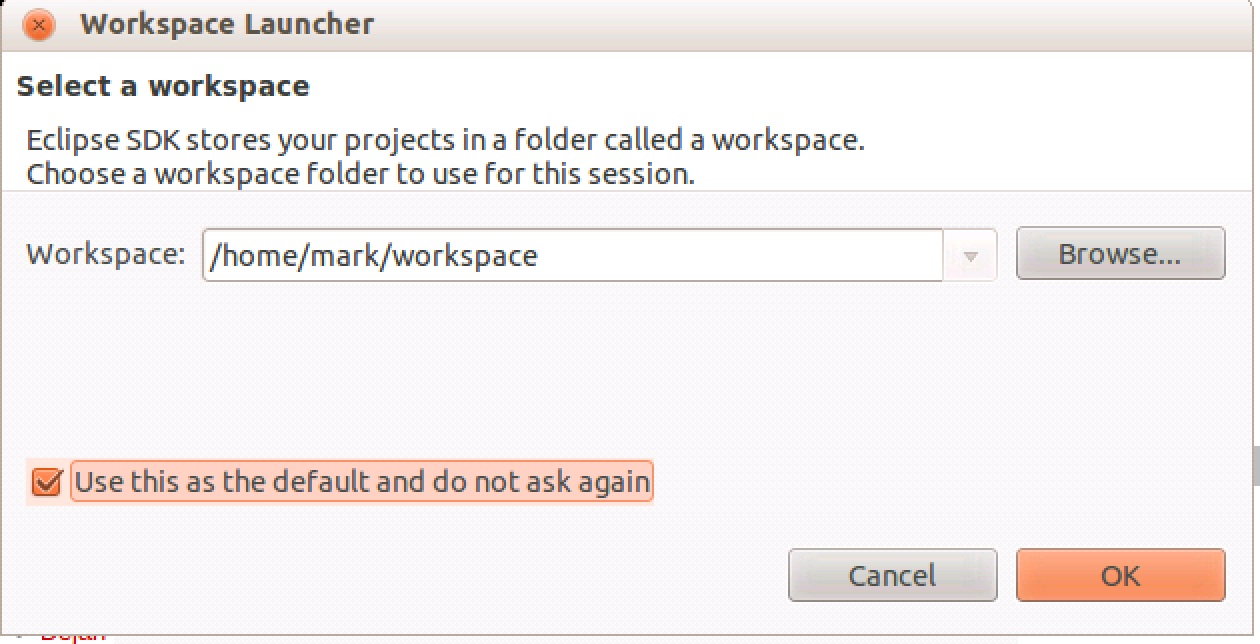
Make sure you see "Kepler" as Eclipse launches. Set your eclipse
workspace to /home/[yourloginid]/workspace and make sure you check the "Use this as the default and do not ask again" option. Click on "OK".
All that's left now is to import this maven project into eclipse and run it from there. This is done with just a few commands. Make sure you are in the file-copy directory where you compiled the code earlier using mvn. In order, execute the following commands:
mvn -Declipse.workspace=/home/[yourloginid]/workspace eclipse:add-maven-repo
mvn eclipse:eclipse
Note that
you will need to set the eclipse.workspace to whatever you defined as
your eclipse workspace directory. What this does is create some
hidden files (such as .project) that represent eclipse project
instructions. All that's left now is to import this directory
into eclipse. Start eclipse (make sure you run the eclipse in
~/mpcs.51050/local/51050/eclipse-4.3.2). Once you've started
eclipse, from the eclipse main menu, choose "File", then "Import", then
expand "General" and choose "Existing Projects into Workspace".
Then click on "Next".
You should select the file-copy directory in which you ran the above
maven commands in (your "file-copy" directory) by clicking
"Browse". Then click on "OK". Once you've selected that
directory and clicked on "OK", you should see the following dialog
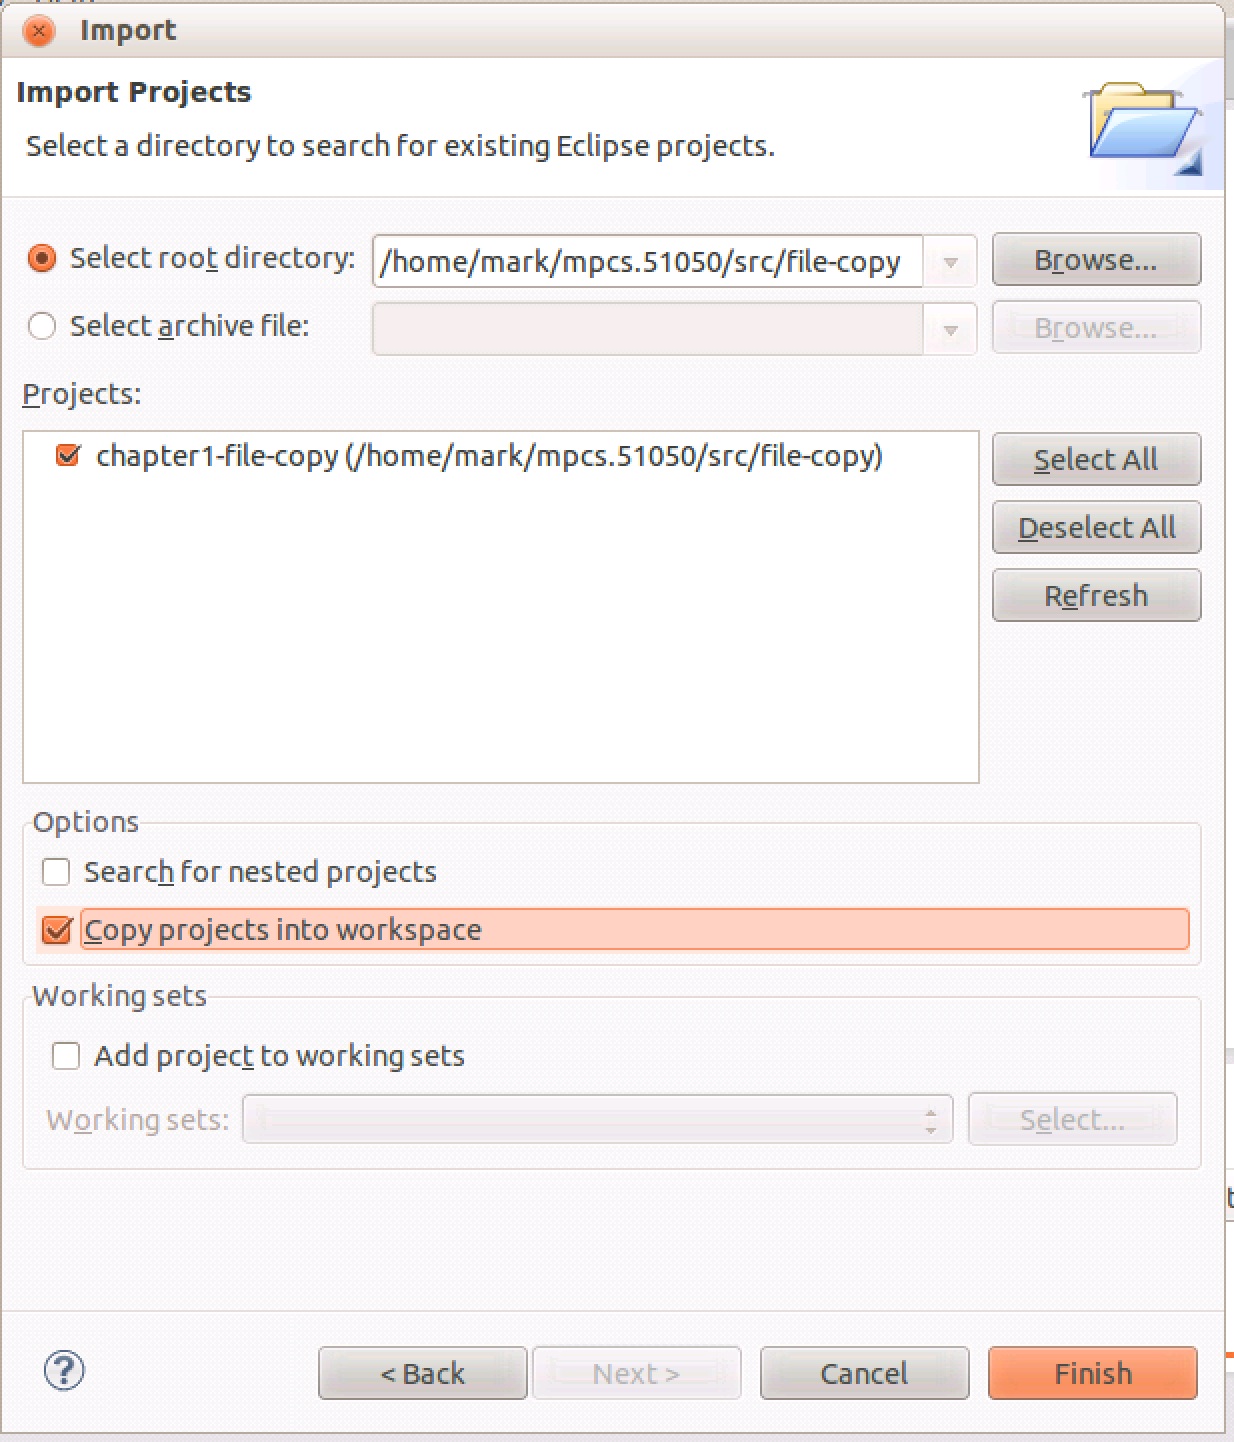
filled out (of course your home directory will vary). Before
clicking on "Finish", make sure you check the option
"Copy projects into workspace". Once your dialog looks like the
one below, click on Finish.
You should see the file-copy project appear in the Package Explorer in Eclipse:
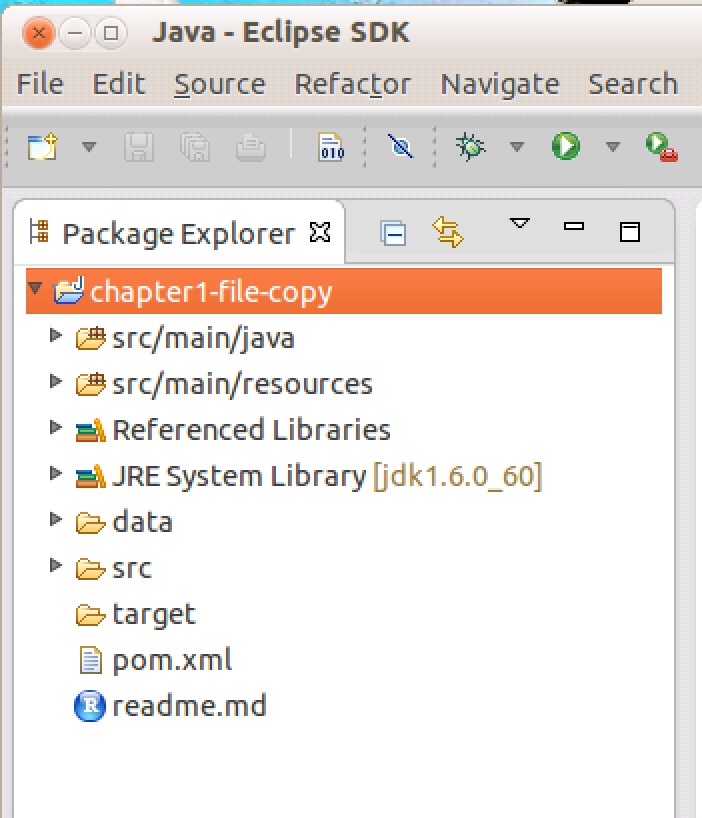
You should not see any errors. At this point, you should be able to execute the project in eclipse. You should now go back into your ApacheMQ console, and you should refresh the pages and verify that you now have two messages in your MPCS51050_config_test queue:
Once everything is working, you are ready to submit your lab 5.
Submitting:
You should create a tarball of your eclipse directory for the
chapter 1 file copy example you created. Submit your
assignments in a folder called lab5 to the subversion
repository. You will
only be graded on your material within a
reasonably labeled folder.
Also, please include a README text file that
contains any instructions for the TAs to assist with grading, such as how to compile, run, or even understand
your code.