Lab 1: OpenGL Basics
Labs/OpenGL Introduction
In this week's lab, you will be introduced to the OpenGL API and begin using it to draw a triangle. OpenGL, which stands for the Open Graphics Library, is a cross-platform API that allows programmers to develop 2D and 3D graphics applications. Since its inception in 1992, the API has undergone significant changes over the years. Today it's largely used to develop applications in video games, CAD, and scientific visualizaiton.The labs in this course will introduce basic concepts of the OpenGL API that will help with implementing your projects. You can think of the labs as being references to use when developing your projects. Your labs and projects will be implemented using C++ but a small subset of the language. Generally, you won't need to use many of these features, but you do need to understand them since our helper code/library uses them. The labs will point out those features when they do occur. One thing you will notice about this lab and future labs that it takes quite a bit of work to render an object to the screen. In earlier versions of OpenGL, this was a lot easier to implement, but it was much more diffcult to render complex objects and apply specialized effects in real time. Thus, the modern API gives you much more power in those regards.
Lab 1 Objectives
- Discuss the OpenGL state machine (beginning of lab)
- Discuss debugging tools (i.e., lldb, CS237_CHECK(...), and the OpenGL Profiler)
- Render a triangle (below)
Part 1: Repository Checkout
- Your repository has already been setup on PhoenixForge . You
can checkout your repository using this command in the terminal:
svn co https://phoenixforge.cs.uchicago.edu/svn/yourusername-cs237-aut-15
replacing yourusername by your CNet username in lowercase. You will be prompted for your CNet password. If you get a prompt asking you if you would like to accept the certificate, press p (meaning to accept permanently).(For example, since my username is lamonts, I would type svn co https://phoenixforge.cs.uchicago.edu/svn/lamonts-cs237-aut-15.)
If you registered late or not at all, this step may not work for you. Please raise your hand if you are having trouble. You will need to submit your work through e-mail rather than SVN until your SVN repository is setup.
- As a svn refresher, when you add additional files to your repository you need to use svn add followed by the file
or directory name. After adding the file to your repository, you need to svn commit the file. And if you change any files inside your repository make sure to svn commit those changes back to the central respository.
- You will notice that we have already seeded your repositories with directories and code:
Almost all labs and projects will have some beginning code to help you get started. One important directory you need to know about is the common directory. This directory contains a lot of helper code for implementing your projects and labs.
CS237 Libary: The common directory includes a small library (or libraries) of utilities for working with OpenGL. The library includes low-level wrappers that provide code for vector/matrix computations, filling buffer objects, reading-in/compiling GLSL shader programs, and loading pixel data into OpenGL textures and much more. We may update this directory on occasion so please make sure you perform an svn update on this directory occassionaly to ensure you have the most up to date code. - Lets go over the structure of the lab1 directory. The directory has the following subdirectories:
- build: contains the makefile for building the lab. This is where the executable will be made for the lab as well. You won't need to modify the makefile in anyway. It may seem a bit daunting but its been created to handle building everything in the src directory and linking in the common directory code correctly. You are welcome to make your own makefile as well. Just ensure it makes correctly on the lab machines and uses clang.
- data: stores all resources needed for your program. For example, png files for texturing, and the shader files for your shader program.
- src: contains the source code for your project/lab. This includes the header files as well.
Note: This structuring will be the typical way we seed your repositories for the projects and labs. Mainly, you'll be working within the src and data directory where you will be modifying and adding files to complete a lab or project.
Part 2: Opening a Window
The OpenGL spec does not specify any API in order to create and manipulate windows. Modern windowing systems that support OpenGL include an interface that provides the binding between an OpenGL context and the windowing system. In this course, we will use a cross-platform library called GLFW. This library provides a simplified API for managing windows along with other features such as handling events, and IO control.
Open up the main.cxx file. You will notice this file already has a few functions but the main function is incomplete. The code sections (grey boxes) below need to go inside the main function in the order shown.
/*! \brief the main function for the program
 *  \param argc the count of arguments in \a argv
 *  \param argv the array of command-line arguments.
 */
int main(int argc, const char **argv)
{
    // # 1
    glfwSetErrorCallback (Error);

    // # 2
    glfwInit ();

    // #3 Check the GLFW version
    {
      int major;
      glfwGetVersion (&major, NULL, NULL);
      if (major < 3) {
        std::cerr << "CS237 requires GLFW 3.0 or later\n" << std::endl;
       exit (EXIT_FAILURE);
      }
    }
- The glfwSetErrorCallback function is a callback function that is called if a GLFW function fails. The callback function then can nicely print the reason for the error.
- Before working with GLFW, you need to initialize the library. If the library was successfully initialized then GL_TRUE is returned, otherwise GL_FALSE is returned.
- This course requires we use GLFW 3.0; therefore, we check to make sure the major version is at least 3.0 using the glfwGetVersion function.
view = new struct View();
view->Init(800,600);
Next, we will create a View struct. The view struct will hold the information needed to render our triangle to the screen. We first allocate the struct and then initialize it by calling its Init function giving it the width and height of the view (i.e. a 800x600 window).
glfwWindowHint (GLFW_RESIZABLE, GL_TRUE);
glfwWindowHint (GLFW_CONTEXT_VERSION_MAJOR, 4);
glfwWindowHint (GLFW_CONTEXT_VERSION_MINOR, 1);
glfwWindowHint (GLFW_OPENGL_PROFILE, GLFW_OPENGL_CORE_PROFILE);
glfwWindowHint (GLFW_OPENGL_FORWARD_COMPAT, GL_TRUE);
Before window creation, you can provide hints to the library that could affect how the window or the OpenGL context is created. In the code above, we specify that we want to use the OpenGL 4.1 and it needs to use the Core profile. We also want the context to remove all deprecated functionality in the requested version of OpenGL by setting the forward compatibility to true.
//#4
GLFWwindow *window = glfwCreateWindow(view->width, view->height, "Simple Triangle", NULL, NULL);
if (window == nullptr)
    exit (EXIT_FAILURE);

//#5
glfwMakeContextCurrent (window);

//#6
SetViewport (window);
- The window and OpenGL context are created at the same time using the glfwCreateWindow function. The function will return a handle (i.e., a pointer) of the window, which also contains the OpenGL context. If window creation fails a NULL pointer is returned, so it is necessary to check the return value.
- Before using the OpenGL API, you are required to set the current context. The context will remain in effect until another context is made current or if the window is destroyed.
- You we need to notify the OpenGL viewport about the size of our window (More about that later).
// Check the OpenGL version
    {
      GLint major, minor;
      glGetIntegerv (GL_MAJOR_VERSION, &major);
      glGetIntegerv (GL_MINOR_VERSION, &minor);
      if ((major < 3) || ((major == 3) && (minor < 2))) {
        std::cerr << "CS237 requires OpenGL 3.2 or later; found " << major << "." << minor << "\n" << std::endl;
        exit (EXIT_FAILURE);
      }
    }
In this course, we are using the modern OpenGL API rather than the fixed fuction API used in prior OpenGL versions. Querying the major and minor OpenGL versions using the glGetIntegerv allows use to verify your hardware supports the modern OpenGL API.
//Initialize the view members
view->InitShaders();
view->InitProjMatrix();
view->InitCamera();
view->InitTriangle();

// set up callbacks
glfwSetWindowRefreshCallback (window, Display);
glfwSetWindowSizeCallback (window, Reshape);
glfwSetWindowIconifyCallback (window, Visible);
glfwSetCharCallback (window, Key);
The first code section continues to initialize the view members (discussed in Part 3). The latter section registers our callback functions. The GLFW library allows us to be notified if a paritcular event happens such as increasing/decreasing the size of the window, tapping on the mouse, and pressing a key by using callback functions.
    while (! glfwWindowShouldClose(window)) {
      Display (window);
      glfwPollEvents ();
    }

    glfwTerminate();

    return EXIT_SUCCESS;

} /* end of main */
The final portion of code is the rendering loop code. We render our triangle to the screen until the user decides to close the window (i.e., !glfwWindowShouldClose(window) ). Inside this loop, we call the display function, which renders the view and swaps buffers, and process events.
Window creation done. Save your main.cxx file and build and run the project inside the build directory. Make sure you see the window before moving on!
Part 3: The View and Camera
Next, we are going to setup the view struct that will handle initializing the triangle that will be drawn, a shader program, and our projection and camera matrices.If you look inside the header file for the view struct (i.e., view.hxx ) then you will see that we have already defined a few member variables and functions. Read over the comments inside the header file to understand the purpose of each member and function.
Open the view's source file (i.e., view.cxx ). Lets begin by implementing a few of the view struct's functions.
- Implement the view's init function (i.e., Init ). Add the following
code to the function:
/*! \brief performs initializations needed before starting up the view*/
void View::Init(int w, int h){
   /* Initialize the camera vectors for the camera matrix */
    this->camPos = cs237::vec3f(0.0, 0.0, -3.0);
    this->camDir = cs237::vec3f(0.0, 0.0, 1.0);
    this->camUp    = cs237::vec3f(0.0, 1.0, 0.0);
    this->width =  w;
    this->height = h;
    this->shader = nullptr;
}
- The first piece of code sets up our camera. A camera contains three parts: position, direction, and up vector. The position is a 3D vector in world coordinates of where the camera should be placed (i.e., its viewpoint). In this code, we place the camera at x = 0,
y = 0, and z = -3.0 (in other words the camera is position a little bit back on the z-axis). The direction states where the camera
should target/face. We are directing the camera to the face the point x = 0.0, y = 0.0, z = 0.0; therefore, we are making the camera face the positive z-axis. Finally, the up vector is a vector defining your world's "upwards" direction. In almost all normal cases, this will be the vector (0, 1, 0) i.e. towards the positive y-axis. We create the actual camera by using the cs237::lookAt function. This is done inside
the View::InitCamera().
- Lastly, we initialize the width, height, and shader members to their respective values.
Struct functions: In C++, one implements a struct function by first supplying the return type for the struct followed by the name of the struct and then two collons ( :: ) and finally the function name and its parameters.Note C237 library: This code shows us our first look at using the CS237 library. The code cs237::vec3f(0.0, 0.0, -3.0); allows us to create a 3D vector that is defined within the library. The vec3f is part of the CS237 namespace thus its required that we specify the cs237:: (although one can get around this). More information about C++ namespaces can be found here. - The first piece of code sets up our camera. A camera contains three parts: position, direction, and up vector. The position is a 3D vector in world coordinates of where the camera should be placed (i.e., its viewpoint). In this code, we place the camera at x = 0,
y = 0, and z = -3.0 (in other words the camera is position a little bit back on the z-axis). The direction states where the camera
should target/face. We are directing the camera to the face the point x = 0.0, y = 0.0, z = 0.0; therefore, we are making the camera face the positive z-axis. Finally, the up vector is a vector defining your world's "upwards" direction. In almost all normal cases, this will be the vector (0, 1, 0) i.e. towards the positive y-axis. We create the actual camera by using the cs237::lookAt function. This is done inside
the View::InitCamera().
- Implement the shader initialize function (i.e., InitShaders ). Add the following
code to the function:
//! \brief performs any initialization before using the view */
void View::InitShaders() {

  //#1 Compile and initialize the shaders;
  if (this->shader == nullptr) {
    cs237::VertexShader vsh("../data/shader.vert");
    cs237::FragmentShader fsh("../data/shader.frag");
    this->shader = new cs237::ShaderProgram (vsh, fsh);
    if (this->shader == nullptr)
        exit (1);
  }

  //#2 Retrieve the uniform locations for the model and projection matrices
  cameraLoc = shader->UniformLocation("camera");
  projectionLoc = shader->UniformLocation("projection");

}
- Creates the shader program by using the VertexShader and FragmentShader types defined in the CS237 library. You only need to specify the location of your shader source files
and these types will handle loading and compiling your shaders for you. We have already written the shader files for you (Look in the data directory). Next, use the cs237::ShaderProgram function to compile the vertex
and fragment shaders together to create a shader program. If the program was not sucessfully compiled then we exit the program.
Note: Shaders are implemented in a language called GLSL. This lanaguage gets its origins from C; therefore if you are familiar with C then you will easily pick up GLSL. We will talk more about shaders next lab.
- We will need to pass our camera and projection matrices to the GPU. Each matrix is given an unique location that allows a variable inside the shader to retrieve that data on the GPU. We can get this location by using the shader->UniformLocation function given the name of the variable inside the shader source file. Note that these variables MUST match the names EXACTLY how they are defined within the shader source file. More on this next week.
- Creates the shader program by using the VertexShader and FragmentShader types defined in the CS237 library. You only need to specify the location of your shader source files
and these types will handle loading and compiling your shaders for you. We have already written the shader files for you (Look in the data directory). Next, use the cs237::ShaderProgram function to compile the vertex
and fragment shaders together to create a shader program. If the program was not sucessfully compiled then we exit the program.
Part 4: Rendering a Triangle
Ok enough with the boring stuff! Lets start using some OpenGL to render a simple triangle.A triangle will be represented by defining three vertices. A vertex is composed of a position (vec3f), and a RGBA color (vec4f) as illustrated below.
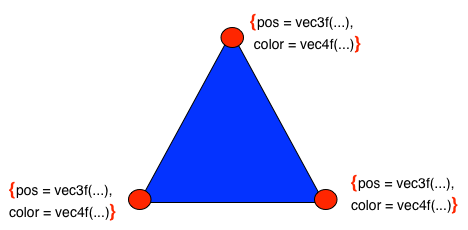
We have defined a vertex struct inside the vertex.hxx header file. And we have already defined these three vertices inside the triangle.hxx header file as an array of vertices. We will need to pass this array to the GPU in order to render the triangle. Open the triangle.cxx file and lets implement the Init and Render functions.
- Implement the Init by creating a VAO and VBO for the vertices (we discussed this at the beginning of lab. See the white board). You will need to use the members: vaoId and vbufId . Your code
should look something like this:
//generate the vertex array object for this mesh (i.e. the simple triangle)
CS237_CHECK(glGenVertexArrays (...));
CS237_CHECK(glBindVertexArray (...));

//Generate a name for the vertices VBO
CS237_CHECK(glGenBuffers(...));

//Bind the vertices buffer to the context using the GL_ARRAY_BUFFER target
CS237_CHECK(glBindBuffer(...));

// Specify the amount of storage we want to use for the vertices buffer
CS237_CHECK(glBufferData(...));
CS237_CHECK function: Make sure to use the CS237 function as discussed at the beginning of lab! - Implement the Render function. You need to set the attributes and use glDrawArrays to draw the triangle. Your code should look something like this:
//Bind the meshes VAO id to get the state information
CS237_CHECK(glBindVertexArray (...));

//Bind our VBO (vertex buffer object) to the GL_ARRAY_BUFFER target
CS237_CHECK(glBindBuffer(...));

//Describe the data that will fill each vertex attribute. In this case, it will be positions and colors.
CS237_CHECK(glVertexAttribPointer(...));
CS237_CHECK(glVertexAttribPointer(...));

//Enable our vertex attributes using the data from the GL_ARRAY_BUFFER
CS237_CHECK(glEnableVertexAttribArray(...));
CS237_CHECK(glEnableVertexAttribArray(...));

//Render the triangle
CS237_CHECK(glDrawArrays(...));
- Implement the InitTriangle . You will need to do the following things:
- Create a triangle struct and assign it to the this->tri member.
- Initialize the triangle by calling the Init function on the tri variable.
- Assign the triangle's locations for the position and color attributes by calling the AttributeLocation(...) function of the shader variable. It is very similiar to how you got the uniform locations inside InitShaders.
- Implement the Render function. Here is the code for implementing the render function:
void View::Render() {

   //Declare a black color
   const GLfloat color[] = { 0.0f, 0.0f , 0.0f, 1.0f};

   // Clear the screen
   glClear(GL_COLOR_BUFFER_BIT | GL_DEPTH_BUFFER_BIT);

   // Set the background to black
   glClearBufferfv(GL_COLOR,0,color);

    glEnable(GL_DEPTH_TEST);

    //Begin using the shader program
    shader->Use();

    //Pass in the camera and projection matrices
    cs237::setUniform(cameraLoc,camera);
    cs237::setUniform(projectionLoc,projectionMat);

    //Render the triangle.
    tri->Render();
}
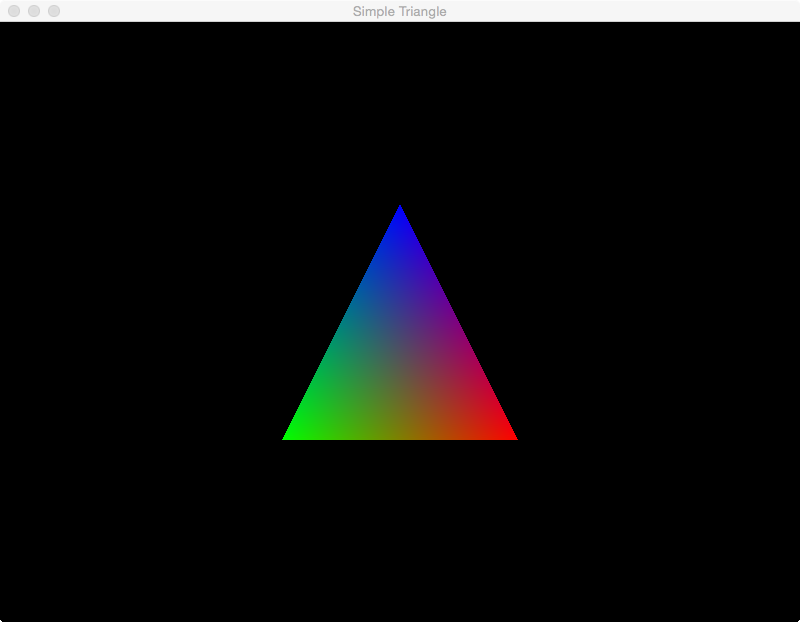
If you do not see this triangle then call me over. You want to get this working before you leave lab today!
Make sure to svn commit the modified source files before leaving lab today since you may want to reference this lab for future projects.