Benford’s Law
Due: Friday, October 7th at 4pm
The goal of this assignment is to give you practice with the basics of Python and to get you to think about how to translate a few simple algorithms into code. You will be allowed to work in pairs on some of the later assignments, but you must work alone on this assignment.
In 1881, Simon Newcomb observed that some pages in his library’s book of log tables were more worn than others. Specifically, the pages for numbers starting with the numeral one were much more worn than the pages corresponding to numbers that started with larger digits. From this observation, he conjectured that numbers that start with one occurred more frequently in the data he and his colleagues used regularly than numbers that start with two, three, etc. Newcomb calculated the probability that the leading significant digit, d, in a number from a data set to be:
If we plot this function for one significant digit (that is, \(d \in \lbrace 1,2,...,9 \rbrace\)), we get the following figure:
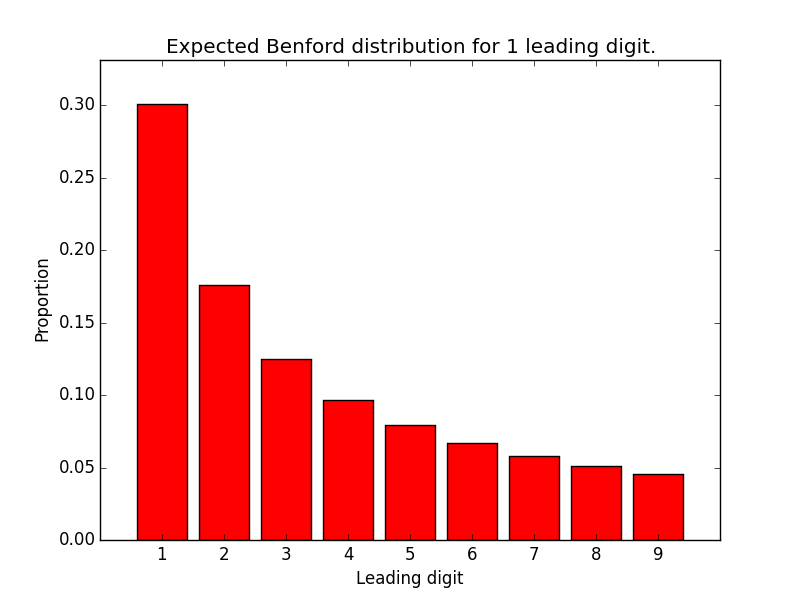
Frank Benford, who made the same observation in 1938, studied a large number of different data sets and came up with the same equation. This rule of thumb has become known as Benford’s Law and it has been used to detect fraud in expense reports, vendor payments, elections, macro economic data, etc. Obviously, this rule of thumb does not hold for all data sets, but it does work surprisingly often. Here is a link to an article from the Information Systems Audit and Control Association that describes when it is valid to use Benford’s Law.
In this assignment, you will write code to generate the distribution of leading significant digits predicted by Benford’s Law and to compute the actual Benford distribution of a given data set.
Getting started
In the first lab, you learned how to use git and our git server. We will use git for all of the programming assignments and labs.
We have seeded your repository with a directory for this assignment.
To pick it up, change to your cs121-aut-16-username directory
(where the string username should be replaced with your username)
and then run the command: git pull upstream master. You should
also run git pull to make sure your local copy of your repository
is in sync with the server.
At the first lab, you already ran this command, which pulled the
pa1 sub-directory into your 121 directory. However, it is good
practice to always run git pull upstream master before you start
working, since we may occasionally update files (e.g., if we notice
bugs in our code, etc.). For example, some of the files for this
assignment may have changed since you downloaded the initial distribution. After you’ve
run git pull upstream master, you can proceed as described in the
lab: work on your code and then run git add <filename> for each
file you change, followed by git commit -m"some message" and git
push to upload your changes to the server before you log out.
You should always sync the latest version of your work to the server
using the commands described above before you log out, then run git
pull before you resume work to retrieve the latest files. This
discipline will guarantee that you always have the latest version, no
matter which machine you are using. We do not care how many times you
push your code to the server.
Getting help
If after carefully reading the details of any part of the assignment, you are still confused about how to get started or make progress, post a question on Piazza to ask for help, come to office hours, or see the CS “Harper Tutors” who are available in North Reading Room of the Arley D. Cathey Learning Center on Sunday through Wednesday evenings from 7pm to 11pm. Before you post a question on Piazza, please check to see if someone else has already asked the same question. Also, please add, commit, and push the most recent version of your code to the server (as described above). Committing your code will allow us to look at it, which may speed up the process of helping you.
Style
We will deduct points for poor style. Please see the Python Style Guide for CS121 for style guidelines.
Your tasks
For this assignment, we will specify a set of specific functions that you must implement. You will start with basic functions and work your way up to more complex tasks. We will also supply extensive test code. Over the course of the term, we will provide less and less guidance on the appropriate structure for your code and fewer and fewer test cases.
All the functions you will need to complete can be found in the file
benford.py.
Task 1: Extracting leading digits
Your first task is to complete the function
extract_leading_digits. This function should take a dollar amount
as a string and a number of digits and return an integer that contains
the specified number of leading digits from the amount. Your code
will need to (1) extract the portion of the string (e.g., "$2.34")
that represents the amount ("2.34"), (2) convert it to a floating
point value (2.34), (3) use the following formula:
to calculate leading digits as an integer, and finally, (4) return the computed value.
The formula uses several operations from the math library that you may not have seen:
| Operation | Description | math library function | Example call | Example result |
|---|---|---|---|---|
\(trunc(x)\)
|
throws away the fractional part of \(x\) | math.trunc |
|
200 -200 |
\(\lfloor x \rfloor\)
|
computes largest integer less than or equal to \(x\) | math.floor |
|
200 -201 |
\(log_{10} x\)
|
computes the base-10 logarithm of \(x\) | math.log10 |
|
0.3692158574101428 1.3692158574101427 |
See the Python math library documentation for more details. Please
note that our test code will assume you use math.log10(x), rather
than math.log(x, 10) because it is likely to yield a more
accurate answer.
The remaining operations–addition, multiplication, and exponentiation–used in the formula are built-in.
To use your function, fire up ipython3 from the linux command-line, run your code, and call the
function with sample arguments. Here are some examples of using this
function from within ipython3:
In [1]: run benford.py
In [2]: extract_leading_digits("$2.34", 1)
Out[2]: 2
In [3]: extract_leading_digits("$2.34", 2)
Out[3]: 23
In [4]: extract_leading_digits("$0.002034", 2)
Out[4]: 20
In [5]: extract_leading_digits("$2.01", 3)
Out[5]: 200
The results for the last two calls might seem surprising at first.
The result of the third call
(extract_leading_digits("$0.002034", 2)) is merely
definitional: the correct result is 20, because zero is not a
valid value for the first significant digit. Zero is a
valid value for all subsequent significant digits.
The result of the fourth call
(extract_leading_digits("$2.01", 3)), which does not match
the definition, occurs due to floating point error. When the amount
is 2.01 and the number of digits is 3, the result of the
multiplication in the formula above is 200.99999999999997. Truncating
the fractional part of this value yields 200. This issue may be your
first encounter with floating point error, but it certainly won’t be
your last! Should you have a need to do serious numerical
calculations in the future, you will need to learn about the origin of
floating point errors and how they propagate.
Testing for Task 1
The file test_benford.py contains test code for all of the tasks
in this assignment. The names of the tests for a given function share
a common pattern: a prefix that includes the function name followed by
the test number. For example, all the tests for
extract_leading_digit start with
test_extract_leading_digits and include the test number.
The table below provides information about the tests for
extract_leading_digits. Each row contains a test number,
the values that will be passed for the amount and num_digits arguments
for that test, and the expected result.
| Test number | Dollar amount | Number of leading digits | Expected result |
|---|---|---|---|
| 1 | $2.34 | 1 | 2 |
| 2 | $2.34 | 2 | 23 |
| 3 | $2.34 | 3 | 234 |
| 4 | $0.002034 | 2 | 20 |
| 5 | $2.01 | 3 | 200 |
| 6 | $1000 | 1 | 1 |
The first three tests check for basic functionality. The next two check for the corner (exceptional) cases discussed above. The last test checks for a common error. Test cases should cover both basic functionality and corner cases.
We will be using the pytest Python testing framework for this and
subsequent assignments. To use pytest to run our tests, you will use
the py.test command from the Linux command line (not from
within ipython3). This command is available on both the lab machines
and your VM. Pytest has a lots of options, which you can see by
running the command py.test -h. We’ll use three of them: -v,
which means run in verbose mode, -x, which means that pytest
should stop running tests after a single test failure, and -k,
which allows you to describe a subset of the test functions to run.
For example, the command:
py.test -v -x -k test_extract_leading_digits test_benford.py
will run all the functions in test_benford.py that have names that
start with test_extract_leading_digits.
Here is (slightly-modified) output from using this command to test our
reference implementation of extract_leading_digits:
$ py.test -v -x -k test_extract_leading_digits test_benford.py
collected 25 items
test_benford.py::test_extract_leading_digits_1 PASSED
test_benford.py::test_extract_leading_digits_2 PASSED
test_benford.py::test_extract_leading_digits_3 PASSED
test_benford.py::test_extract_leading_digits_4 PASSED
test_benford.py::test_extract_leading_digits_5 PASSED
test_benford.py::test_extract_leading_digits_6 PASSED
============ 19 tests deselected by '-ktest_extract_leading_digits' ============
=================== 6 passed, 19 deselected in 0.22 seconds ====================
(Note: we will use $ to signal the Linux command-line prompt.
Your prompt will look different. Do not type $ when issuing commands.)
If you fail a test, pytest will tell you the name of the test function that failed and the line in the test code at which the failure was detected. This information can be very helpful in determining what is wrong with your program. Read it carefully!
FYI, pytest has some useful shortcuts:
- The
-koption can be used with any string that uniquely identifies the tests you wish to run, not just a prefix. For example, if you specify-k extract, pytest will run all tests that start withtest_and include the wordextract. If you do not use the-koption, pytest will run all functions in the test files that start withtest_. - If you do not supply the name of a specific test file, pytest will look in the current directory tree for Python files that start with
test_.
In subsequent examples, we will leave out the name of the file with
the test code (test_benford.py) and we will use short substrings
to describe the desired tests.
Hint
Remember to save any changes you make to your code as you are debugging and to reload it into Python. Skipping one of these two steps is a common error.
Task 2: Compute leading digit range
Your second task is to complete the function
get_leading_digits_range, which takes the number of leading digits
and returns a tuple with the lower bound (inclusive) and upper bound
(exclusive) on the range of the values for that number of leading
digits. For example, when called with a value of 2, the range of
possible values (inclusive) is 10,..,99, so the function should return
the tuple (10, 100).
It is common in Python to write helper functions that are only a few
lines long. get_leading_digits_range is an example of such a
function.
Testing Task 2
We have provided three tests for this task:
| Test number | Number of leading digits | Expected result |
|---|---|---|
| 1 | 1 | (1, 10) |
| 2 | 2 | (10, 100) |
| 3 | 3 | (100, 1000) |
You can run these tests, by executing the following command from the Linux command-line.
py.test -v -x -k range
Task 3: Compute expected Benford distribution
Your third task is to complete the function
compute_expected_benford_dist, which takes the number of digits as
an argument and returns a list of floats with the expected
distribution, that is, probability of occurrence of a leading digit as
defined in the introduction. The value that corresponds to the lower
bound of the range of leading digits should be at index zero in the
result. For example, if the number of digits is 1, the array should
have nine values with the value at index 0 holding the expected
distribution for the numeral 1. If the number of digits is 2, the
array should have 90 values, with the value at index 0 holding the
expected distribution for 10.
Here is an example use of this function:
In [23]: run benford.py
In [24]: compute_expected_benford_dist(1)
Out[24]:
[0.3010299956639812,
0.17609125905568124,
0.12493873660829993,
0.09691001300805642,
0.07918124604762482,
0.06694678963061322,
0.05799194697768673,
0.05115252244738129,
0.04575749056067514]
The implementation of this function can be done with a simple loop to
construct the desired list. You must call your
get_leading_digits_range function to determine the range of of
possible values for the specified number of digits.
Testing for Task 3
We have provided two tests for this task:
| Test number | Number of leading digits | Expected output filename |
|---|---|---|
| 1 | 1 | expected_benford_dist_1_output.txt |
| 2 | 2 | expected_benford_dist_2_output.txt |
The first calls compute_expected_benford_dist with an argument of
1 (as shown in the example above) and the other calls it with an
argument of 2. Our test code matches your results against the
expected values stored in the specified files. These files and the
files used in subsequent tests can be found in the data
subdirectory of your pa1 directory. You can look at the contents
of a text file using the Linux commands cat, more, or
less.
Our test code can be run from the Linux command-line with the command:
py.test -v -x -k expected
Task 4: Computing the Benford distribution
Your fourth task is to complete the function compute_benford_dist,
which takes a non-empty list of strings that represent positive
amounts in dollars and a number of digits as arguments. It should
compute the Benford distribution of the given data for the specified
number of digits.
Your implementation will need to determine the number of times each value in the range of leading digits occurs, using a list to hold the counts, and then generate a list with the distribution from the counts.
You will need to determine the number of values in the range of
leading digits. Use your get_leading_digits_range function to
determine the range. Also, do not repeat the code for extracting the
leading digits from a dollar amount. Instead, you must call the
function you wrote for task 1 for this purpose.
You may be tempted to implement this task by creating a list of the leading digits and then calling the list count method once for each possible value in the range of leading digits. You may not use this approach, because it is inefficient. Let \(N\) be the length of the list of leading digits and \(M\) be the number of values in the leading digit range. Using the count method takes time proportional to \(N*M\), because each call to the count method takes time proportional to \(N\) and it would need to be called \(M\) times, once for each value in the range.
Part of your task is to come up with an algorithm for doing this computation in time proportional to \(N\). Here are some example uses of this function:
In [19]: compute_benford_dist(["$2.34"], 1)
Out[19]: [0.0, 1.0, 0.0, 0.0, 0.0, 0.0, 0.0, 0.0, 0.0]
In [20]: AMOUNTS = ["$1.01", "$2.20", "$3.333", "$44.4", "$0.000055",
...: "$6.006", "$99999.9999", "$99"]
In [21]: compute_benford_dist(AMOUNTS, 1)
Out[21]: [0.125, 0.125, 0.125, 0.125, 0.125, 0.125, 0.0, 0.0, 0.25]
In the first example, all of the entries except the value at index 1 are zero, because the list has only one value and it has a leading digit of 2. In the second example, the numerals 1, 2, 3, 4, 5, and 6 all occur once as leading digits in a list of length eight, the numerals 7 and 8 do not occur at all, and the numeral 9 appears twice as a leading digit in the list.
Testing Task 4
The table below contains information about the test cases for
compute_benford_dist. For each test case, our code reads the list
of dollar amounts from a file, calls your function with appropriate
arguments, reads the expected return value from the specified file,
and then compares the actual return value with the expected return
value.
Our test code includes the two examples above, a test that computes
the Benford distribution for the same values as the AMOUNTS variable
defined above with two leading digits, and four tests that use data
extracted from payment records downloaded from the City of Chicago’s
data portal. The file payments_50_input.csv contains data on 50
payments. The amount of interest in is column labeled “AMOUNT”. The
file payments_50000_inputs.csv contains information about 50,000
payments.
| Test number | Input filename | Number of leading digits | Expected output filename |
|---|---|---|---|
| 1 | simple_input.csv | 1 | simple_computed_benford_dist_1_output.txt |
| 2 | amounts_input.csv | 1 | amounts_computed_benford_dist_1_output.txt |
| 3 | amounts_input.csv | 2 | amounts_computed_benford_dist_1_output.txt |
| 4 | payments_50_input.csv | 1 | payments_50_computed_benford_dist_1_output.txt |
| 5 | payments_50_input.csv | 2 | payments_50_computed_benford_dist_2_output.txt |
| 6 | payments_50000_input.csv | 1 | payments_50000_computed_benford_dist_1_output.txt |
| 7 | payments_50000_input.csv | 2 | payments_50000_computed_benford_dist_2_output.txt |
Our test code for this task can be run from the Linux command-line using the command:
py.test -v -x -k compute_benford_dist
Task 5: Compute Benford mean absolute difference
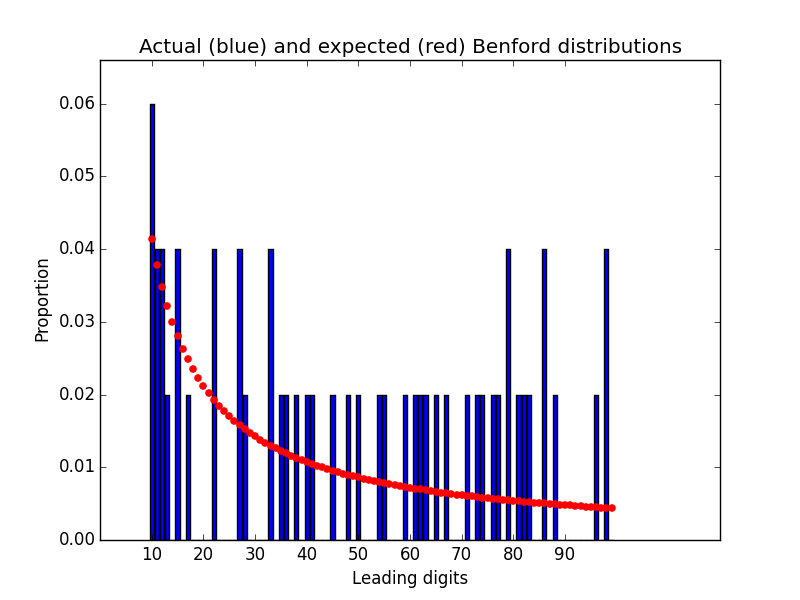
You can plot the actual distribution for a set of data and the
expected distribution to get a sense of the difference between the
two. In fact, we have included a function to do just that in
benford.py. It is also useful to have a quantitative measure of
the difference between the distributions as well. For this
assignment, we’re going to use the mean absolute difference (MAD) of
the expected distribution and the actual distribution for a given set
of data and specified number of digits as our quantitative measure.
Given two lists, x and y, of length \(N\), the MAD
is:
where \(x_i\) and \(y_i\) are the ith elements of x and
y respectively.
You can find a brief description of how to interpret this value here. For a more detailed analysis, see the book Digital Analysis Using Benford’s Law by Mark Nigrini.
Your last task is to complete the function compute_benford_MAD,
which should take a non-empty list of strings that represent positive
amounts in dollars and a number of digits as arguments. As in the
previous task, it does not make sense to call this function on an
empty list.
Your implementation should call your functions from Tasks 3 and 4 to get the distributions and then compute and return the mean absolute difference between the two. Do not repeat the code from Tasks 3 and 4 in this function.
Testing Task 5
Our test code for this function uses the same inputs as the tests for
Task 4. The expected results are read from files
(simple_computed_benford_mad_1_output.txt, for example).
Run the command:
py.test -v -x -k MAD
from the Linux command-line to run our test code for this task.
Putting it all together
We have included code in benford.py that calls your functions to
compute and then plot the expected and actual Benford distributions
for a data set and to compute and report the MAD of the data set. It
takes three arguments: name of the input data file, the number
of the column that contains the amounts (zero-based), and the number
of leading digits.
Here is a sample use of this program:
$ python3 benford.py data/payments_50_input.csv 2 2
MAD: 0.01211
and here is the plot that it generates:
Submission
To submit your assignment, make sure that you have:
- put your name at the top of your file,
- registered for the assignment using chisubmit (if you have not done so already),
- added, commited, and pushed your code to the git server, and
- run the chisubmit submission command.
chisubmit student assignment register pa1
git add benford.py
git commit -m"final version ready for submission"
git
push
chisubmit student assignment submit pa1
We recommend cutting and pasting these commands rather than re-typing them!
Remember to push your code to the server early and often!