Visualizing Bank Deposits Using TreeMaps
Computer Science with Applications 2
Due date: Tuesday, January 12th at 5pm
The purpose of this assignment is to give you more practice with a recursive data structure and recursive programming.
You must work alone on this assignment.
Introduction
The Federal Deposit Insurance Corporation (FDIC) is the United States federal government agency that protects depositors from bank failures. If a bank becomes insolvent, the FDIC steps in and ensures that its customers do not lose their money.
As you might expect, this agency collects and maintains various statistics about banks for operational and planning reasons. For instance, the Summary of Deposits dataset lists every bank branch under the jurisdiction of the FDIC and contains facts about its location and total deposits.
We could imagine using this public information in various ways, such as to understand the distribution of savings geographically, or to assess the concentration of financial relationships within or across various financial institutions. This analysis could allow us to understand whether large financial institutions are dominant in a market or whether residents prefer to save at local banks; and to identify areas whose population may be unbanked or underbanked.
To explore the data, we might benefit from visualizing how deposits within a geographic area are distributed. Across all US states, what fraction of bank deposits are in each? What are the proportions of those deposits among the various counties in those states, among the cities in a state, or among the specific branches in various neighborhoods?
The hierarchical nature of these geographic relationships (states have many counties and each county belongs to only one state; a particular address belongs to a particular city and county within its state) lends itself well to being modeled with a tree. The recursive nature of a tree matches the nesting that is inherent to this situation.
Individual bank branches have deposits, but we are also interested in the sum of all deposits across a city, county, state, and nation, and the proportional contributions of each. We can place bank branches as leaf nodes underneath city nodes, city nodes underneath county nodes, county nodes underneath state nodes, and state nodes underneath a root that represents the country. Then we can aggregate deposits up the tree using a recursive algorithm, and store these cumulative values at each node.
But how can we visualize this information? We have seen ways to draw trees on a blackboard, but the methods we have seen so far do not emphasize different amounts of “mass” in different parts of the tree.

Note that we will add one extra wrinkle to our hierarchy: under each city, we group different classes of financial institutions. For instance, we may have “N”-class institutions and “SB”-class ones. These are the FDIC’s codes for “National Associations” and “Savings Banks,” respectively; we may be interested in analyzing the relative strength of these different bank structures, along with credit unions, and so on.
Treemaps are a space-constrained method for visualizing hierarchical structures that present this sense of “mass” and proportionality in a way that the above diagram does not. Treemaps allow users to compare leaves and sub-trees even at varying depths in the tree, and spot patterns and exceptions. Ben Shneiderman designed treemaps during the 1990s as a way to visualize the contents of a file system, but they have since been used to visualize many different types of data including stock portfolios, oil production, a gene ontology, stimulus spending, and more. A former CS121 student even used treemaps as a way to visualize the difference between two catastrophe reinsurance pricing methods. The original idea has been extended in lots of interesting ways.
In this assignment, you will write code to draw treemaps for bank deposit data along with a key for interpreting the result.
How Treemap works
The treemap algorithm takes a weighted tree—where the weight of a leaf is an application-specific cost and the weight of a subtree is the sum of the weights of its children—and an initial bounding rectangle as arguments. It assigns regions in the rectangle to the leaves of the tree. The size of the region assigned to a leaf (itself a rectangle) is a function of the leaf’s weight and its placement is a function of its position in the tree.
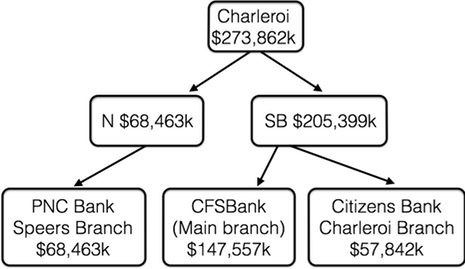
Here is an example that we will use to make this concept more concrete. This tree represents a single city (Charleroi, PA). Charleroi has two savings bank branches and one national association bank branch.

To explain how the treemap algorithm works, we will describe: (1) a weighting function; (2) how the initial bounding rectangle is partitioned; and (3) how the colors and labels of rectangles are chosen.
Weighting Function:
We will use the total deposits of the associated bank branch as the weight of the leaf. The cost of an interior node is just the sum of the weights of its children. In our example, CFSBank’s main branch has $147,557k of deposits, so the weight of that node is $147,557k. The weight of the “SB” node is the sum of the weights of its children, that is, the two savings banks ($205,399k).
Partitioning the initial bounding rectangle
To describe how area is assigned in the treemap algorithm, we will start by looking at the treemap for the “SB” subtree from our example above.
 |
 |
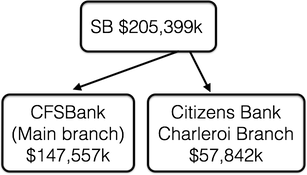
The treemap algorithm splits the initial rectangle into sub-rectangles— one per child of the root. The proportion of a child’s sub-rectangle is determined by its weight as a fraction of the total weight of its parent. For example, the treemap algorithm splits the initial rectangle assigned to the “SB” node into two pieces from left to right: 72% to CFSBank and 28% to Citizens Bank. These values are in proportion to their relative deposits.
Moving on to the “Charleroi” subtree:
 |
 |
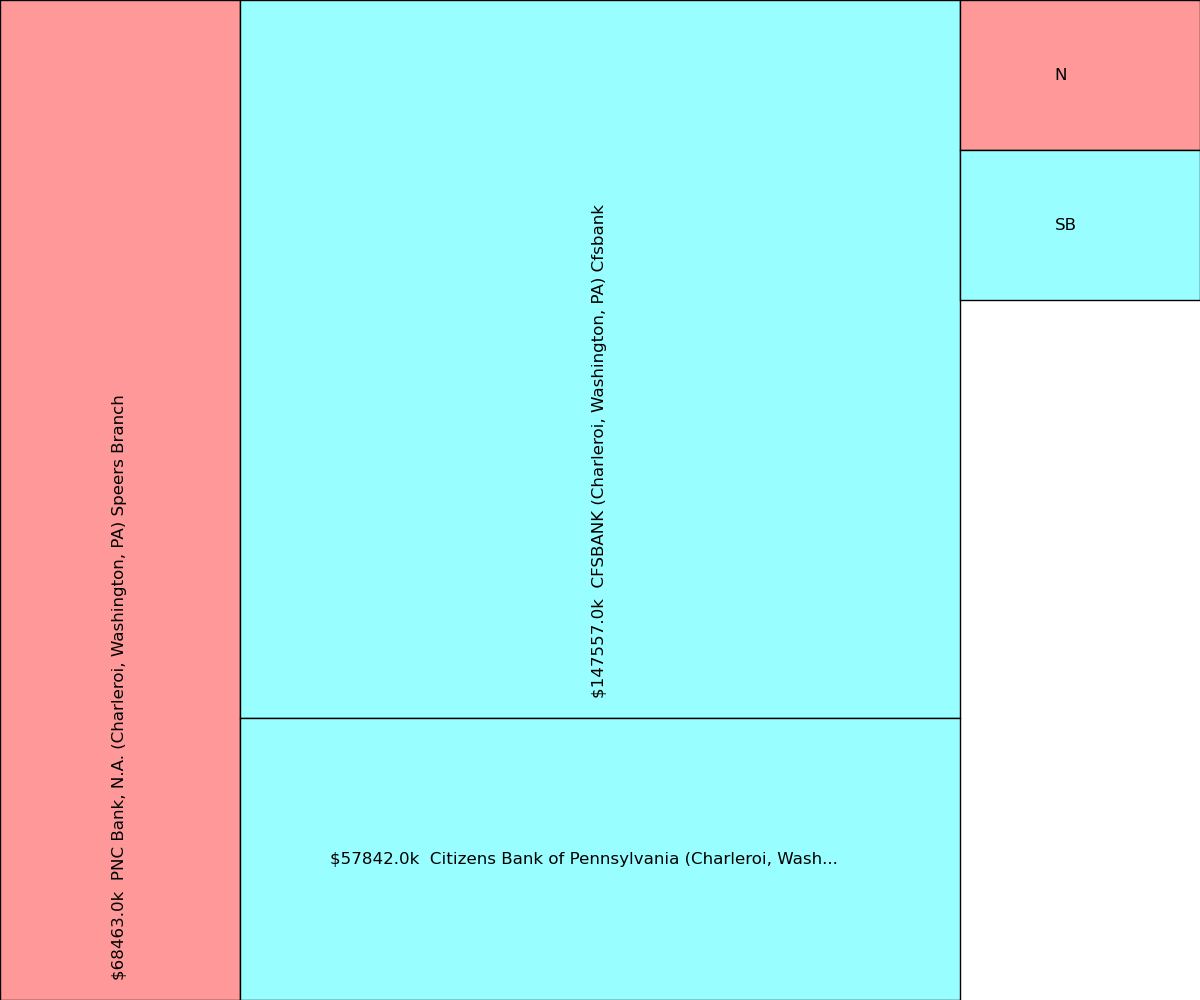
The treemap algorithm splits the initial rectangle assigned to the “Charleroi” node from left to right into two rectangles with 25% of the initial rectangle going to the “N” subtree and the remaining 75% going to the “SB” subtree. The “SB” rectangle is further subdivided as described earlier. Notice that while the proportions of the “SB” split are the same as the earlier picture, the orientation of the corresponding rectangles has changed.
The orientation of the partitions alternates as we move down the tree. The rectangle assigned to the “Charleroi” node was split left-to-right. The class rectangles were split top-down if they contained multiple branches. Alternating the split at each level in the tree produces a picture that is much easier to understand than one in which all the partitions have the same orientation.
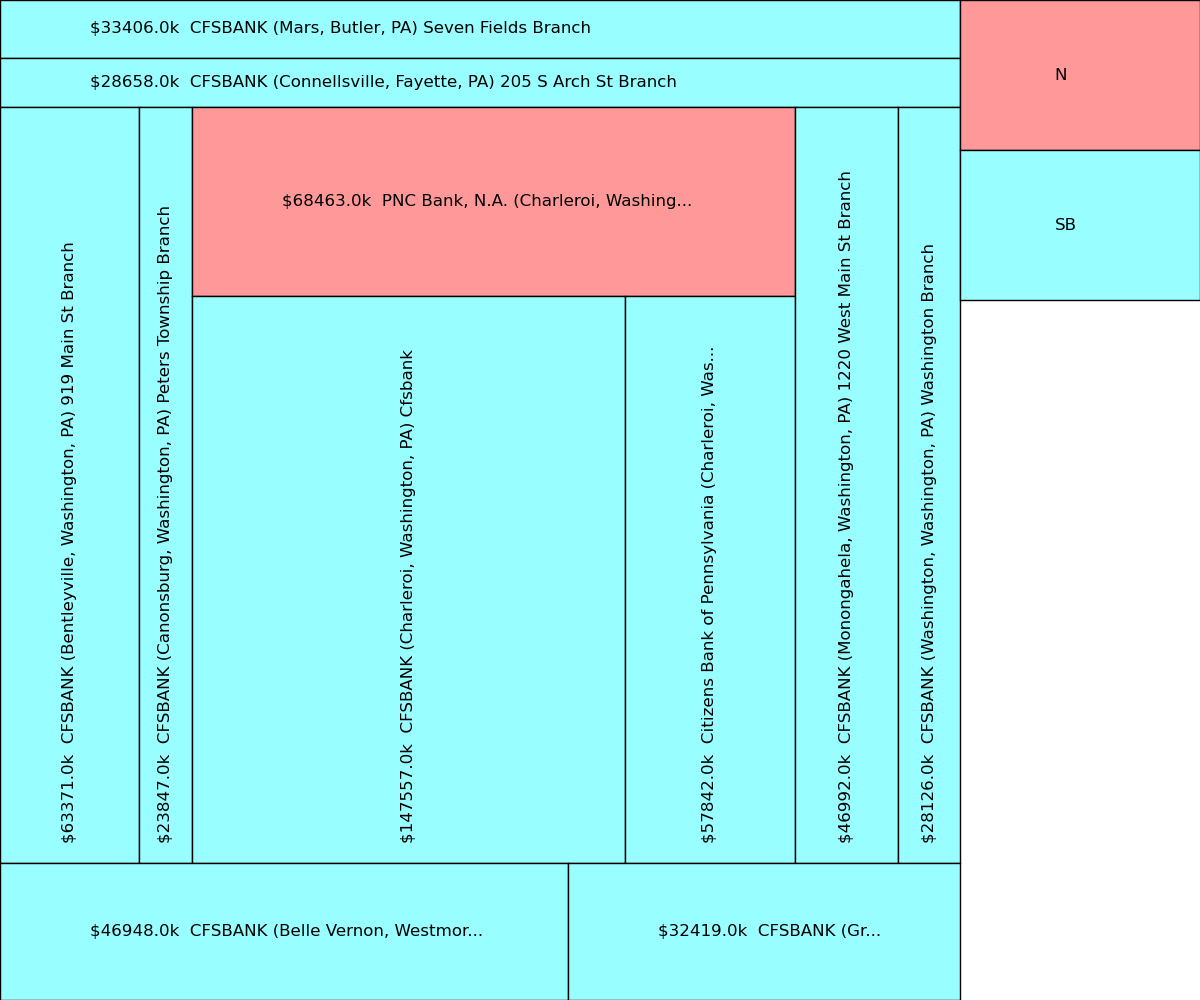
Finally, here is the treemap for Charleroi and surrounding areas:

The orientation of the partitions again alternates. The rectangle assigned to the “PA” node was split left-to-right. The county rectangles were split top-down if they contained multiple cities, and so on.
Important detail: We will use an initial bounding rectangle with a lower left corner at (0,0), a width of 0.8, and a height of 1.0. (The units do not matter.) In case you are curious, the extra space on the right (from 0.8 to 1.0 on the x-axis) is reserved for the color key.
During the course of running the treemap algorithm, you may generate a
rectangle that is too small to be useful. In this case, do not split it
any further. We will define a rectangle to be too small if it has a
height or a width less than 0.01. (We have defined a constant,
MIN_RECT_SIDE, in Tree_Map.py, for this purpose.)
Choosing labels and colors
You will assign colors to the rectangles based on the branch’s
class (N, SB, etc). You should use a default color
for any rectangle that becomes too small to split. You can accomplish this by passing in the class “Default” to the get_color function in Color_Key.
This will yield the color gray and gray rectangles will not have a corresponding
entry in the legend.
Your colors need not match the ones we used in the figures shown here, so long as they are consistent (things that should have the same color do, things that shouldn’t have the same color don’t).
We will use a concatenation of deposits, institution name, city / county / state, and branch name as label. You should orient the labels in
the rectangles horizontally or vertically depending on whether the width
or the height of the rectangle is larger. Do not label any rectangle
that has a width (height) of less than .03. (We have defined a constant,
MIN_RECT_SIDE_FOR_TEXT for this purpose.) Note that labels that are
too long will be clipped to fit automatically.
Your task
Your task is to complete the function:
def draw_tree_map(canvas, t):
in Tree_Map.py, which takes a Chi_Canvas object (canvas) and
an unweighted deposit tree (t) and draws a tree map on the canvas.
Your function must compute the weights—where the weight of a leaf is the
total deposits of the corresponding branch and the weight of an interior node is
the sum of the weights of its children—before you can draw the tree. In
addition, your program should compute the set of institution classes that appear
anywhere in the tree and then draw a key that shows each class name
and the color assigned to it (see the ColorKey section below). You may
not hardwire-in the list of classes. [Hint: we found the Python
set data structure
useful when compiling the set of classes.
You are on your own for deciding what functions to write. We highly
recommend that you figure out what functions you need before you start
writing code and test those functions as you go. Our solution has five
functions, including draw_tree_map, and is roughly 50 lines of code.
Testing
We have included functions— test_savings_banks, test_charleroi, and
test_greater_charleroi—that call draw_tree_map with deposit trees that
correspond to the various examples in the assignment description. Try running
the Tree_Map.py file with no arguments to see its usage.
Getting started
We have seeded your repository with a directory for this assignment.
To pick it up, change to your cs122-win-16-username directory
(where the string username should be replaced with your username),
run git pull to make sure that your local copy of the repository
is in sync with the server, and then run git pull upstream master
to pick up the distribution.
The directory pa1 contains:
Tree_Map.py– you will modify this file and this file only.Chi_Canvas.py– a class that provides very simple drawing functions. (API)Color_Key.py– a class for creating and drawing a color key/map. (API)sample.py, sample_ck.py– sample uses ofChi_CanvasandColor_Keyrespectively.Deposit_Tree.py– a python class for representing the deposit data as a tree. (API)Branch.py– a python class for representing bank branches. (API)CPA.csv– a file with sample data.
We strongly encourage you to look carefully at the APIs and ``sample.py`` and ``sample_ck.py`` before you get started.
Using ChiCanvas
We will be using the Chi_Canvas class for drawing rectangles and
text. This class provides a way to create a canvas, draw a rectangle of
a particular color, draw text horizontally and vertically, show a
drawing, and save a drawing. See the API for
details.
Note that our code handles the construction of a canvas for you. The coordinate system for the canvas is the unit square with location (0.0, 0.0) as the upper left corner and (1.0, 1.0) as the lower right corner.
The file sample.py in contains a set of simple examples that use this class.
Branches
We use the Branch (API)
class to represent branches. Each branch has a label, deposit information,
and location and identity information.
The Branch class has a
constructor (which you will NOT use directly) and a set of properties
(label, for example) for retrieving the label, deposits,
etc.
Deposit Trees
We will model the FDIC data as a tree with nodes of the tree being
represented by objects from the Deposit_Tree class
(API). It is common when discussing trees to
talk about interior nodes, which have children, and leaves, which do not
have children. Even though we might treat interior and leaves
differently, they have the same type. It is often the case that we care
about different information depending on whether a node is an interior
node or a leaf. When working with the interior nodes of a
Deposit_Tree, we will use the node’s children (a list of
Deposit_Trees) and weight. When working with leaf nodes, we
will use the node’s branch (an object of type Branch) and
weight.
The Deposit_Tree constructor handles the details of dealing with
parsing the FDIC data. Given the name of a file containing FDIC
data it builds a tree from the data in that file. (Warning: the code to
generate the tree is complicated. You DO NOT need to understand how it
works. Abstraction is your friend!) In addition to the constructor, the
Deposit_Tree class has properties for getting weights,
branches, and children and a method for setting weights.
The Deposit_Tree constructor sets the initial weights to zero.
Color Key
We have provided a class for creating and drawing a color key that
maps text to colors (API). There is an example use of this class in
sample_ck.py
Submission
To submit your assignment, make sure that you have:
- put your name at the top of your file,
- registered for the assignment using chisubmit,
- added, commited, and pushed your code to the git server, and
- run the chisubmit submission command.
chisubmit student assignment register pa1

git add Tree_Map.py
git commit -m "final version ready for submission"
git push

export COMMIT_SHA=`git rev-parse master`
chisubmit student assignment submit USERNAME pa1 $COMMIT_SHA