cs223
Homework 1
Download the skeleton files FP.elm and Pi.elm and use them as a starting point for the following problems. Look for all occurrences of TODO in comments, which point out where you should implement your solutions. Once you are done, follow the submission instructions below.
Problem 1: FP Warmup
The goal of this problem is to develop experience with basic functional programming tasks in Elm.
1.1.1 (10 points)
Write a function
digitsOfInt : Int -> List Intsuch that digitsOfInt n returns [] if n is less than zero, and returns the list of digits of n in the order in which they appear. Once you have implemented the function, you should get the following behavior at the Elm REPL:
> import HW1 exposing (..)

> digitsOfInt 3124
[3,1,2,4] : List Int

> digitsOfInt 352663
[3,5,2,6,6,3] : List Int

> digitsOfInt 0
[0] : List Int
1.1.2 (10 points)
Consider the process of taking a number, adding its digits, then adding the digits of the number derived from it, etc., until the remaining number has only one digit. The number of additions required to obtain a single digit from a number n is called the additive persistence of n, and the digit obtained is called the digital root of n. For example, the sequence obtained from the starting number 9876 is 9876, 30, 3, so 9876 has an additive persistence of 2 and a digital root of 3.
Write two Elm functions
additivePersistence : Int -> Int
digitalRoot : Int -> Int
that take positive integer arguments n and, respectively, return the additive persistence and the digital root of n. Once you have implemented the functions, you should get the following behavior at the Elm REPL:
> additivePersistence 9876
2 : Int

> digitalRoot 9876
3 : Int
Think about how you can factor the implementations of these two functions into common, reusable parts.
1.1.3 (10 points)
Write a function
subsequences : List a -> List (List a)that computes all subsequences of a list. This function is analogous to the powerset of a set. Your implementation may return subsequences in any order. For example, the following are two answers, among others, that are correct:
> subsequences [1..3]
[[],[1],[2],[1,2],[3],[1,3],[2,3],[1,2,3]] : List (List number)

> subsequences [1..3]
[[1,2,3],[2,3],[1,3],[3],[1,2],[2],[1],[]] : List (List number)
1.1.4 (10 points)
The List library function includes a take such that take k xs returns the first k elements of xs. If k is negative or if there are not enough elements in xs, take quietly succeeds anyway.
In this problem, you will write a version of take that differentiates between the success and error cases using the Result type. Implement the function
take : Int -> List a -> Result String (List a)so that it returns the error strings "not enough elements" and "negative index" in the corresponding error cases. For example:
> take 0 [1..9]
Ok [] : Result.Result String (List number)

> take 5 [1..9]
Ok [1,2,3,4,5] : Result.Result String (List number)

> take 10 [1..9]
Err ("not enough elements") : Result.Result String (List number)

> take (-10) [1..9]
Err ("negative index") : Result.Result String (List number)
Problem 2: Estimating Pi
In this problem, you will write a program that estimates the value of π. You will also get practice with the basics of functional reactive programming in Elm by implementing an animation to accompany the estimation process.
The idea behind estimating π for this problem is simple: throw darts randomly at the unit square and keep track of how many fall within the circle that is centered in the square. According to the areas of circles and squares, the fraction of points within the circle is an estimate of π / 4.
1.2.1 -- The "Model" (10 points)
First, we define the following type alias to describe points:
type alias Point = { x:Float, y:Float }Next, we define the following type to keep track of the "state" or the "model" of the simulation at any given point:
type alias State = ((Int, List Point), (Int, List Point))The first component of a State value is a pair of the number of "hits" (points inside the circle) as well as the points themselves. Similarly, the second component contains the number and list of "misses" (points outside the circle). Notice that we keep counters and lists of hits and misses separate to avoid recomputation.
A key operation is to update the simulation state every time a new point is randomly generated; for kicks, we will call this operation "upstating". Implement the function
upstate : Point -> State -> Stateso that upstate pt st produces an updated state st' that takes into account whether pt is a hit or miss.
1.2.2 -- The "Controller" (20 points)
The next key aspect is to randomly generate points to "drive" the simulation. First, implement the function
genPoint : Random.Seed -> (Point, Random.Seed)to generate random Points. Notice how the result of generating a point produces a new seed to be used next time this function is called. There are many ways to implement this function using the Random library.
You will now connect the infrastructure you have built to some reactive components, namely, the passing of time. Implement the signal
signalPointSeed : Signal (Point, Random.Seed)by calling genPoint every so often. Exactly how long (for example, every 100 milliseconds or every 1 second) is up to you. You will want to use the Time library to define a "ticking clock" and then the Signal.foldp function to turn this ticker into a signal that produces values of type (Point, Random.Seed). You may choose any point (such as {x=0, y=0}) and initial seed (such as Random.initialSeed 17) for the initial value of this signal.
Then use signalPointSeed to implement the signal
signalPoint : Signal Pointto produce random points.
1.2.3 -- The "View" (20 points)
The last key component is to render the current state of the simulation to the screen. For this, implement the function
view : (Int,Int) -> State -> Elementwhich takes a pair of integers (w,h) that describes the current width and height of the HTML window as well as the current State to render. Although the particular details are largely up to you, your rendering should:
- draw dots for each randomly generated point, using different colors to distinguish hits and misses; and
- display the current estimate of π based on these points.
You will need to use the APIs of the Graphics.Collage and Graphics.Element to implement your rendering. Be creative!
You may find it useful to define helper functions, such as the following, for the two subtasks above:
pointsToCircles : Color.Color -> List Point -> List Form
piApprox : State -> Float
With everything in place, we can now put the model, view, and controller pieces together as follows:
main : Signal Element
main =
  Signal.map2 view Window.dimensions
(Signal.foldp upstate initState signalPoint) 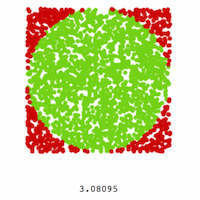
For reference, click here to see the output from a sample implementation.
1.2.4 (10 points based on voting)
You will receive full points for the parts above as long as everything is working, no matter how pretty (or ugly) the results are. These last few remaining points are reserved for solutions that are particularly pleasing.
To help get the creative juices flowing, here are some possible ideas for making the animation prettier:
- Make more recent dots darker than older ones
- Make the dartboard more colorful
- Have π appear in the background of the dartboard
- Use a different shape for the dartboard
- Vary the size of the board and dots based on window size
In the coming weeks, we will generate a poll based on everyone's solutions to this problem. You may receive points for this problem based on the results of the voting. More details to follow.
Grading and Submission Instructions
Submit the following three files:
The files
FP.elmandPi.elmupdated with your changes. You are free to modify these files as you wish, as long as you do not change any type signatures that are provided.A 200-by-200 pixel thumbnail image of your animation called
ThumbPi.EXT, whereEXTis a standard image format such aspng,jpg, orgif. This thumbnail will be used to help generate a gallery on the forthcoming voting page, where each thumbnail will link to the corresponding animation. So you will want to choose an accurate and compelling preview of your animation to entice people to view it.
Your solution will be graded using a combination of automated grading scripts and manual review. It is a good idea for you to design some test cases of your own to exercise more sample behaviors than just the ones provided in the writeup. We also reserve the right to take into account the organization and style of your code when assigning grades.
If you are not able to finish all parts of the assignment, make sure that all of your submitted files compile successfully. If not, you risk getting zero points for the assignment. In particular, for each file Foo.elm, make sure that it can be loaded into the Elm REPL
% elm-repl
> import Foo
>
and that it can be compiled to a standalone HTML file:
% elm-make Foo.elm --output=Foo.html
Successfully generated Foo.html
Submitting Your Code
We will use the cs223-win-16 Subversion repository on PhoenixForge. You should have done this by now.
Start by navigating to the folder where you checked out your repo. Next, create a subfolder for this assignment and populate it with the skeleton code:
% cd USER-cs223-win-16
% svn mkdir hw1
% cd hw1
% wget http://www.classes.cs.uchicago.edu/current/assignments/hw1/FP.elm
% wget http://www.classes.cs.uchicago.edu/current/assignments/hw1/Pi.elm
If wget or a similar tool (such as curl) is not available on your machine, download and save the skeleton files provided above in some other way. Then add only these files to your repo:
% svn add FP.elm
% svn add Pi.elm
% svn add ThumbPi.EXT
Make sure you choose the same exact names for directories and files that you create. Once you are ready to submit:
% svn commit -m "hw1 submission"You can resubmit as many times as you wish, and we will grade the most recent versions submitted. Late days, if any, will be computed based on your submission times.
As a sanity check, you can visit the Web-based frontend for your repository to make sure that you have submitted your files as intended:
https://phoenixforge.cs.uchicago.edu/projects/USER-cs223-win-16/repository