Lab 3
Details for MPCS 51205
Each
lab will consist of a small problem and details of
how to proceed. Each lab is intended to give every student hands-on
experience with the core technologies utilized during the course.
A student may concentrate, as a team member, on one technology over
another for the final project, but labs are designed to give each and
every student exposure to all the technologies that come into
play. You need to submit labs to the TAs for
grading--see submission instructions below.
Generally, unless otherwise specified, you will have one week to
complete each assigned lab.
See
the syllabus for information on grading. Turning in lab
assignments on time is required, without exception, and all late deliveries will be penalized,
regardless of cause.
Submit your
assignments to the subversion repository according to the
directions on the syllabus page.
For steps 1-3, you will be working in Java. For Step 4 below, you
may write these solutions in either
Java or C++ or Python or whatever language you wish...your choice, as long as it's supported under RabbitMQ.
Lab 3
Due: 5:00 pm, Monday, November 18, 2019
Problem
1: Playing With Docker and RabbitMQ:
BACKGROUND:
Like
all
programming problems, learning a new technology is not an exercise in
reading but rather and exercise in typing. This lab is designed
to
give you hands-on experience in (a) running a dockerized RabbitMQ and
(b) creating a RabbitMQ message queue and (c) having two different
programs (a producer and a consumer, written in whatever language that
RabbitMQ supports that you wish to implement in, although you will start out in Java) in multiple separate
containers (you will have at least 3 containers running) pass
messages over that queue. You
will generally find the References section below helpful in addition to
the required and recommended reading. When we talk about
"Docker", we are talking specifically about the Stable Community Edition
of Docker, which is the version we will be using in this class.
The Stable Community Edition provides the basic container engine and
built-in orchestration, networking, and security.
WHAT YOU NEED TO DO:
For
this third lab, we are going to code a microservice that runs
RabbitMQ and two client microservices (each running in its own
container) that pass messages over the queue. You will work
through a couple of the very fine examples provided on the RabbitMQ
website and then you will each write a Request/Response RPC
producer/consumer yourselves.
STEP 1:
Get RabbitMQ in a Docker
Container (RABBITMQ)
First,
make sure docker is running
in your environment. Next, get down a
dockerized RabbitMQ:
On Linux (or VirtualBox VM):
docker run -d --hostname my-wabbit --name MyWabbit rabbitmq:3-management
On the Mac:
docker run -d --hostname my-wabbit --name MyWabbit -p 15672:15672 -p 5672:5672 rabbitmq:3-management
In this latter MAC command you have mapped the management
console port to 15672 on the mac AND you have mapped port 5672 on the
MAC. THIS is the port that rabbitmq server listens on by
default for new connections:
"For RabbitMQ to accept client connections, it needs to
bind to one or more interfaces and listen on (protocol-specific) ports.
The interfaces are configured using the rabbit.tcp_listeners config
option. By default, RabbitMQ will listen on port 5672 on all available
interfaces". Cf.: https://www.rabbitmq.com/networking.html. Note the Linux version of docker will map ports for you.
Then, exec a shell into your container:
docker exec -it MyWabbit /bin/bash
update the software:
apt-get update
apt-get install -y procps
apt-get install -y vim
apt-get install -y net-tools
apt-get install -y openssh-client
NOTE: DO NOT install default-jdk as you will not need it...and there are issues.
Stay in your container...
STEP 2:
Get down a docker container for ubuntu 18.04. This will be for your Message Producer.
Next, in a new terminal window in your VM, get down an ubuntu:18.04 container and name that container "MsgProducer":
docker run -di --hostname msgproducer --name MsgProducer ubuntu:18.04
docker exec -it MsgProducer /bin/bash
Now, update the software in MsgProducer:
apt-get update
apt-get install -y procps
apt-get install -y vim
apt-get install -y openjdk-8-jdk-headless
apt-get install -y net-tools
apt-get install -y openssh-client
Then, install the RabbitMQ client tarball
into your MsgProducer container under the /opt directory in your container:
scp userid@linux.cs.uchicago.edu:/stage/classes/archive/2019/fall/51205-1/libs/rabbitmq-java-client-5.6.0.tgz .
[enter your user id and password on the cluster]
root@msgproducer:/# ls rabbit*
rabbitmq-java-client.tgz
root@msgproducer:/# cd /opt
root@msgproducer:/opt# tar xzvf ../rabbitmq-java-client-5.6.0.tgz
root@msgproducer:/opt# mkdir rabbitmq-java-client
root@msgproducer:/opt# mv ./*.jar ./rabbitmq-java-client/
root@msgproducer:/opt# find rabbitmq-java-client/
rabbitmq-java-client/
rabbitmq-java-client/slf4j-simple-1.7.25.jar
rabbitmq-java-client/amqp-client-5.6.0.jar
rabbitmq-java-client/slf4j-api-1.7.25.jar
Now set your class path in your container to (note this example assumes
you've downloaded the client libs to /opt/rabbitmq-java-client):
export
CLASSPATH=/opt/rabbitmq-java-client/amqp-client-5.6.0.jar:/opt/rabbitmq-java-client/slf4j-api-1.7.25.jar:/opt/rabbitmq-java-client/slf4j-simple-1.7.25.jar:.
Don't forget the ":." at the end. Now, create a directory to work in:
mkdir -p /src/HelloWorld
cd /src/HelloWorld
STEP 2a:
Visit the RabbitMQ Tutorial Site and look under the Hello World! example and and download the
producer-related code for java: click on Java, and then scroll
down the page until you see the "Sending" section (this will be the
producer), and download the file "Send.java" and put it into the /src/HelloWorld directory on MsgProducer.
Compile Send.java and make sure you modify the
factory.setHost("localhost") to whatever host you have your RabbitMQ
container running in from STEP 1, such as "172.17.0.2". Your mileage may vary.
Work through each line of the Send.java code, and referring to the javadocs, make sure you understand the main AQMP and RabbitMQ calls that are made in the source.
Compile Send.java:
javac Send.java
Then execute "java Send" from MsgProducer container
root@msgproducer:/src/HelloWorld# java Send
[x] Sent 'Hello World!'
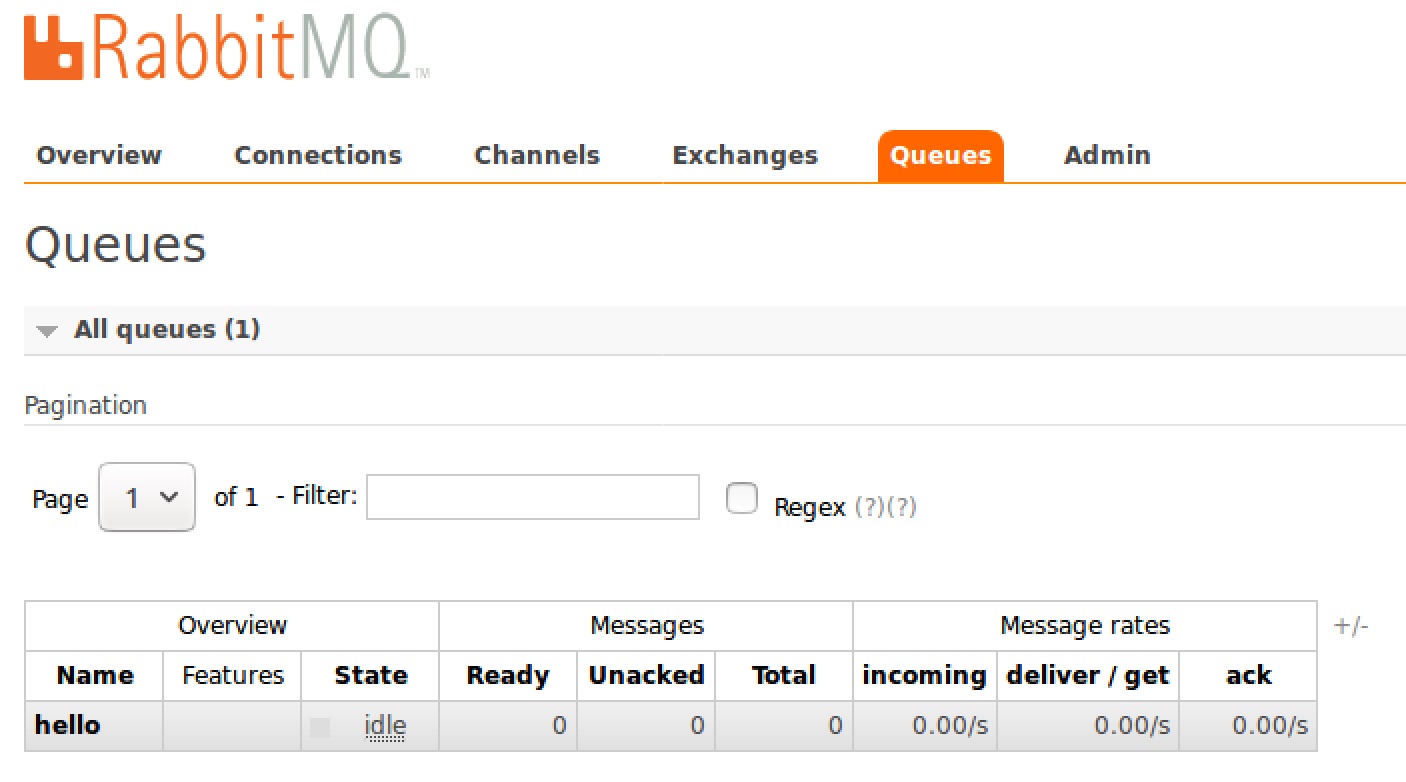
Then, in your MyWabbit container, verify that your
queue has one message on it (the "hello" queue has 1 message):
root@my-wabbit:/# rabbitmqctl list_queues
Listing queues
hello 1
Use the RabbitMQ management console running in a browser in your
VirtualBox VM and hit: http://172.17.0.2:15672/. Of course
substitute the IP address of your MyWabbit container in the above
URL. On a Mac, enter instead http://localhost:15672/ because of the defined port mapping.
If you are asked to log into RabbitMQ, the default username is "guest" and the default password is "guest".
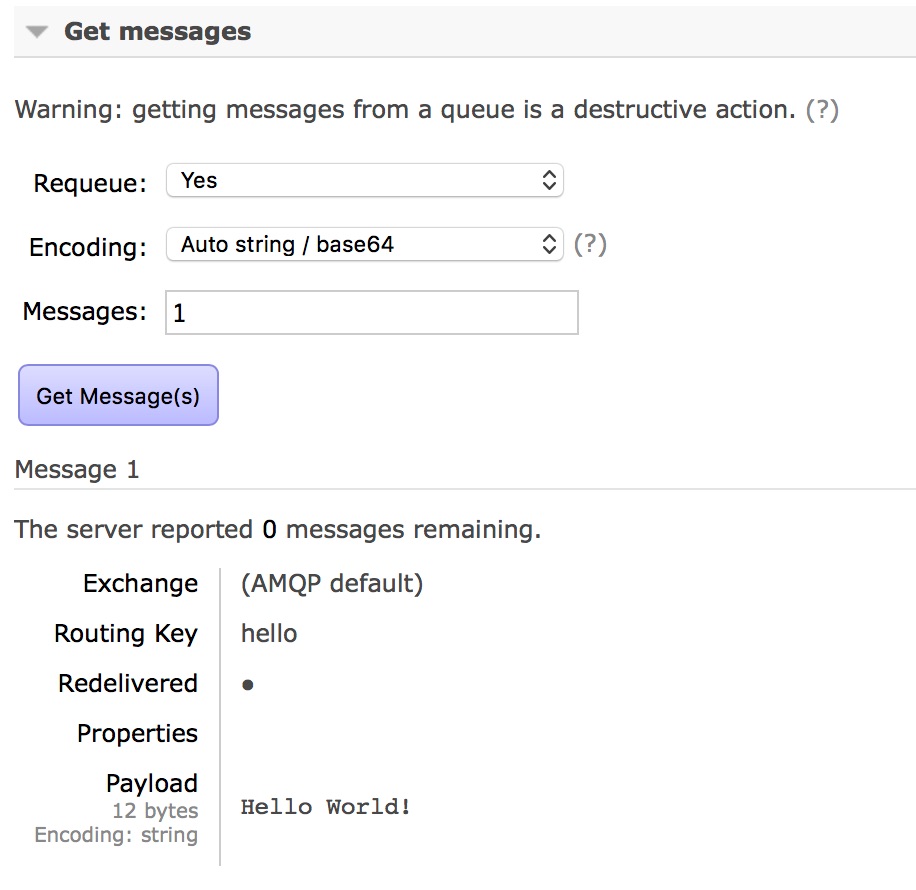
Examine the message that was sent under the Queues Tab
under "Get Messages":
Finally, use docker save to save your container to a new image.
STEP 3:
Get down another docker container for ubuntu 18.04. This will be for your Message Consumer.
Next, Get down an ubuntu:18.04 container and name that container "MsgConsumer".
docker run -di --hostname msgconsumer --name MsgConsumer ubuntu:18.04
docker exec -it MsgConsumer /bin/bash
Now, update the software in MsgConsumer:
apt-get update
apt-get install -y procps
apt-get install -y vim
apt-get install -y openjdk-8-jdk-headless
apt-get install -y net-tools
apt-get install -y openssh-client
Then, install the RabbitMQ client tarball
into your MsgConsumer under the /opt directory as you did above in Step 2:
scp userid@linux.cs.uchicago.edu:/stage/classes/archive/2019/fall/51205-1/libs/rabbitmq-java-client-5.6.0.tgz .
[enter your user id and password on the cluster]
root@msgconsumer:/# ls rabbit*
rabbitmq-java-client.tgz
root@msgconsumer:/# cd opt
root@msgconsumer:/opt# tar xzvf ../rabbitmq-java-client-5.6.0.tgz
root@msgproducer:/opt# mkdir rabbitmq-java-client
root@msgproducer:/opt# mv ./*.jar ./rabbitmq-java-client/
root@msgproducer:/opt# find rabbitmq-java-client/
rabbitmq-java-client/
rabbitmq-java-client/slf4j-simple-1.7.25.jar
rabbitmq-java-client/amqp-client-5.6.0.jar
rabbitmq-java-client/slf4j-api-1.7.25.jar
Then, set your class path to (note this example assumes
you've downloaded the client libs to /opt/rabbitmq-java-client):
export
CLASSPATH=/opt/rabbitmq-java-client/amqp-client-5.6.0.jar:/opt/rabbitmq-java-client/slf4j-api-1.7.25.jar:/opt/rabbitmq-java-client/slf4j-simple-1.7.25.jar:.
Don't forget the ":." at the end.
Now, create a directory to work in:
mkdir -p /src/HelloWorld
cd /src/HelloWorld
STEP 3a:
Visit the RabbitMQ Tutorial Site and
look under the Hello World! example and and download the
consumer-related code for java: click on Java, and then scroll
down the page until you see the "Receiving" section (this will be the
consumer), and download the file "Recv.java" and put it into the
/src/HelloWorld directory on MsgConsumer.
Compile Recv.java and make sure you modify the
factory.setHost("localhost") to whatever host you have your RabbitMQ
MyWabbit container running in from STEP 1, such as "172.17.0.2". Your mileage may vary.
Work through each line of the Recv.java code, and referring to the javadocs, make sure you understand the main AQMP and RabbitMQ calls that are made in the source.
Compile Recv.java:
javac Recv.java
Then execute "java Recv" from MsgProducer container
root@msgconsumer:/src/HelloWorld# java Recv
[*] Waiting for messages. To exit press CTRL+C
[x] Received 'Hello World!'
Then, press CTRL+C to exit. Now in your MyWabbit container, verify that your
queue has no messages on it (the "hello" queue has 0 message):
root@my-wabbit:/# rabbitmqctl list_queues
Listing queues
hello 0
This means of course the message on the queue was consumed (and removed from the queue).
Use the RabbitMQ management console running in a browser in your VirtualBox VM and hit:
http://172.17.0.2:15672/.
Of course substitute the IP address of your MyWabbit container in the
above URL. On a Mac, enter instead http://localhost:15672/ because of the defined port mapping.
Examine the message that was sent under the Queues Tab and verify that the hello queue as 0 Messages under the Ready column.
Next, start two MsgConsumers in two seperate terminal windows and a
single MsgProducer in a third terminal window. Set your CLASSPATH
in each instance of the containers. In each MsgConsumer container, run java Recv. These programs will block. Then, in the MsgProducer container, run java Send
over and over again. Notice what is happening with each of the
two MsgConsumers. You are witnessing Point-to-Point messaging
with a round-robin algorithm.
Finally, use docker save to save your container to a new image.
STEP 4:
Repeat with other examples.
You should have running at this point, and output from "docker ps" should look something like this:
CONTAINER
ID
IMAGE
COMMAND
CREATED
STATUS
PORTS
NAMES
fb011b3ff871
ubuntu:18.04
"/bin/bash"
3
minutes ago Up 3
minutes
MsgConsumer
ce30e9054fbb
ubuntu:18.04
"/bin/bash"
4
minutes ago Up 4
minutes
MsgProducer
cd776144660a
rabbitmq:3-management "docker-entrypoint.sh" 27 minutes ago Up 27
minutes 4369/tcp, 5671-5672/tcp, 15671-15672/tcp, 25672/tcp MyWabbit
Now, repeat steps 2a and 3a for the following examples on the RabbitMQ examples website:
Work Queues
Publish/Subscribe
Topics
RPC
You may now choose any language for the above examples you wish, including Python, Ruby, Go, etc. Whatever you'd like.
Follow the instructions on the website on how to run the
examples. In particular, run (in separate terminal windows)
multiple consumers for the pub-sub and topics examples. For each
of these new examples, create another directory under source (at the
same level as HelloWorld). For example:
src/work-queues
src/pub-sub
src/topics
src/rpc
Regardless of what language you choose to work in,
make sure you do not just copy and paste the code and simply run
it. You must work
through each line of the rabbit sample code (notice the setup code that
is virtually identical across all the examples in a given language),
and referring to the javadocs,
make sure you understand the main AQMP and RabbitMQ calls that are made
in the source. If you skip this step, you will have learned
little, and will put your project deliverable in jeopardy, as it will
heavily depend upon messaging including point-to-point, pub/sub, topics,
and
RPC.
For the Work Queues examples, run multiple
worker consumers simultaneously in separate windows (just as you did
above in the HelloWorld example) inside the MsgConsumer
container. Notice what is happening with
each of the consumers when your publisher sends messages (send several). Make
sure you read carefully the sections on the Work Queues page concerning message durability, acknowledgment, and fair dispatch.
For the Publish/Subscribe and Topics examples, run multiple
consumers (x > 2) simultaneously in separate windows (just as you did above in
the HelloWorld example) inside the MsgConsumer container. For the Publish/Subscribe example, notice
what is happening with each of the consumer windows when your publisher sends
messages. You are witnessing Publish/Subscribe messaging.
For the Topics example, also run multiple
consumers (x>2) simultaneously in separate windows (just as you did above in the HelloWorld
example). Observe what is happening in each of the MsgConsumers when your publisher sends messages.
For the RPC example, run a single RPCServer in the MsgProducer container and run a single RPCClient consumer in the MsgConsumer container.
Observe what is happening the two containers when the RPCClient makes
the call. Make sure you read carefully the sections on the RPC
page concerning the Callback Queue and the Correlation ID. [If
you get a compiler error on corrId not being final, simply change line
32 in the source code for RPCClient.java so that corrId is final: final String corrId...]
STEP 5:
Your Turn.
Using the Admin Console in a browser, create a new exchange in RabbitMQ. Name your exchange "youruserid.exchange".
Make it a direct exchange and make it durable. Do not set it for
auto delete and do not make it internal.
Next, using the Admin Console in a browser, create a new queue in RabbitMQ. Name your new queue "youruserid.queue". Make the new queue durable. Do not set it for auto delete.
Next, using
the Admin Console in a browser, create a new binding between your new
queue and your new exchange in RabbitMQ. You get to decide what
binding key you want to use.
Again, do not create the queue from within the producer or consumer
code (as the rabbit examples do), but create the exchange and queue
manually using the Admin Console.
Now, using whatever language binding you prefer, write a simple message producer that will send a message to your
new queue. Write a simple message consumer that will read
messages from that queue. Write the producer program in the
MsgProducer container under a new subdirectory called "/lab3".
Write the consumer program in the MsgConsumer container under a new
subdirectory called "/lab3".
Once you have your
new changes all executing properly, you're done. Submit as
instructed below.
References:
You
may find the following references helpful (in addition to the links
from previous labs):
The docker page for RabbitMQ
RabbitMQ Documentation
RabbitMQ Clients (Java, C++, Python, Ruby, Spring, etc.)
RabbitMQ Java Javadocs
Ubuntu
package commands
General Docker Tutorial Links
Docker
Cheat Sheet
Submitting:
Use
the folder named "lab_3" in your Subversion repository. See the
syllabus for more info about submission using Subversion. Upload
your Lab 3 MsgProducer and MsgConsumer and MyWabbit tarballs (using
docker export) to this repo. gzip each tarball before
submitting. Please include a README text file that contains any
instructions for the TAs to assist with grading, including how to run
your containers, and any other helpful hints you can provide.