Lab
4
Details for MPCS 51205
Each
lab
will consist of a small problem and details of
how to proceed. Each lab is intended to give every student
hands-on
experience with the core technologies utilized during the
course.
A student may concentrate, as a team member, on one technology
over
another for the final project, but labs are designed to give
each and
every student exposure to all the technologies that come into
play. You need to submit labs to the TAs for
grading--see submission instructions below.
Generally, unless otherwise specified, you will have one week to
complete each assigned lab.
See
the
syllabus for information on grading. Turning in lab
assignments on time is required, without exception, and all late deliveries will be
penalized,
regardless of cause.
Submit
your
assignments to the subversion repository according to the
directions on the syllabus page.
You
may
write this solution in Java.
Lab 3
Due: 5:00 pm, Monday, November 25, 2019
Problem
1: Playing With Multiple Dockerized Microservices and
MongoDB:
BACKGROUND:
Like
all
programming problems, learning a new technology is not an
exercise in
reading but rather and exercise in typing. This lab is
designed
to
give you hands-on experience in (a) running multiple dockerized
microservices that communicate both synchronously and
asynchronously
with each other and finally write data to a MongoDB
database.
You
will generally find the References section below helpful in
addition to
the required and recommended reading. When we talk about
"Docker", we are talking specifically about the Stable Community Edition
of Docker, which is the version we will be using in this
class.
The Stable Community Edition provides the basic container engine
and
built-in orchestration, networking, and security.
WHAT YOU NEED TO DO:
STEP 1:
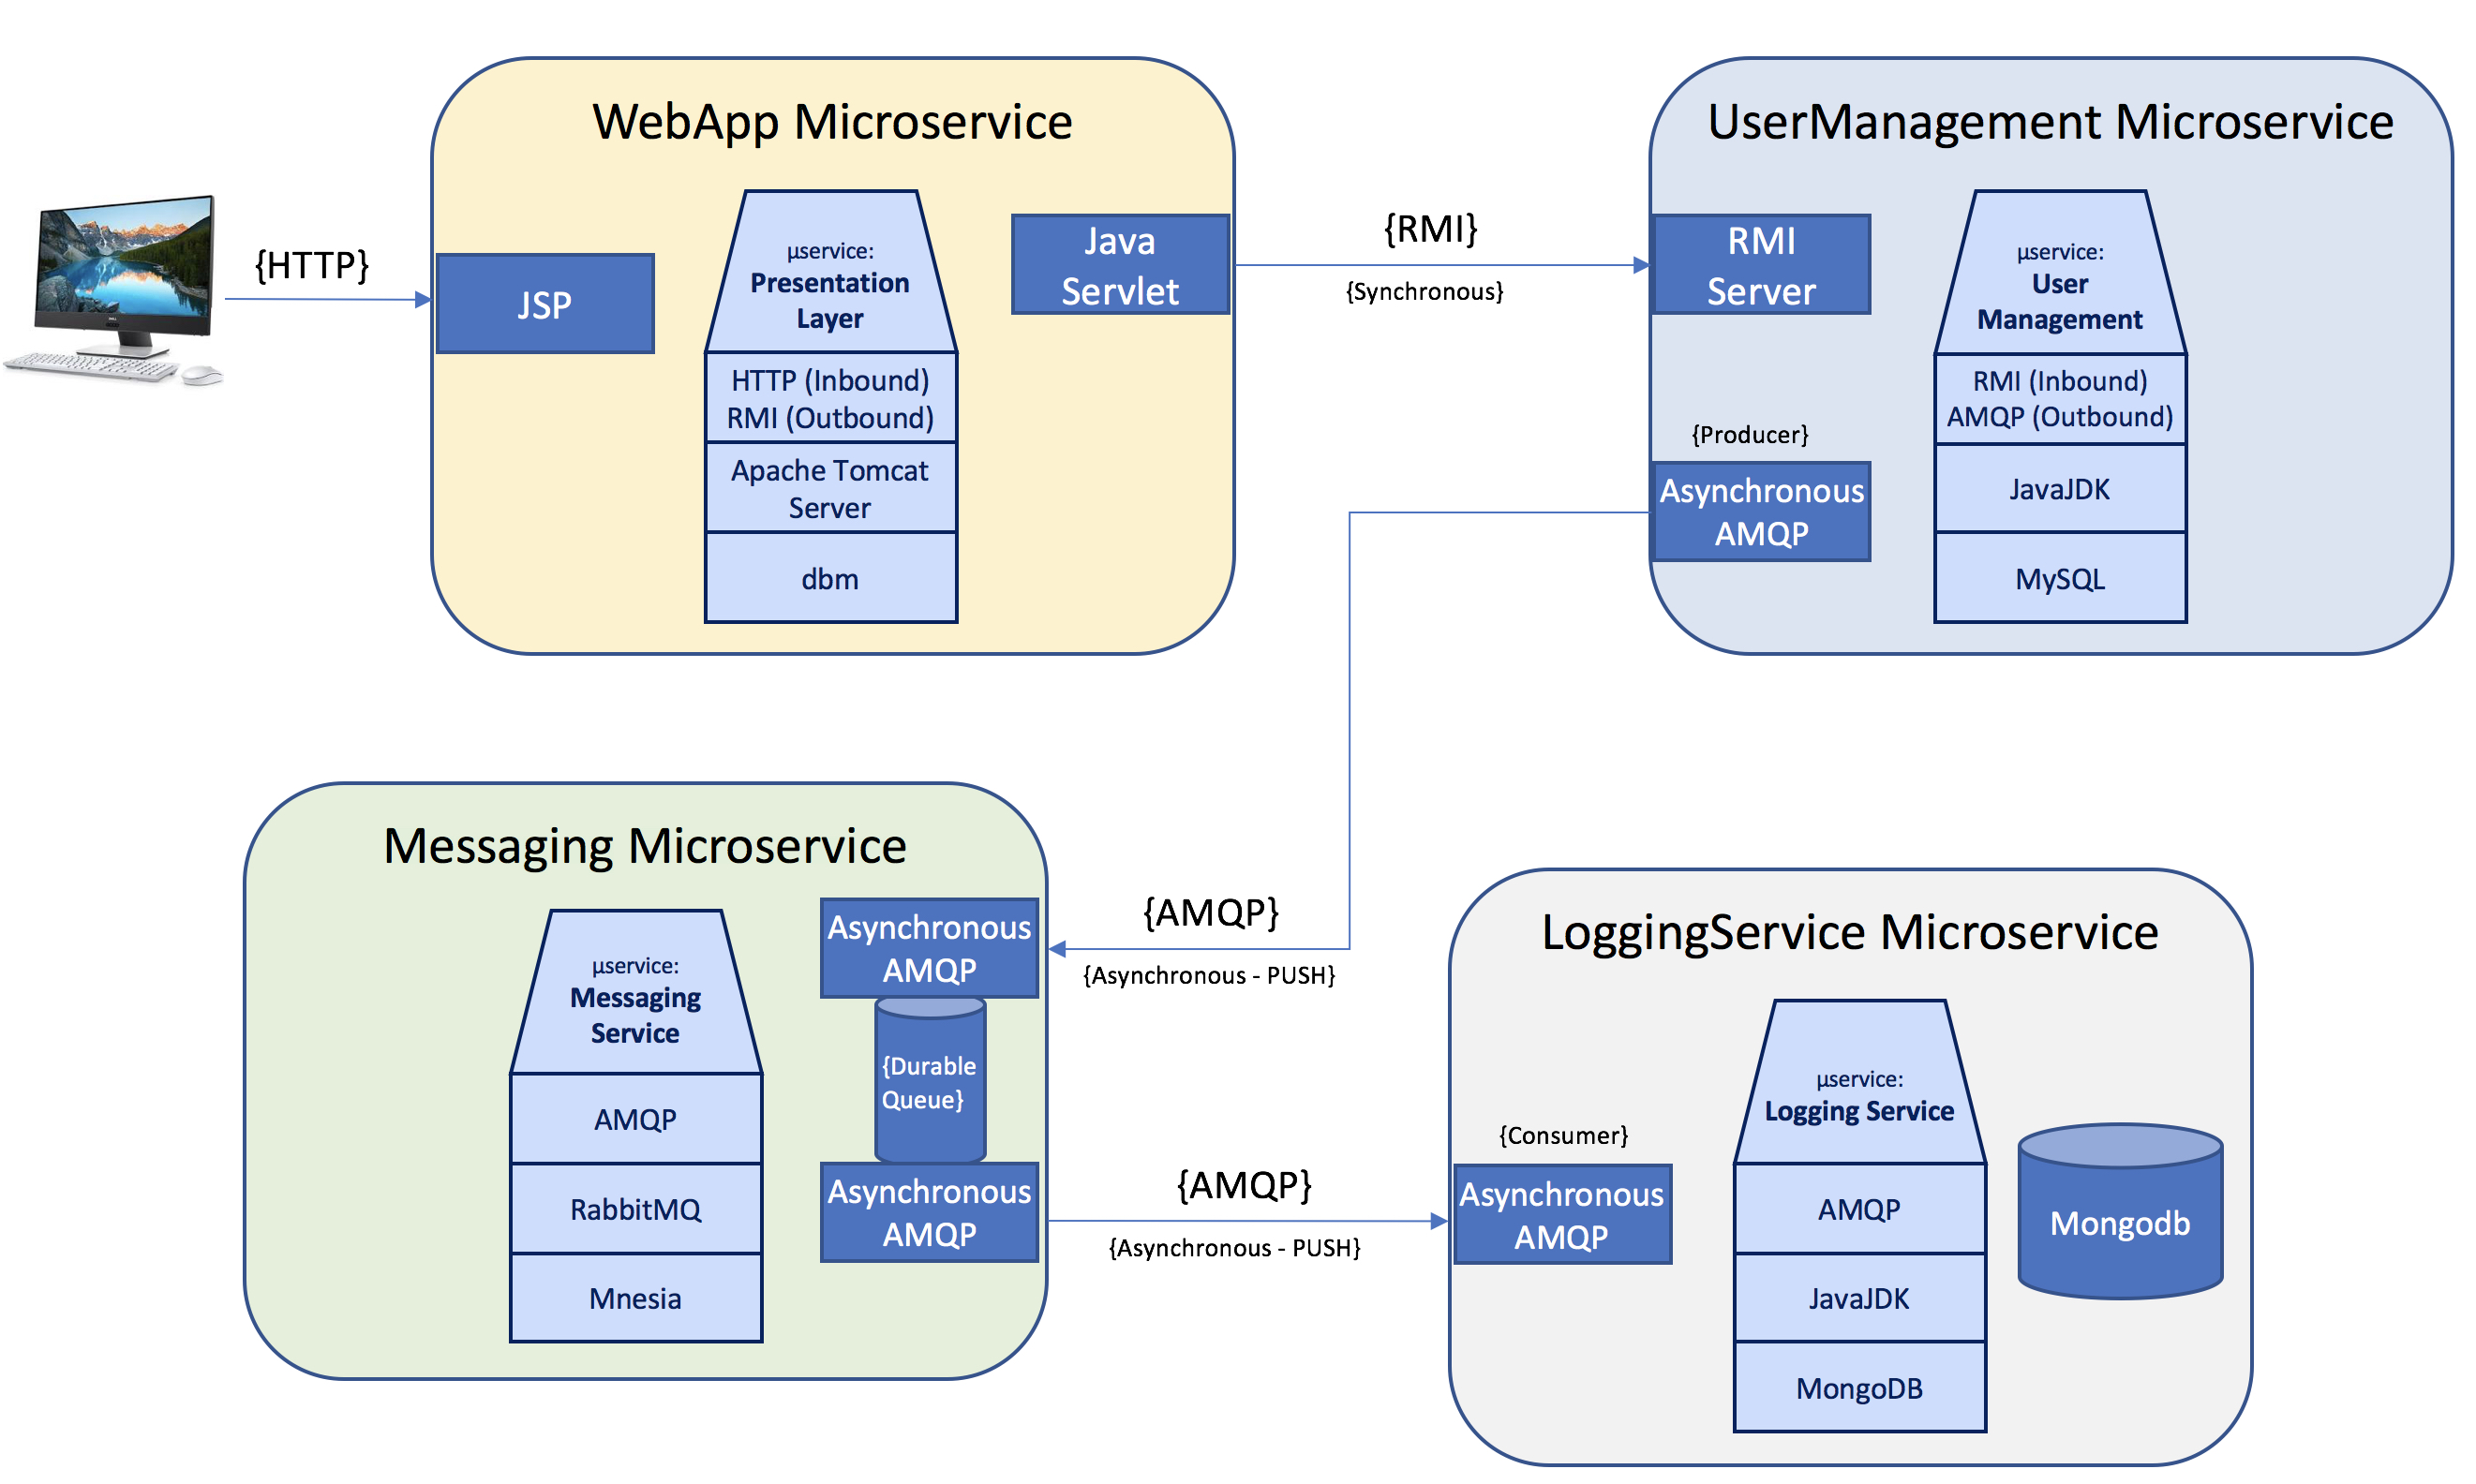
For
this
fourth lab, we are going to run a prototype that
consists of four distinct microservices. This prototype
consists
of:
1. A dockerized Apache Tomcat web server microservice named WebServer
running ubuntu that will serve up a web page and backing jsp and
Java
servlet that will prompt the user to add a new user to the
system. This web page is for adding new users only and is
strictly no frills.
A
field for a username, and a second field for a password, and an
"Confirm New User" button that, when clicked, does no error
checking
and sends the new user request (over synchronous RMI from the
servlet)
to the UserManagement
microservice, which has an RMI Server listening for remote
calls.
2.
A dockerized UserManagement
microservice running ubuntu that hosts an RMI Server that
listens for new user requests from the WebServer's servlet-based
RMI client. A synchronous RMI client
running in the servlet on the WebServer
is used to communicate new user requests to the RMI server
running on UserManagement.
3. The RMI server running on UserManagement receives the
new user request and forwards that request asynchronously to a queue
running in a dockerized RabbitMQ microservice
called MyWabbit.
4. A dockerized LoggingService,
based on a docker MongoDB image will be listening/subscribed to
the MyWabbit's "new
user" queue, and upon every incoming message (about a new user
to add),
will write that new user's information out to a new MongoDB
document. Note that the purpose of the MongoDB database is
not to store new user
information, but to provide a
document store for log messages from the system.
The
big picture here is this:
These
steps will involve running several different docker containers
and installing software inside them. Details are below. After
downloading and installing the prototype in STEPS 2-5, get the
prototype running (there will be a few code and environment
changes you
will need to make) and
examine the code carefully and observe how it executes.
First,
make
sure docker is running either on your laptop (Option I from the
first lab) or
in your VM (Option II from the first lab).
STEP 2:
Get Tomcat working in a Docker
Container (WebService microservice)
First, get down the Apache Tomcat app server into a new
container. Do this by executing
the following docker command:
docker run -di --hostname tomcat --name
WebServer -p 8080:8080 tomcat:8.0
Once
you have that container down (and
verify it is running), obtain a bash shell in
that container by running docker exec into the container.
Once
you are in your WebService container, install some software in
the
container. Install:
apt-get update
apt-get install vim
apt-get install net-tools
apt-get install openssh-client
apt-get install default-jdk
Once you have the software installed, let's hit the Tomcat
default web
page at http://localhost:8080/index.jsp. Bookmark this
page. Then navigate to
http://localhost:8080/docs/index.html. Browse around the
documentation a bit. Next, browse over to http://localhost:8080/examples,
and
go into the Servlets examples, and Execute the Hello World
servlet. Back up two levels and go into the jsp examples
at http://localhost:8080/examples/jsp/.
Try the Numberguess and Calendar examples under the JSP 1.2
Examples
heading. Take a look at the source code for these examples
(the "Source" link to the right of "Execute").
Now, we need to modify the setup a bit. Namely, we need to
set
you up as an admin so you can run the tomcat manager. Use
vi to
edit the file in your tomcat container:
/usr/local/tomcat/conf/tomcat-users.xml. Note that
Tomcat's
configuration files are located in the /usr/local/tomcat/conf
directory. Edit the file and at the very end (right above
the
closing </tomcat-users> tag and below
the --> comment end"), add these two lines:
<role rolename="admin"/>
<user username="admin" password="admin"
roles="manager-gui,manager-status,manager-script,manager-jmx,admin-gui"/>
Save the file and exit vi. Now, hop out of your
container's bash shell and have docker restart the Tomcat
server:
docker
restart WebServer
Now, exec a bash shell back into WebServer. Go back to
your
browser and hit http://localhost:8080/manager/html (yes, it's
slash html and not .html) and when prompted,
log in as "admin/admin". You should now be in the Tomcat
Web
Application Manager. You will become intimate with this.
Now for some sample software. cd to the following
directory: /usr/local/tomcat/webapps. Do an ls and
look at
the directories there. This is where Tomcat stores web
applications,
one of which you're about to install. Now, using scp from
within your WebServer container, type
scp userid@linux.cs.uchicago.edu:/home/mark/pub/51205/src.labs/lab4/tomcat.starter.kit.tgz .
[enter your userid and password on the cluster]
Now, untar that tarball under the /usr/local/tomcat/webapps
subdirectory. Do an "ls" again. You should see a new
mpcs subdirectory. Execute:
root@tomcat:/usr/local/tomcat/webapps/#
find mpcs
You will see a number of files under the mpcs directory,
including a
WEB-INF subdirectory, a jsps subdirectory, and a WEB-INF/classes
subdirectory. Note especially the mpcs/WEB-INF/web.xml
file, as
it is the key to the kingdom as far as Tomcat applications are
concerned.
Now, go back to your Tomcat Web Application Manager, and refresh
the
page. Scroll down and you will see a new application Path
for
mpcs. Look for options over to the right including Stop,
Reload,
and Undeploy. Click on Reload now.
Finally, navigate to this page:
http://localhost:8080/mpcs/jsps/starter.kit.html. You
should see
a tidy little web page allowing you to enter a New Username and
a New
Password by clicking on a button called "Confirm New
User".
Resist the urge to click on the button quite yet.
Now, in your shell cd over to
/usr/local/tomcat/webapps/mpcs/WEB-INF/classes directory and
execute
the command ". set.classpath.sh" (make sure you have a space after the initial
period before the command...). Then echo out your
$CLASSPATH variable:
root@tomcat:/usr/local/tomcat/webapps/mpcs/WEB-INF/classes#
. set.classpath.sh
root@tomcat:/usr/local/tomcat/webapps/mpcs/WEB-INF/classes#
echo $CLASSPATH
/usr/local/tomcat/lib/servlet-api.jar:/opt/rabbitmq-java-client/amqp-client-4.0.2.jar:/opt/rabbitmq-java-client/slf4j-api-1.7.21.jar:/opt/rabbitmq-java-client/slf4j-simple-1.7.22.jar:.
Don't worry that you do not have the rabbitmq jars. That's
ok. They are there in case you wish to use asynchronous
communication to talk to RabbitMQ. Our little prototype does
not
do that.
Now, do an "ls" on the classes directory. You will find
several
java files, along with several .class files. Using vi, hop
into
HelloWorldServlet.java and take a look at its contents. Then
hop
out without saving (":q! [Enter]").
Now, let's compile our java source files. In the classes
directory, execute:
root@tomcat:/usr/local/tomcat/webapps/mpcs/WEB-INF/classes#
javac *.java
STEP 3:
Get RabbitMQ working in a
Docker
Container (MyWabbit microservice)
You
will reuse your MyWabbit microservice from the previous
lab. If
you have removed it or it has otherwise suffered irreperable
damage,
you may create another one. Simply refer back to the
instructions
for Lab 3, STEP 1, in order to do that. (You may need to
docker
rm your current MyWabbit container). You will need to have
net-tools installed in your RabbitMQ container. See
STEP 4
below on how to apt-get net-tools.
One thing. docker exec into the container and execute
ifconfig
and write down the IP address reported for your MyWabbit
container. It will be something like "173.17.0.3".
You will need to modify some
source code in both
the UserManagement and LoggingService containers
with that IP address.
The good news is after all you had to do for STEP 2 above, this
is all you have to do for STEP 3.
STEP 4:
Get ubuntu working in a Docker
Container (UserManagement microservice)
First, get
down the Ubuntu:18.04 container. Do this by executing the
following command:
docker run -di --hostname usrmgr --name UserManagement
ubuntu:18.04
Once you have that container down (and
running), obtain a bash shell in
that container by running docker exec into the container.
Once
you are in your UserManagement
container, docker exec into the container and install some
software in the
container:
apt-get update
apt-get install -y vim
apt-get install -y net-tools
apt-get install -y openssh-client
apt-get install -y
openjdk-8-jdk-headless
cd to / and create a subdirectory called "/src/RMI" (mkdir -p
/src/RMI) and change to the /src directory. Next, download
~mark/pub/51205/src/lab4/UserManagement.tgz and copy it into
your container and untar
the
contents into your RMI subdirectory.
scp userid@linux.cs.uchicago.edu:/home/mark/pub/51205/src.labs/lab4/UserManagement.tgz .
[enter your userid and password on the cluster]
Now, untar the tarball:
root@usrmgr:/src/#
tar xzvf UserManagement.tgz
root@usrmgr:/src/#
find .
root@usrmgr:/src/#
cd RMI
Now, set your classpath (you will need to do this everytime you
log in, or add the call to your .bashrc file):
root@usrmgr:/src/# . set.classpath.sh
root@usrmgr:/src/# echo $CLASSPATH
/opt/rabbitmq-java-client/amqp-client-4.0.2.jar:/opt/rabbitmq-java-client/slf4j-api-1.7.21.jar:/opt/rabbitmq-java-client/slf4j-simple-1.7.22.jar:/opt/mongo-java-client/mongo-java-driver-2.13.3.jar:.
Now, we need to get your jar balls down and into your /opt
directory, which right now should be empty.
Install the RabbitMQ
client tarball
(as you did in lab 3) into your UserManagement container under the
/opt directory:
root@usrmgr:/# cd /opt
root@usrmgr:/# scp
userid@linux.cs.uchicago.edu:/home/mark/pub/51205/src.labs/rabbitmq-java-client.tgz .
[enter your password on the cluster]
root@usrmgr:/# ls rabbit*
rabbitmq-java-client.tgz
root@usrmgr:/opt# tar xzvf
rabbitmq-java-client.tgz
root@usrmgr:/opt# find rabbitmq-java-client/
rabbitmq-java-client/
rabbitmq-java-client/slf4j-simple-1.7.22.jar
rabbitmq-java-client/amqp-client-4.0.2.jar
rabbitmq-java-client/slf4j-api-1.7.21.jar
You will not need to install the mongodb jarball in
UserManagement.
This container will serve as your "UserManagement" microservice
container for this lab.
Now, change to your /src/RMI
directory. Type "javac *.java" to compile everything.
Then, execute:
root@usrmgr:/src/RMI# javac *.java
Examine the java source code beginning with RMIServer.java
carefully. Make
sure you understand what is going on.
You should not see any errors. Fix any
issues.
STEP 5:
Get MongoDB working in a
Docker
Container (LoggingService microservice)
First, get
down the MongoDB database Server into a new container. Do
this by executing
the following docker command:
docker run --hostname
mongodb --name LoggingService -p 28017:28017 -p 27017:27017 -e
MONGODB_PASS="password" -d mongo:3.4-xenial
Read the MongoDB
page
on the docker hub to make sure you understand the implication of
these
port assignments. Once you have that container down (and
running), obtain a bash shell in
that container by running docker exec into the container.
Once
you are in your LoggingService container, install some software
in the
container:
apt-get update
apt-get install vim
apt-get install net-tools
apt-get install openssh-client
apt-get install default-jdk
Next, you'll
need to install both
the mongodb and
rabbitmq java client jarballs:
root@mongodb/# cd /opt
root@mongodb:/opt# scp
userid@linux.cs.uchicago.edu:/stage/classes/archive/2019/fall/51205-1/libs/* .
[enter your password on the cluster]
root@mongodb:/opt# ls rabbit*
rabbitmq-java-client.tgz
root@:/opt# tar xzvf rabbitmq-java-client.tgz
root@mongodb:/opt# find rabbitmq-java-client/
rabbitmq-java-client/
rabbitmq-java-client/slf4j-simple-1.7.22.jar
rabbitmq-java-client/amqp-client-4.0.2.jar
rabbitmq-java-client/slf4j-api-1.7.21.jar
root@mongodb:/opt# ls mongo*
mongo-java-client.tgz
root@mongodb:/opt# tar xzvf mongo-java-client.tgz
root@mongodb:/opt# find mongo-java-client
/opt/mongo-java-client/
/opt/mongo-java-client/mongo-java-driver-2.13.3.jar
/opt/mongo-java-client/gson-2.6.2.jar
/opt/mongo-java-client/._mongo-java-driver-2.13.3.jar
/opt/mongo-java-client/._gson-2.6.2.jar
Now, we need to download our java source code.
Now, cd to the
highest-level "/" directory.
root@mongodb:/# scp
userid@linux.cs.uchicago.edu:/home/mark/pub/51205/src.labs/lab4/mongodb.src.tgz .
[enter your password on the cluster]
Now, untar that tarball:
root@mongodb:/opt# tar xzvf mongodb.src.tgz
Then type "cd /src".
Now, set your classpath (you will need to do this everytime you
log in, or add the call to your .bashrc file):
root@mongodb:/src/# . set.classpath.sh
root@mongodb:/src/# echo $CLASSPATH
/opt/rabbitmq-java-client/amqp-client-4.0.2.jar:/opt/rabbitmq-java-client/slf4j-api-1.7.21.jar:/opt/rabbitmq-java-client/slf4j-simple-1.7.22.jar:/opt/mongo-java-client/mongo-java-driver-2.13.3.jar::.
Type "javac *.java" to compile everything.
root@mongodb:/src# javac *.java
Examine the java source code beginning with Recv.java
carefully. Make sure you understand what is going on.
You should not see any errors. Fix any
issues.
STEP 6:
Run it all.
WebServer startup:
The WebServer should still be running. You may need to
update the
IP address of UserManagement in the servlet code. Get into
your
UserManagement container and type "ifconfig" and note the inet
addr for
eth0. It should be something like "172.17.0.4". Edit
the
code
located at
/usr/local/tomcat/webapps/mpcs/WEB-INF/classes/HelloWorldServlet.java.
Search
for 172.17. Then change that to the correct IP address for
the RMIServer running in UserManagement. Makd sure that
that
address matches your actual IP address of UserManagement.
Save
the file and recompile.
Now, go back to your Tomcat Web Application
Manager, and refresh the
page. Scroll down and you will see
mpcs. Click on Reload.
UserManagement startup:
Now run the server:
root@usrmgr:/src/RMI# java RMIServer
LoggingService startup:
Now run the server:
root@mongodb:/src# java Recv
RabbitMQ startup:
Of course, MyWabbit should already be
running, if it's not, start it again (docker start MyWabbit).
Docker exec into your MyWabbit container
(if you're not
already there). You will need to create a new queue.
For
the source code to work, the queue needs to be named
"mark.queue". Create the queue from the RabbitMQ
Management
Console. Make
the queue a direct exchange and make it durable. Do not
set it
for
auto delete and do not make it internal. You did something
similar in Lab 3. Refer to Lab 3 STEP 5 if you have any
questions
on how to do this.
STEP 7:
Execute.
The WebServer should still be running. Go to the webapp
with the create new user page (http://localhost:8080/mpcs/jsps/starter.kit.html)
and enter a new user and a new user password. Click on the
button.
Then, navigate to your LoggingService terminal, and see if you
have new
output. You should see a lot of MONGODB:... output, but
the last
line should be "Message To Log: {...}" and you should see that
the
newPassword is set to the password you entered and the
newUserName
field is set to the new user name you entered.
Hit control-C (^-C) to exit out of the Recv program, and then
run mongo:
root@mongodb:/src# mongo
At the ">" prompt in mongo, type the
following commands:
> show dbs
> use
loggingService
> show
collections
>
db.logging.find().pretty()
> quit()
And you should see the log for the new user you created in
mongodb, as a new document.
Note that the default
logging location for Tomcat is
/usr/local/tomcat/logs/*. You will find that the log calls
(for debugging purposes...not
your logging calls to the LoggingService) in the
servlet go to a file called "localhost.2019.11.14.log" (your
mileage
may vary with the name, but you can grep the logs directory for
"context.log"), and the log calls inside the servlet code look
like
this:
...
context.log("in doPost");
context.log("in Preparing to call RMI");
String userName =
request.getParameter( "user_name" );
context.log("userName is: "+userName);
String userPassword =
request.getParameter( "user_password" );
context.log("userPassword is: "+userPassword);
...
A sample of the output of this logging looks like this:
14-Nov-2019 23:19:05.540 INFO [http-apr-8080-exec-17]
org.apache.catalina.core.ApplicationContext.log in doGet
14-Nov-2019 23:19:05.540 INFO [http-apr-8080-exec-17]
org.apache.catalina.core.ApplicationContext.log calling doPost
14-Nov-2019 23:19:05.540 INFO [http-apr-8080-exec-17]
org.apache.catalina.core.ApplicationContext.log in doPost
14-Nov-2019 23:19:05.540 INFO [http-apr-8080-exec-17]
org.apache.catalina.core.ApplicationContext.log in Preparing to call RMI
14-Nov-2019 23:19:05.541 INFO [http-apr-8080-exec-17]
org.apache.catalina.core.ApplicationContext.log userName is: joe
14-Nov-2019 23:19:05.541 INFO [http-apr-8080-exec-17]
org.apache.catalina.core.ApplicationContext.log userPassword is: blow
14-Nov-2019 23:19:05.541 INFO [http-apr-8080-exec-17]
org.apache.catalina.core.ApplicationContext.log in doPost
Preparing to
call RabbitMQ
14-Nov-2019 23:19:05.555 INFO [http-apr-8080-exec-17]
org.apache.catalina.core.ApplicationContext.log in doPost
Preparing to
call RMI
14-Nov-2019 23:19:05.557 INFO [http-apr-8080-exec-17]
org.apache.catalina.core.ApplicationContext.log RemoteInterface
and
registery set up with address and port
You can add context.log() calls to enhance your understanding of
what
the servlet code is doing. The other programs (RMIServer
and
Recv) all log straight to the console.
STEP 8:
Review.
It
might behoove you to now go back "down" through the code, from
the
tomcat servlet through the UserManagement service through the
LoggingService code, and make sure you understand what all is
taking
place here.
STEP 9:
Your turn (only if you want).
Now,
the servlet really doesn't know whether the user and password
were
actually successfully logged in the mongodb database.
Frankly, in
the real world, that's perfectly fine, and the cost of doing
business
"fire and forget". But what if the servlet did want to know that the
data was successfully logged before it returned from
doPost? Let's imagine that we do care.
Now, create a
Request/Reply queue in the Rabbit management console (one
each) and have the servlet create a CorrelationID (you can
hard-code
this CorrelationID) after it has made the call to the RMI server
in
UserManagement, and send the CorrelationID via the Request queue
from
doPost().
Then, inside the LoggingService
code, after
successfully writing the data to the mongodb database, have the
LoggingService
retrieve the CorrelationID from the Request queue and send it
back to
the servlet via the Reply queue, which will be listening to the
Reply
queue.
Once the servlet receives the CorrelationID back from the
LoggingService via the Reply queue, the servlet can then
consider its
work "done". Create both the Request and Reply queues as
durable.
Hints: You will need to add the amqp jar to the Tomcat's
lib directory and restart the Tomcat WebServer container.
References:
You
may
find the following references helpful (in addition to the links
from previous labs):
Ubuntu
package
commands
The docker page
for MongoDB
MongoDB
Documentation Home Page
Microservices resources at MongoDB
General Docker Tutorial Links
Docker
Cheat
Sheet
Submitting:
Use the folder named "lab_4" in your Subversion repository.
Upload your Lab 4 microservice tarballs to this repo.
Please include a README text file that contains any instructions
for the TAs to assist with grading, and design notes are often
the most useful thing you can provide. We do not usually need
any info on how to compile your code unless your code layout is
arcane.