Lab
1
Details for MPCS 56600
Each
lab
will consist of a small problem and details of
how to proceed. Each lab is intended to give every student
hands-on
experience with the core concepts and technologies covered
during the course.
A student may concentrate, as a team member, on one technology
over
another for the final project, but labs are designed to give
each and
every student exposure to all the technologies that come into
play. You need to submit labs to the TAs for
grading--see submission instructions below.
Generally, unless otherwise specified, you will have one week to
complete each assigned lab.
See
the
syllabus for information on grading. Turning in lab
assignments on time is required, without exception, and all late deliveries will be
penalized,
regardless of cause.
Submit
your
assignments to the subversion repository according to the
directions on the syllabus page.
You
may
write these solutions in any programming language of
your choice. Our suggestion is now is not the time to
learn a new programming language along with the concepts
themselves. So our suggestion is to use whatever
programming language you know best.
Lab 1
Due: 5:00 pm, Monday, April 8, 2019
System Setup
and Software Installation:
BACKGROUND:
Like
all
programming problems, learning a new technology is not an
exercise in
reading but rather an exercise in thinking and typing.
This lab is designed
to help you install the bitcoin core software we will be using
throughout the course. You
will generally find the References section below helpful in
addition to
the required and recommended reading.
This lab has no specific deliverable, and is not graded.
WHAT YOU NEED TO DO:
STEP 1: Installing
Bitcoin Core
Bitcoin Core requires a one-time initial download of
about 180GB of data plus a further 5-10GB per month to install the
full Mainnet Bitcoin blockchain. By default, you will need to
store all of that data (if running the mainnet), but if you enable
pruning, you can store as little as 6GB total without
sacrificing any security. For more information about setting up
Bitcoin Core, please read the full node guide.
For our purposes, we will be running on Testnet. The Bitcoin Wiki
contains some information about Testnet, including wallets and
faucets (free monopoly money!).
The instructions that follow are for setting up bitcoin core on a
Mac computer. Those running a linux distribution will follow
similar instructions. Those installing on a Windows computer
will need to refer to the Windows installation instructions here.
Go to https://bitcoincore.org/en/download/
and download the version 0.17.1 of the software. Install it
but do not start it. We cannot give step-by-step
installation instructions for multiple environments, so these
pages will be helpful if you have questions about installing the
software on different hardware and operating system platforms.Note
in all cases we will be installing the current version of bitcoin
core, which is 0.17.1.
MAC Instructions:
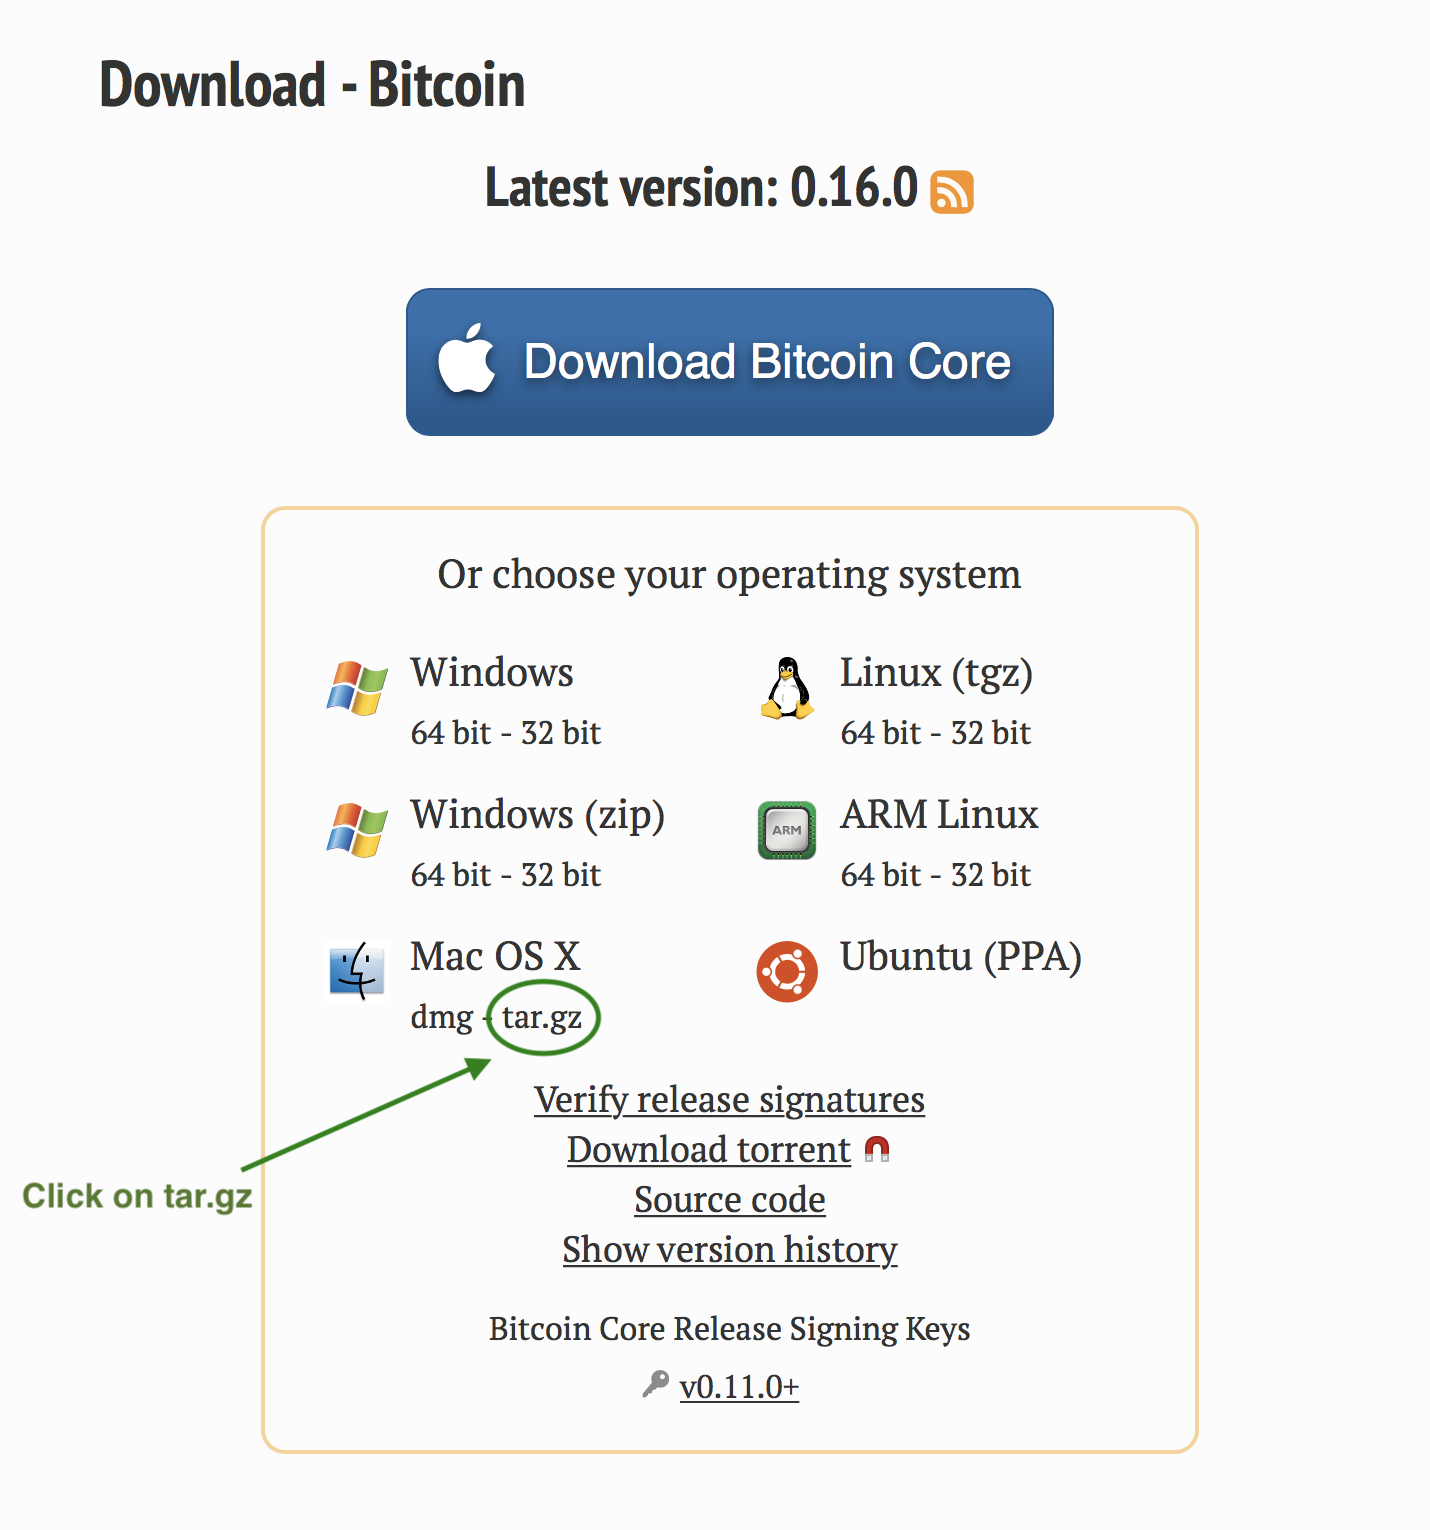
Go to https://bitcoincore.org/en/download/
and download the version 0.17.1 of the software for the
mac. Make sure you download the tar.gz file, as in
here:
After downloading, you will have a new tar file called bitcoin-0.17.1-osx64.tar. Untar
this file (and you may need to gunzip it as well if it doesn't
do that automatically, you can simply do this under the
~/Downloads directory if you wish):
Either:
$
tar xzvf bitcoin-0.17.1-osx64.tar.gz
or:
$ tar xvf bitcoin-0.17.1-osx64.tar
Take a look at what's there:
$ ls bitcoin-0.17.1
Next, cd to your /usr/local directory:
$ cd /usr/local
Next, create a Bitcoin directory there (don't change into that
directory just yet):
$ sudo
mkdir Bitcoin
Then, set your rights on that directory so you don't have to
keep running sudo:
$ sudo
chmod u+rwX Bitcoin
Next, cd to your new Bitcoin directory:
$ cd
Bitcoin/
Now, copy all the files and directories from your download
directory into your /usr/local/Bitcoin directory:
$ sudo
cp -r ~/Downloads/bitcoin-0.17.1/* .
Now do an ls -la on your directory. You should see a bin,
include, lib, and share directory there.
Next, add the /usr/local/Bitcoin/bin directory to your PATH (do
this in your .bash_profile or .bashrc file, whichever you're
running). Start a new shell or refresh your environment in
your current shell (as in: . ./.bashrc). Make sure
what when you type:
$ which
bitcoin-qt
You see:
/usr/local/Bitcoin/bin/bitcoin-qt
Now, run it:
$ bitcoin-qt
You will see a warning dialog saying that it will install under
(again this is the Mac) ~/Library/Application Support/Bitcoin,
and it will also warn you that you're going to need some 280
GIGABYTES of free space, of which you will perhaps have less
than that, possibly much less. NO WORRIES. We're not
going to actually download the entire Bitcoin
Mainnet. We're just going to let it think it's
doing that...let it get itself started.
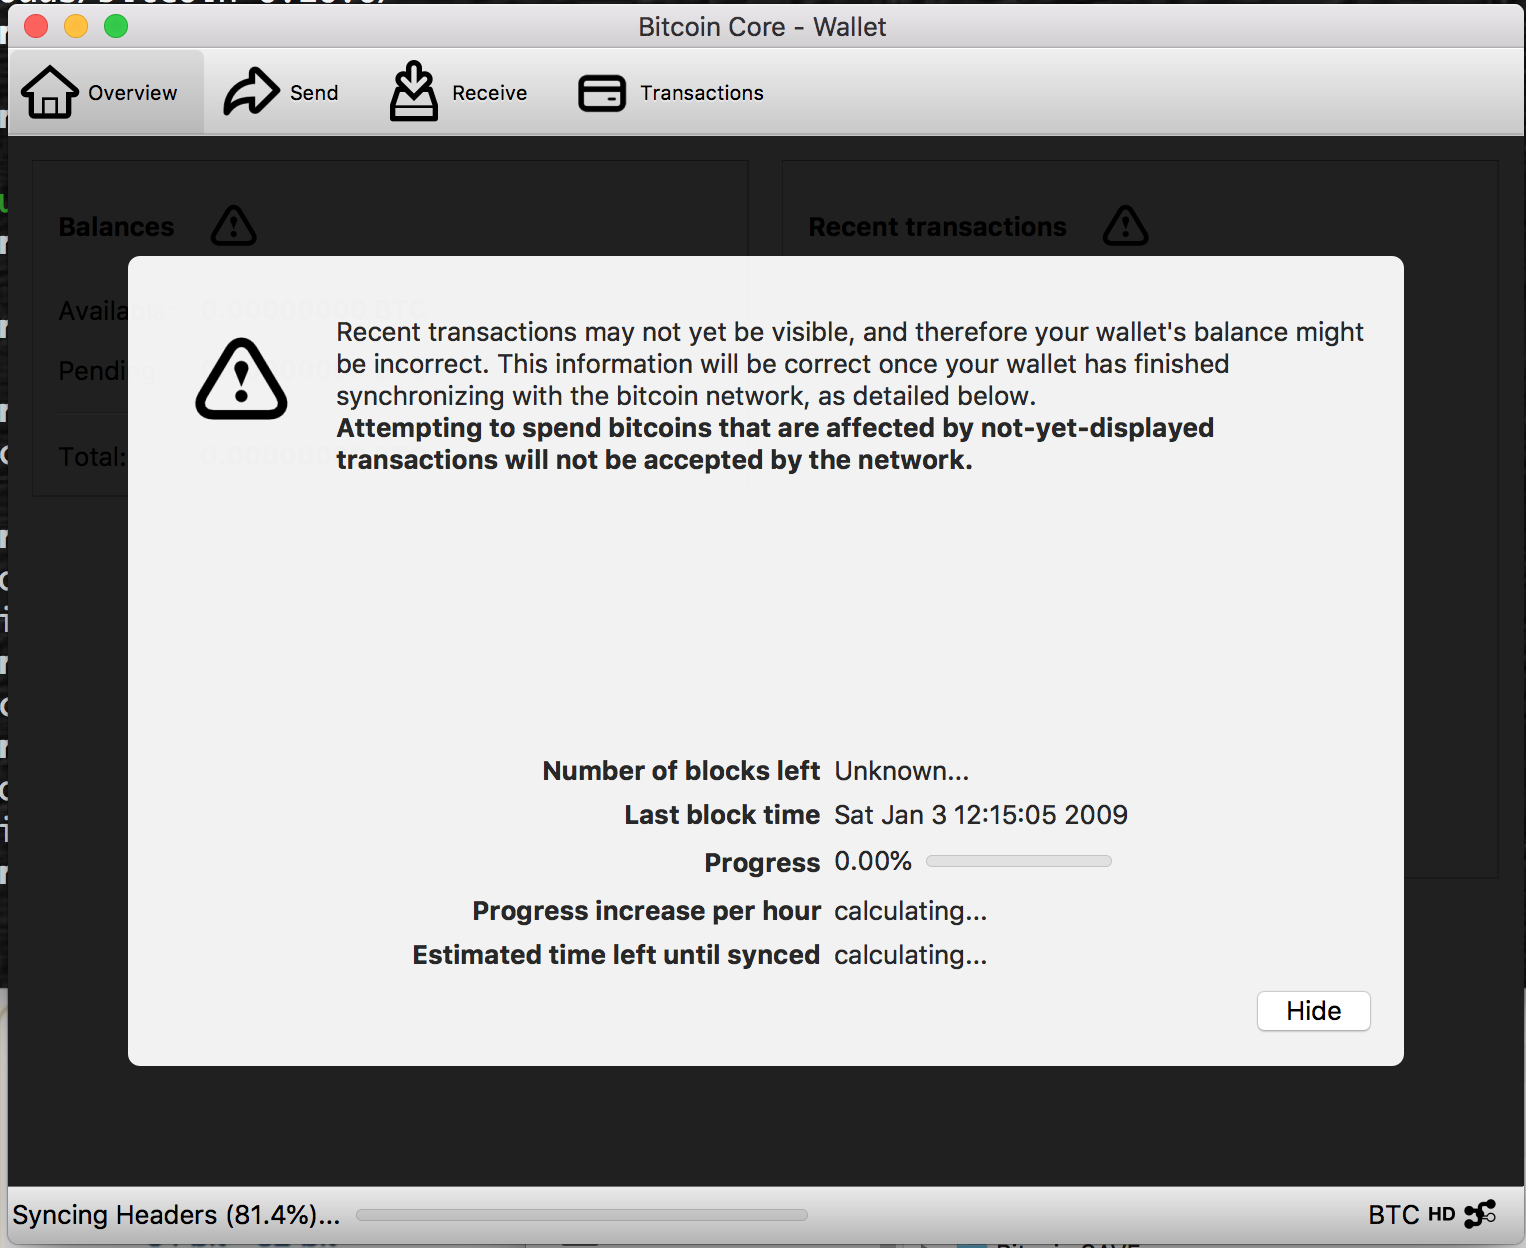
Once you click on Continue, you'll see that it starts "Syncing
Headers" in the lower left status bar. The picture below
shows headers at 81.4% complete. Let it get to 100%.
Once you've got all the headers, it will begin to actually
download the bitcoin blockchain. Again, don't panic if you
only have 20 gig free. We're not going to let it get close
to that.
You'll see that it starts downloading blocks in the blockchain,
and that will look like this:
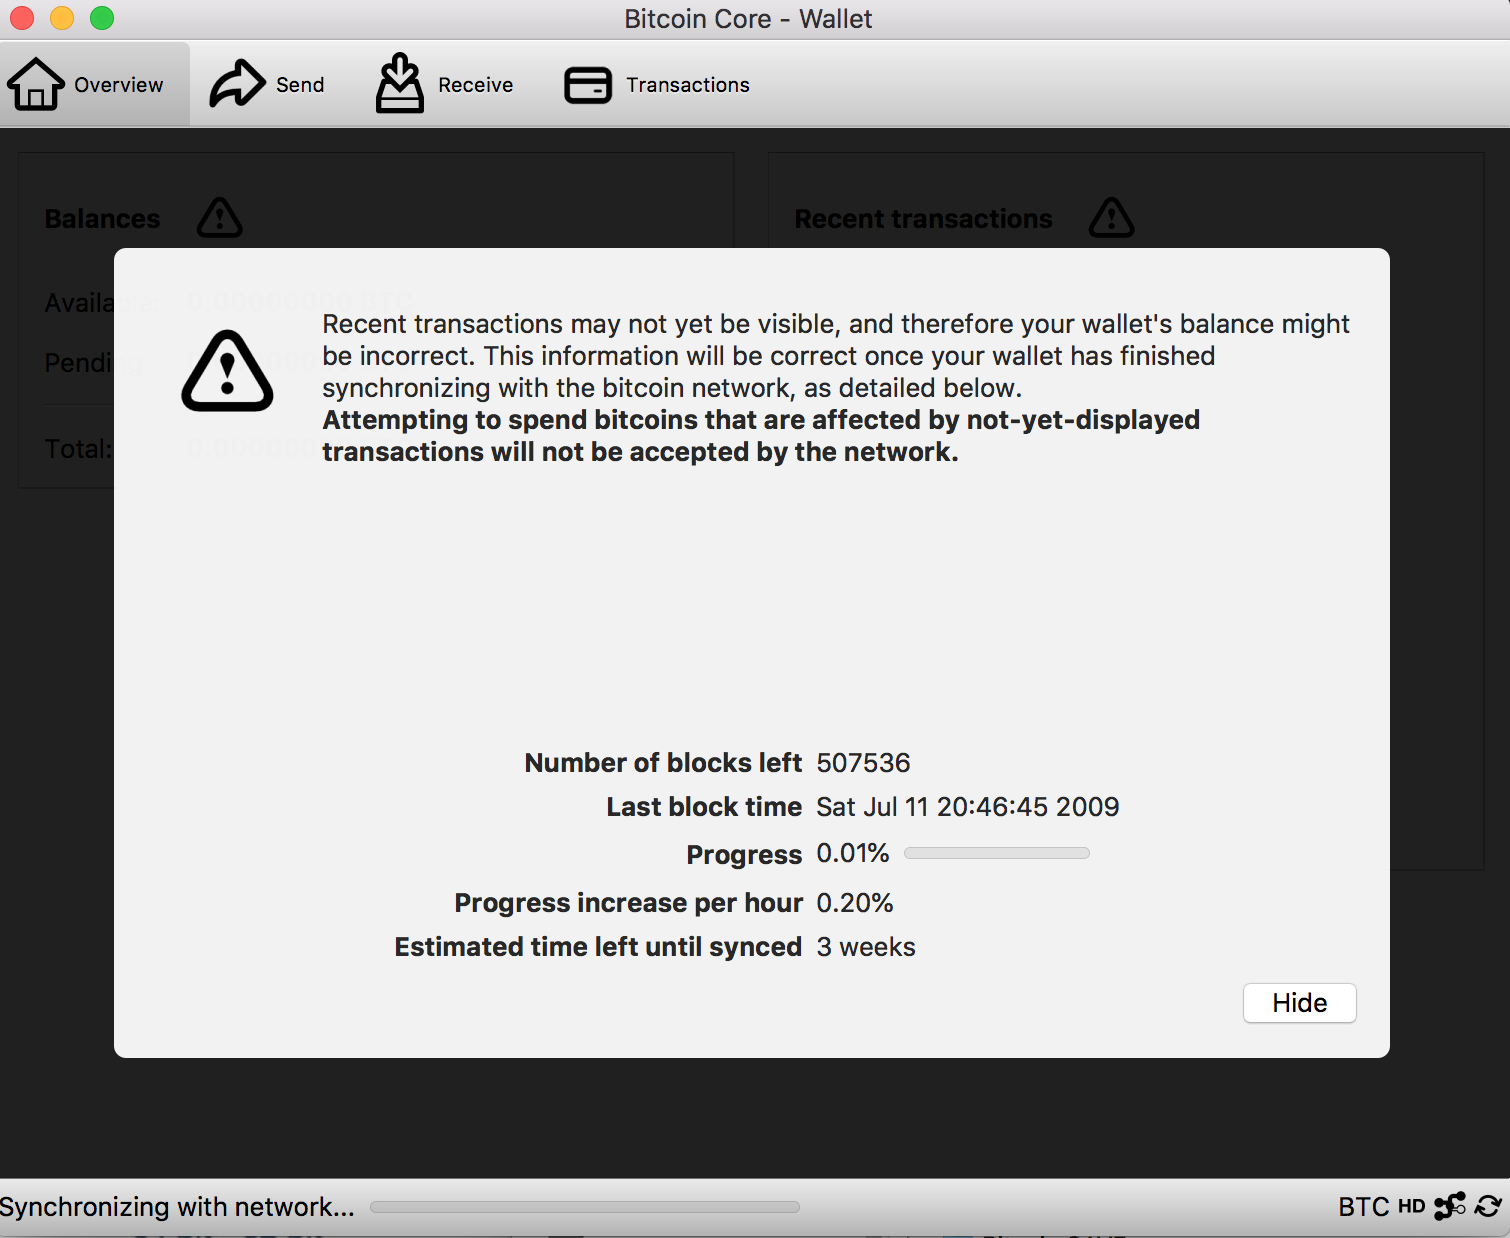
In this image, you can see that it's begun "Synchronizing with
network..." (see status bar lower left). This is a GOOD
SIGN. You're downloading the Bitcoin blockchain. But
to you really want to spend "3 weeks" downloading the whole
enchilada? This screen shows there's over half a million
blocks still to download. Once you see that the blocks are
successfully downloading, you can click on File/Close to exit out
of bitcoin-qt. This will be that last time we run this in
our labs.
WHERE ARE WE? We have successfully installed the bitcoin
core software, and we have initialized our environment and
software. Now, let's look in that Bitcoin directory:
$ ls -1
~/Library/Application\ Support/Bitcoin
Note the escaping of the space before the word Support.
You should see (something like) the following files and
directories:
banlist.dat
blocks
chainstate
debug.log
fee_estimates.dat
mempool.dat
peers.dat
wallets
Notice there's a directory there called "wallets".
Congratulations! You've got a wallet to play around
with.
NOW, we need to set up a config file for
mainnet. Download this file
(bitcoin.MAINNET.conf) into your ~/Library/Application\
Support/Bitcoin directory. Make sure
it's there. Now, edit the file and
modify the following two lines:
rpcuser=markrpc
to a username you like, like "paulrpc" or
"billybob".
Next, create a hard-to-guess password that
you've never used before and replace the
following rpcpassword text from
"CHANGE_THIS_TO_SOMETHING" to a password of
your choice:
rpcpassword=CHANGE_THIS_TO_SOMETHING
You
can use a password manager to generate a
good one or you can just type random letters
and numbers there. This is used only
on your machine and you don't have to
remember it. So just make it look
somewhat random, like (don't use this
but...):
rpcpassword=sdjfa3u98hfleiurhf88
I literally just typed a bunch of "random"
letters and numbers.
Once updated, save the file and exit.
NOW, we need to change over from Mainnet to Testnet, so we can
play around with Monopoly Bitcoins and not real ones!
Download this file (bitcoin.conf) into
your ~/Library/Application\
Support/Bitcoin directory. Make sure it's
there. Now, edit the file and modify the following
two lines:
rpcuser=markrpc
to a username you like, like "paulrpc" or "billybob".
Next, create a hard-to-guess password that you've never
used before and replace the following rpcpassword text
from "CHANGE_THIS_TO_SOMETHING" to a password of your
choice:
rpcpassword=CHANGE_THIS_TO_SOMETHING
You
can use a password manager to generate a good one or you
can just type random letters and numbers there.
This is used only on your machine and you don't have to
remember it. So just make it look somewhat random,
like (don't use this but...):
rpcpassword=sdjfa3u98hfleiurhf88
I literally just typed a bunch of "random" letters and
numbers. Note it can simply be the same password
you typed into your mainnet conf file above.
Once updated, save the file and exit.
Now, you're going to manually kick off bitcoind
(previously bitcoin-qt did it for you). To do
this, in your terminal, type:
$ bitcoind -testnet --printtoconsole
You'll see a TON of output, starting with something like
this (I've elided some of the text):
2018-06-10 17:22:20 Bitcoin Core version v0.16.0
(release build)
2018-06-10 17:22:20 InitParameterInteraction: parameter
interaction: -whitelistforcerelay=1 -> setting
-whitelistrelay=1
2018-06-10 17:22:20 Assuming ancestors of block
0000000000000000005214481d2d96f898e3d5416e43359c145944a909d242e0
have valid signatures.
2018-06-10 17:22:20 Setting
nMinimumChainWork=000000000000000000000000000000000000000000f91c579d57cad4bc5278cc
2018-06-10 17:22:20 Using the 'sse4' SHA256
implementation
2018-06-10 17:22:20 Using RdRand as an additional
entropy source
2018-06-10 17:22:20 Default data directory
/Users/mark/Library/Application Support/Bitcoin
2018-06-10 17:22:20 Using data directory
/Users/mark/Library/Application Support/Bitcoin
2018-06-10 17:22:20 Using config file
/Users/mark/Library/Application
Support/Bitcoin/bitcoin.conf
2018-06-10 17:22:20 Using at most 125 automatic
connections (2560 file descriptors available)
2018-06-10 17:22:20 Using 16 MiB out of 32/2 requested
for signature cache, able to store 524288 elements
2018-06-10 17:22:20 Using 16 MiB out of 32/2 requested
for script execution cache, able to store 524288
elements
2018-06-10 17:22:20 Using 4 threads for script
verification
2018-06-10 17:22:20 scheduler thread start
2018-06-10 17:22:20 Using wallet directory
/Users/mark/Library/Application Support/Bitcoin/wallets
2018-06-10 17:22:20 init message: Verifying wallet(s)...
2018-06-10 17:22:20 Using BerkeleyDB version Berkeley DB
4.8.30: (April 9, 2010)
2018-06-10 17:22:20 Using wallet wallet.dat
2018-06-10 17:22:20 CDBEnv::Open:
LogDir=/Users/mark/Library/Application
Support/Bitcoin/wallets/database
ErrorFile=/Users/mark/Library/Application
Support/Bitcoin/wallets/db.log
2018-06-10 17:22:20 Cache configuration:
2018-06-10 17:22:20 * Using 2.0MiB for block index
database
2018-06-10 17:22:20 * Using 8.0MiB for chain state
database
2018-06-10 17:22:20 * Using 440.0MiB for in-memory UTXO
set (plus up to 286.1MiB of unused mempool space)
2018-06-10 17:22:20 init message: Loading block index...
2018-06-10 17:22:20 Opening LevelDB in
/Users/mark/Library/Application
Support/Bitcoin/blocks/index
2018-06-10 17:22:21 Opened LevelDB successfully
2018-06-10 17:22:21 Using obfuscation key for
/Users/mark/Library/Application
Support/Bitcoin/blocks/index: 0000000000000000
2018-06-10 17:22:21 LoadBlockIndexDB: last block file =
0
2018-06-10 17:22:21 LoadBlockIndexDB: last block file
info: CBlockFileInfo(blocks=0, size=0, heights=0...0,
time=1970-01-01...1970-01-01)
2018-06-10 17:22:21 Checking all blk files are
present...
2018-06-10 17:22:21 LoadBlockIndexDB: transaction index
disabled
2018-06-10 17:22:21 Initializing databases...
2018-06-10 17:22:21 Pre-allocating up to position
0x1000000 in blk00000.dat
2018-06-10 17:22:21 Opening LevelDB in
/Users/mark/Library/Application
Support/Bitcoin/chainstate
2018-06-10 17:22:21 Opened LevelDB successfully
2018-06-10 17:22:21 Wrote new obfuscate key for
/Users/mark/Library/Application
Support/Bitcoin/chainstate: 5b53589e86e2cec3
2018-06-10 17:22:21 Using obfuscation key for
/Users/mark/Library/Application
Support/Bitcoin/chainstate: 5b53589e86e2cec3
2018-06-10 17:22:21 init message: Rewinding blocks...
2018-06-10 17:22:21 block
index
470ms
2018-06-10 17:22:21 init message: Loading wallet...
2018-06-10 17:22:21 nFileVersion = 160000
2018-06-10 17:22:21 Keys: 0 plaintext, 0 encrypted, 0 w/
metadata, 0 total
2018-06-10 17:22:21 Performing wallet upgrade to 60000
2018-06-10 17:22:22 keypool added 2000 keys (1000
internal), size=2000 (1000 internal)
2018-06-10 17:22:22
wallet
1445ms
2018-06-10 17:22:22 setKeyPool.size() = 2000
2018-06-10 17:22:22 mapWallet.size() = 0
2018-06-10 17:22:22 mapAddressBook.size() = 0
2018-06-10 17:22:22 UpdateTip: new
best=000000000019d6689c085ae165831e934ff763ae46a2a6c172b3f1b60a8ce26f
height=0 version=0x00000001 log2_work=32.000022 tx=1
date='2009-01-03 18:15:05' progress=0.000000
cache=0.0MiB(0txo)
2018-06-10 17:22:22 Failed to open mempool file from
disk. Continuing anyway.
2018-06-10 17:22:22 mapBlockIndex.size() = 1
2018-06-10 17:22:22 nBestHeight = 0
2018-06-10 17:22:22 torcontrol thread start
2018-06-10 17:22:22
AddLocal([2601:248:200:4516:815:bf31:6b66:e526]:8333,1)
2018-06-10 17:22:22 Discover: IPv6 en0:
2601:248:200:4516:815:bf31:6b66:e526
2018-06-10 17:22:22
AddLocal([2601:248:200:4516:7d26:76b:d7a3:d013]:8333,1)
2018-06-10 17:22:22 Discover: IPv6 en0:
2601:248:200:4516:7d26:76b:d7a3:d013
2018-06-10 17:22:22
AddLocal([2601:248:200:4516::931c]:8333,1)
2018-06-10 17:22:22 Discover: IPv6 en0:
2601:248:200:4516::931c
2018-06-10 17:22:22 Bound to [::]:8333
2018-06-10 17:22:22 Bound to 0.0.0.0:8333
2018-06-10 17:22:22 init message: Loading P2P
addresses...
2018-06-10 17:22:22 ERROR: DeserializeFileDB: Failed to
open file /Users/mark/Library/Application
Support/Bitcoin/peers.dat
2018-06-10 17:22:22 Invalid or missing peers.dat;
recreating
2018-06-10 17:22:22 init message: Loading banlist...
2018-06-10 17:22:22 ERROR: DeserializeFileDB: Failed to
open file /Users/mark/Library/Application
Support/Bitcoin/banlist.dat
2018-06-10 17:22:22 Invalid or missing banlist.dat;
recreating
2018-06-10 17:22:22 init message: Starting network
threads...
2018-06-10 17:22:22 net thread start
2018-06-10 17:22:22 dnsseed thread start
2018-06-10 17:22:22 addcon thread start
2018-06-10 17:22:22 init message: Done loading
2018-06-10 17:22:22 opencon thread start
2018-06-10 17:22:22 msghand thread start
2018-06-10 17:22:22 Loading addresses from DNS seeds
(could take a while)
2018-06-10 17:22:22 GUI: Platform customization:
"macosx"
2018-06-10 17:22:23 GUI: PaymentServer::LoadRootCAs:
Loaded 169 root certificates
2018-06-10 17:22:24 New outbound peer connected:
version: 70015, blocks=526877, peer=0
2018-06-10 17:22:24 220 addresses found from DNS seeds
2018-06-10 17:22:24 dnsseed thread exit
2018-06-10 17:22:25 New outbound peer connected:
version: 70015, blocks=526877, peer=1
2018-06-10 17:22:26 New outbound peer connected:
version: 70015, blocks=526877, peer=2
2018-06-10 17:22:27 New outbound peer connected:
version: 70015, blocks=526877, peer=3
2018-06-10 17:22:27 New outbound peer connected:
version: 70015, blocks=526877, peer=4
2018-06-10 17:22:35 New outbound peer connected:
version: 70015, blocks=526877, peer=5
2018-06-10 17:22:39 New outbound peer connected:
version: 70015, blocks=526877, peer=6
2018-06-10 17:22:57 New outbound peer connected:
version: 70015, blocks=526877, peer=7
And then, it may just hang there for a while...no
worries, it's just bootstrapping and setting up peer
nodes to talk to, and download the TESTNET blockchain
from. Be patient. This could take from 1 to
10 minutes, depending on bandwidth, etc.
Eventually, you should see the following output:
2018-06-10 17:23:36 Pre-allocating up to position
0x100000 in rev00000.dat
2018-06-10 17:23:36 UpdateTip: new
best=00000000839a8e6886ab5951d76f411475428afc90947ee320161bbf18eb6048
height=1 version=0x00000001 log2_work=33.000022 tx=2
date='2009-01-09 02:54:25' progress=0.000000
cache=0.0MiB(1txo)
2018-06-10 17:23:36 UpdateTip: new
best=000000006a625f06636b8bb6ac7b960a8d03705d1ace08b1a19da3fdcc99ddbd
height=2 version=0x00000001 log2_work=33.584985 tx=3
date='2009-01-09 02:55:44' progress=0.000000
cache=0.0MiB(2txo)
2018-06-10 17:23:36 UpdateTip: new
best=0000000082b5015589a3fdf2d4baff403e6f0be035a5d9742c1cae6295464449
height=3 version=0x00000001 log2_work=34.000022 tx=4
date='2009-01-09 03:02:53' progress=0.000000
cache=0.0MiB(3txo)
2018-06-10 17:23:36 UpdateTip: new
best=000000004ebadb55ee9096c9a2f8880e09da59c0d68b1c228da88e48844a1485
height=4 version=0x00000001 log2_work=34.32195 tx=5
date='2009-01-09 03:16:28' progress=0.000000
cache=0.0MiB(4txo)
2018-06-10 17:23:36 UpdateTip: new
best=000000009b7262315dbf071787ad3656097b892abffd1f95a1a022f896f533fc
height=5 version=0x00000001 log2_work=34.584985 tx=6
date='2009-01-09 03:23:48' progress=0.000000
cache=0.0MiB(5txo)
2018-06-10 17:23:36 UpdateTip: new
best=000000003031a0e73735690c5a1ff2a4be82553b2a12b776fbd3a215dc8f778d
height=6 version=0x00000001 log2_work=34.807377 tx=7
date='2009-01-09 03:29:49' progress=0.000000
cache=0.0MiB(6txo)
2018-06-10 17:23:36 UpdateTip: new
best=0000000071966c2b1d065fd446b1e485b2c9d9594acd2007ccbd5441cfc89444
height=7 version=0x00000001 log2_work=35.000022 tx=8
date='2009-01-09 03:39:29' progress=0.000000
cache=0.0MiB(7txo)
2018-06-10 17:23:36 UpdateTip: new
best=00000000408c48f847aa786c2268fc3e6ec2af68e8468a34a28c61b7f1de0dc6
height=8 version=0x00000001 log2_work=35.169947 tx=9
date='2009-01-09 03:45:43' progress=0.000000
cache=0.0MiB(8txo)
2018-06-10 17:23:36 UpdateTip: new
best=000000008d9dc510f23c2657fc4f67bea30078cc05a90eb89e84cc475c080805
height=9 version=0x00000001 log2_work=35.32195 tx=10
date='2009-01-09 03:54:39' progress=0.000000
cache=0.0MiB(9txo)
2018-06-10 17:23:36 UpdateTip: new
best=000000002c05cc2e78923c34df87fd108b22221ac6076c18f3ade378a4d915e9
height=10 version=0x00000001 log2_work=35.459454 tx=11
date='2009-01-09 04:05:52' progress=0.000000
cache=0.0MiB(10txo)
. . .
This is great news. You've started with block
height 1 from January 9, 2009, downloaded that block,
then downloaded the next block at height 2, then the
block at height 3, and on and on and on. Feel free
to let this run for a while. When you get bored,
simply press "Ctrl-C" in your terminal window and
bitcoind will shut down gracefully like a boss.
Whenever you subsequently run bitcoind -testnet
--printtoconsole, you'll see the following output at
startup of bitcoind:
2018-06-10 18:44:41 Bitcoin Core version v0.16.0
(release build)
2018-06-10 18:44:41 InitParameterInteraction: parameter
interaction: -blocksonly=1 -> setting
-whitelistrelay=0
2018-06-10 18:44:41 Assuming ancestors of block
0000000002e9e7b00e1f6dc5123a04aad68dd0f0968d8c7aa45f6640795c37b1
have valid signatures.
2018-06-10 18:44:41 Setting
nMinimumChainWork=00000000000000000000000000000000000000000000002830dab7f76dbb7d63
2018-06-10 18:44:41 WalletParameterInteraction:
parameter interaction: -blocksonly=1 -> setting
-walletbroadcast=0
2018-06-10 18:44:41 Using the 'sse4' SHA256
implementation
2018-06-10 18:44:41 Using RdRand as an additional
entropy source
2018-06-10 18:44:41 Default data directory
/Users/mark/Library/Application Support/Bitcoin
2018-06-10 18:44:41 Using data directory /Users/mark/Library/Application
Support/Bitcoin/testnet3
2018-06-10 18:44:41 Using config file
/Users/mark/Library/Application
Support/Bitcoin/bitcoin.conf
2018-06-10 18:44:41 Using at most 16 automatic
connections (256 file descriptors available)
2018-06-10 18:44:41 Using 16 MiB out of 32/2 requested
for signature cache, able to store 524288 elements
2018-06-10 18:44:41 Using 16 MiB out of 32/2 requested
for script execution cache, able to store 524288
elements
2018-06-10 18:44:41 Using 0 threads for script
verification
2018-06-10 18:44:41 scheduler thread start
2018-06-10 18:44:41 Binding RPC on address 0.0.0.0 port
18332 failed.
2018-06-10 18:44:41 HTTP: creating work queue of depth
16
2018-06-10 18:44:41 Config options rpcuser and
rpcpassword will soon be deprecated. Locally-run
instances may remove rpcuser to use cookie-based auth,
or may be replaced with rpcauth. Please see
share/rpcuser for rpcauth auth generation.
2018-06-10 18:44:41 HTTP: starting 4 worker threads
2018-06-10 18:44:41 Using wallet directory /Users/mark/Library/Application
Support/Bitcoin/testnet3/wallets
2018-06-10 18:44:41 init message: Verifying wallet(s)...
2018-06-10 18:44:41 Using BerkeleyDB version Berkeley DB
4.8.30: (April 9, 2010)
2018-06-10 18:44:41 Using wallet wallet.dat
2018-06-10 18:44:41 CDBEnv::Open: LogDir=/Users/mark/Library/Application
Support/Bitcoin/testnet3/wallets/database
ErrorFile=/Users/mark/Library/Application
Support/Bitcoin/testnet3/wallets/db.log
I've highlighted above the things you'll want to make
sure you see as you run TESTNET in bold above.
Mainly, you want to make sure that bitcoind is operating
out of testnet3. See bold entries above...Don't
worry about the RPC binding error.
Now, we're going to create a few aliases to help us
along. Linux people you can do the same.
Windows users, you'll either have to write some proshell
scripts or run cygwin or just type out the
contents of the aliases manually (with Windows slashes
replaced, etc.).
First, let's establish a symbolic link to our Mac
Library bitcoin subdirectory:
ln -s /Users/[YOURID]/Library/Application\
Support/Bitcoin/ .bitcoin
This will make things a little easier in getting to our
Bitcoin directory, how instead of typing, with the
escaping:
cd /Users/mark/Library/Application\
Support/Bitcoin/
we can simply type (don't forget the '.',
it's a hidden directory):
cd ~/.bitcoin
and we're there. This will make things
a little bit more "linuxy". (Linux
people note you may already have this as
your bitcoin directory).
Now, we
want to append some aliases and exports to your
.bashrc startup file. Download this file and place it
in your home directory.
NOTE: For the following, DO NOT merely open
your .bashrc or .bash_profile file, whichever
you're actively using, and paste the contents of
bashrc.addendum.sh in your file. This will not
work.
Execute (assuming your startup file is .bashrc):
cd
cat bashrc.addendum.sh >> .bashrc
This will add several commands that will hopefully make
your life a little easier running bitcoin core and
especially bitcoin-cli. The lines added are:
export BLOCKCHAIN='testnet'
export BX_CONFIG=/usr/local/etc/libbitcoin/bx.testnet.cfg
alias btcdir="cd ~/.bitcoin/" #linux default bitcoind path
alias bitc='/usr/local/Bitcoin/bin/bitcoin-cli -${BLOCKCHAIN}'
alias bitd='/usr/local/Bitcoin/bin/bitcoind -${BLOCKCHAIN} -printtoconsole'
alias bitd-MAINNET='/usr/local/Bitcoin/bin/bitcoind -conf=bitcoin.MAINNET.conf -printtoconsole'
alias bitc-MAINNET='/usr/local/Bitcoin/bin/bitcoin-cli -conf=bitcoin.MAINNET.conf'
alias btcinfo='bitcoin-cli -${BLOCKCHAIN} getwalletinfo | egrep "\"balance\""; bitcoin-cli -${BLOCKCHAIN} getnetworkinfo | egrep "\"version\"|connections"; bitcoin-cli -${BLOCKCHAIN} getmininginfo | egrep "\"blocks\"|errors"'
alias      btcblockjson="echo \`wget --no-check-certificate -O - https://testnet.blockexplorer.com/api/status?q=getBlockCount 2> /dev/null\`"
alias     btcblocksofar='echo `bitcoin-cli -testnet getblockcount 2>&1`'
alias     btcblocktotal='echo `btcblockjson` | sed "s/.*blocks.:\([0-9]*\).*/\1/"'
alias          btcblock='echo `btcblocksofar`/`btcblocktotal`'
alias btcinfo-MAINNET='bitcoin-cli -conf=bitcoin.MAINNET.conf getwalletinfo | egrep "\"balance\""; bitcoin-cli -${BLOCKCHAIN} getnetworkinfo | egrep "\"version\"|connections"; bitcoin-cli -${BLOCKCHAIN} getmininginfo | egrep "\"blocks\"|errors"'
alias btcblock-MAINNET='echo `bitcoin-cli -conf=bitcoin.MAINNET.conf getblockcount 2>&1`/`wget -O - https://blockexplorer.com/api/status?q=getBlockCount 2> /dev/null | cut -d : -f2 | rev | cut -c 2- | rev`'
The above aliases make life a little easier and allow us
to hop back and forth between mainnet, testnet, and
regtest (later)
Save your .bashrc file (or .bash_profile) and launch a
new terminal.
Now, launch your bitcoind server again, but this time,
use your alias:
$ bitd
You should see your same old output again as it syncs up
with peers, and begins to further download the blocks on
TESTNET. Once you see the blocks being downloaded
again (can take a few seconds to a few minutes), in your
new terminal window, type:
btcblock
You'll see something like:
12799/1487094
This is great news. It tells you that you've
already downloaded 12799 blocks on
TESTNET! That's great. Run it again!
You might see something like this now:
54506/1487094
What does that mean? Well, you've got a pretty
fast internet connection, because you're now up to 54506
blocks. Keep it running. At
some point, you want to see something like this:
1487094/1487094
Congrats. You're up and running.
References:
You
may
find the following references helpful (in addition to the links
from previous labs):
Installing
Bitcoin Core on ubuntu: https://bitzuma.com/posts/getting-started-with-bitcoin-core-on-ubuntu/,
and: https://linuxhint.com/install-bitcoin-core-ubuntu/
Installing Bitcoin Core on Windoze: https://www.deepdotweb.com/2017/05/05/tutorial-start-full-bitcoin-node-windows/
Blockchain Information (Bitcoin): https://blockchain.info
Coindesk Blockchain 101: https://www.coindesk.com/information/
Bitcoin Wiki: https://en.bitcoin.it/wiki/Main_Page
Bitcoin FAQ: https://en.bitcoin.it/wiki/Help:FAQ
Bitcoin Developer’s Reference: https://bitcoin.org/en/developer-reference
Submitting:
Use the folder named "lab1" in your Subversion repository. See
the syllabus for more info about submission using Subversion.
Execute
the following command:
ls
-laF ~/.bitcoin/* > ~/lab.1.out.txt
Upload your lab.1.out.txt
output to your lab directory.