Each lab will consist of a small problem and details of how to proceed. Each lab is intended to give every student hands-on experience with the core concepts and technologies covered during the course. A student may concentrate, as a team member, on one technology over another for the final project, but labs are designed to give each and every student exposure to all the technologies that come into play. You need to submit labs to the TAs for grading--see submission instructions below. Generally, unless otherwise specified, you will have one week to complete each assigned lab.
See the syllabus for information on grading. Turning in lab assignments on time is required, without exception, and all late deliveries will be penalized, regardless of cause. Submit your assignments to the subversion repository according to the directions on the syllabus page.
These
solutions are to be writing in the programming language
prescribed by the instructions. The reason for this is
simple. One cannot write a Java RMI solution in
Haskell. That said, you will not need to be "programming"
in Java (or Python or C++ or Go) in this lab, although you will
be following instructions to build Docker containers and you
will run executables in these languages in their respective
containers. The goal of this lab is to get you introduced
to the networking capabilities of Docker and introduced to Java
RMI (Problem 1) and Google gRPC (Problem 2), so that (Problem 3)
you can distribute your blockchain across multiple containers
and mine from multiple containers that are all communicating in
a peer-to-peer fashion.
Lab 9
Due: See individual
due dates for each Problem below (NOTE:
To receive any points for Lab 9, Problem 3 must be submitted)
CHOOSE
BETWEEN DOING PROBLEM 1 or PROBLEM 2 (DO NOT DO BOTH)
You are to
do either Problem 1 or Problem 2. Both
are worth 1 out of 5 points for this lab. Everyone
will do Problem 3. Problem 3 is worth 4 out of 5
points for this lab. Your key decision point on whether
to opt for Problem 1 or Problem 2 will be whether you are
working in Java and would prefer the simplicity of Java RMI
network communication (Problem 1) or you wish to
explore Google gRPC (Problem 2). Note that you can still
do gRPC using Java as well (and instructions are
below)...so this is totally up to you. Everyone working
in a language other than Java will likely opt for Problem 2
(although there are no rules here...you can still choose
Problem 1 even if you're programming in Haskell or
Go....).
Problem 1: Java RMI and Docker Networking: Due: 6:00 pm, Tuesday, June 11, 2019 (revised 6/10)
BACKGROUND:
WHAT YOU NEED TO DO:
There are two shell scripts that you will use to document your work with this lab (that utilize the script command), one if you're working on linux, and the other if you're working on MacOS. Contact the TA if you're working on Windows. We will be looking to see if you have successfully run all the commands required in the lab. Note that you may "play around" further with options and other commands, even as you work through the lab. Therefore if your script output shows additional commands etc., that's perfectly fine (in fact it's great!). We will simply be grading the subset of required commands that you are to follow when working through the this lab and subsequent labs, and will ignore any output that we see that is not part of the lab requirements.
Create a working directory (perhaps something like "~/mpcs56600/lab7" and in that directory type either runscript.linux.sh or runscript.mac.sh. That will launch a new shell (in your same window), but all your commands and output will be recorded in a file with an extension of "*.out". Once you are finished with Step 3 of this lab, simply type "exit" or press "^d" and you will exit the subshell and your activity will be saved in the script output. Your script output will be saved in a file with your login id and a date-time stamp. The filename will look something like "mark.Tue.Sep.19.17-59-26.CDT.2017.out". Your userid and time stamp will of course be different. This is the file you will submit for grading per the submission instructions below.
STEP 1:
For this lab problem, we are going to code a little container that will accept a synchronous call over RMI to a server. That RMI Server will echo back the string sent from the RMI Client, and return it to the RMI Client running in a separate container.
First,
make
sure docker is running either on your laptop (Option I from the
first lab) or in your VM (Option II from the first lab).
STEP 2:
Get Java RMI working in a Docker Container (SERVER)STEP 3:
Get Java RMI working in a separate Docker Container (CLIENT)$ docker ps >Problem1.out $ docker diff RMIServer >>Problem1.out $ docker diff RMIClient >>Problem1.outYou can shut things down now (Ctrl-C out of java RMIServer).Once back at your host prompt, type:
Problem 2: gRPC and Docker Networking: Due: 6:00 pm, Tuesday, June 11, 2019 (revised 6/10)
BACKGROUND:
WHAT YOU NEED TO DO:
There are two shell scripts that you will use to document your work with this lab (that utilize the script command), one if you're working on linux, and the other if you're working on MacOS. Contact the TA if you're working on Windows. We will be looking to see if you have successfully run all the commands required in the lab. Note that you may "play around" further with options and other commands, even as you work through the lab. Therefore if your script output shows additional commands etc., that's perfectly fine (in fact it's great!). We will simply be grading the subset of required commands that you are to follow when working through the this lab and subsequent labs, and will ignore any output that we see that is not part of the lab requirements.
Create a working directory (perhaps something like "~/mpcs56600/lab7" and in that directory type either runscript.linux.sh or runscript.mac.sh. That will launch a new shell (in your same window), but all your commands and output will be recorded in a file with an extension of "*.out". Once you are finished with Step 3 of this lab, simply type "exit" or press "^d" and you will exit the subshell and your activity will be saved in the script output. Your script output will be saved in a file with your login id and a date-time stamp. The filename will look something like "mark.Tue.Sep.19.17-59-26.CDT.2017.out". Your userid and time stamp will of course be different. This is the file you will submit for grading per the submission instructions below.
We will be working with containers that contains Google Protocol
Buffers and example gRPC code (from google) for the following
language bindings:
java [https://grpc.io/docs/tutorials/basic/java.html]
C++ [https://grpc.io/docs/tutorials/basic/c.html#generating-client-and-server-code]
go [https://grpc.io/docs/quickstart/go.html#install-protocol-buffers-v3]
python [https://grpc.io/docs/tutorials/basic/python.html]
There is a quickstart guide for each language (implementing simple HelloWorld):
gRPC
Guides: https://grpc.io/docs/guides/
gRPC Tutorials: https://grpc.io/docs/tutorials/
C++: https://grpc.io/docs/quickstart/cpp.html
Java: https://grpc.io/docs/quickstart/java.html
Go: https://grpc.io/docs/quickstart/go.html
Python: https://grpc.io/docs/quickstart/python.html
These are the simplest introductions to the various language bindings.
STEP 1:
Download
the file : grpc-lab7.tar.bz2. from
/home/mark/pub/56600/src.labs/LAB.7 It's over a gig in
size, so it will take a minute or so.
bunzip2
it. (install bunzip2 if you need to).
Load it into docker:
$
docker load < grpc-lab7.tar
18f9b4e2e1bc: Loading layer
[==================================================>]
129.3MB/129.3MB
a021c4ee5b3a: Loading layer
[==================================================>]
281.1MB/281.1MB
7656f8e9f9d5: Loading layer
[==================================================>]
182.3MB/182.3MB
ecb7d1e409dd: Loading layer
[==================================================>]
664.6MB/664.6MB
cb19c93edb8e: Loading layer
[==================================================>]
208MB/208MB
f6ba9235b10c: Loading layer
[==================================================>]
1.886GB/1.886GB
680f7dcf7877: Loading layer
[==================================================>]
691.2kB/691.2kB
bcab93a01dd1: Loading layer
[==================================================>]
234.4MB/234.4MB
Loaded image: grpc-lab7:mpcs56600
Now,
run:
$
docker images
REPOSITORY
TAG
IMAGE
ID
CREATED
SIZE
grpc-lab7
mpcs56600
d1e7bbaa08a1 16
hours ago 3.53GB
Now,
run a new docker image to create a GRPC_SERVER container:
docker run -it --hostname grpc_server --name GRPC_SERVER grpc-lab7:mpcs56600 /bin/bash
this
creates a new container based on grpc:mpcs5660 called
GRPC_SERVER:
$ docker ps
CONTAINER ID
IMAGE
COMMAND
CREATED
STATUS
PORTS
NAMES
7e298f1b6e59
grpc-lab7:mpcs56600
"/bin/bash"
Less than a second ago Up 3
seconds
GRPC_SERVER
Now, exec into your new GRPC_SERVER container:
$
docker exec -it GRPC_SERVER /bin/bash
root@grpc_server:/#
Run the C++ server:
cd to /src/grpc/examples/cpp/helloworld
root@grpc_server:/src/grpc/examples/cpp/helloworld#
./greeter_server
Server listening on 172.17.0.3:50051
Now,
confirm that the server is functioning by opening another
terminal window, exec'ing into the same container (as above),
and changing into the same helloworld cpp directory, and
executing:
root@grpc_server:/src/grpc/examples/cpp/helloworld#
./greeter_client
Greeter received: Hello world
You
are looking to see Hello world printed out. Great.
Now, run a python test:
$
docker run -it --hostname grpc_client_python --name
GRPC_CLIENT_PYTHON --link GRPC_SERVER:grpc_server
grpc-lab7:mpcs56600 /bin/bash
If you open another terminal window on your host, and run docker ps, you should see your new python container:
$
docker ps
CONTAINER
ID
IMAGE
COMMAND
CREATED
STATUS
PORTS
NAMES
7f07214e3521
grpc-lab7:mpcs56600
"/bin/bash" 41
seconds ago Up 52
seconds
GRPC_CLIENT_PYTHON
7e298f1b6e59
grpc-lab7:mpcs56600
"/bin/bash" 10
minutes ago Up 10
minutes
GRPC_SERVER
Now, execute the following cat command:
root@grpc_client_python:/#
cat /etc/hosts
127.0.0.1 localhost
::1 localhost ip6-localhost
ip6-loopback
fe00::0 ip6-localnet
ff00::0 ip6-mcastprefix
ff02::1 ip6-allnodes
ff02::2 ip6-allrouters
172.17.0.2 grpc_server grpc_server
GRPC_SERVER
172.17.0.3 grpc_client_python
Notice
that docker has kindly added a HOSTS link to your GRPC_SERVER
which is aliased as "grpc_server". This is nice and very
kind of Docker, and the magic happened because you added
the --link GRPC_SERVER:grpc_server line in your
docker run command for your GRPC_CLIENT_PYTHON above.
Well,
let's see if this stuff works. Execute:
root@grpc_client_python:/src/grpc/examples/python/helloworld#
python greeter_client.py
Greeter client received: Hello you
root@grpc_client_python:/#
$ docker ps
CONTAINER
ID
IMAGE
COMMAND
CREATED
STATUS
PORTS
NAMES
5098b903220e
grpc-lab7:mpcs56600
"/bin/bash" 8
minutes ago Up 10
minutes
GRPC_CLIENT_PYTHON
a0cad78cfbf2
grpc-lab7:mpcs56600
"/bin/bash"
About an hour ago Up About an
hour
GRPC_CLIENT_GO
3a597e796815
grpc-lab7:mpcs56600
"/bin/bash"
About an hour ago Up About an
hour
GRPC_CLIENT_JAVA
c0fe154dbc9a
grpc-lab7:mpcs56600
"/bin/bash" 2
hours ago Up 2
hours
GRPC_SERVER
In your python container you just ran, cd to the
/src/grpc/examples/python/helloworld directory, and then
execute:
root@grpc_client_python:/src/grpc/examples/python/helloworld#
python greeter_client.py
Greeter client received: Hello you
This is wonderful! The python client (you should of course
examine the python client code) has done this to communicate to
the GRPC_SERVER in the other container:
channel =
grpc.insecure_channel('grpc_server:50051')
stub = helloworld_pb2_grpc.GreeterStub(channel)
response =
stub.SayHello(helloworld_pb2.HelloRequest(name='you'))
print("Greeter client received: " +
response.message)
It has created a channel to the grpc_server listening on port 50051, and has created an RPC stub, and has called the server's SayHello function (remember the server is written in C++) passing it the parameter "you". The response back from the server is: "Hello you". You can of course change the name from the anonymous "you" to your own name.
Ok,
so far, so good. Now let's run a Go container.
First, exit out of the GRPC_CLIENT_PYTHON container. Then,
execute:
docker
run -it --hostname grpc_client_go --name GRPC_CLIENT_GO --link
GRPC_SERVER:grpc_server grpc-lab7:mpcs56600 /bin/bash
et voila! There you are in your brand new GRPC_CLIENT_GO container:
root@grpc_client_go:/#
From
that other free terminal, execute:
$
docker ps
CONTAINER
ID
IMAGE
COMMAND
CREATED
STATUS
PORTS
NAMES
cb1c098fbbf9
grpc-lab7:mpcs56600
"/bin/bash" 54
seconds ago Up About a
minute
GRPC_CLIENT_GO
7e298f1b6e59
grpc-lab7:mpcs56600
"/bin/bash" 25
minutes ago Up 25
minutes
GRPC_SERVER
Whoa
Nellie! What happened to the Python container????
Well, when you exited it's bash shell, the container
stopped. No matter, it's still there:
$
docker ps -a
CONTAINER
ID
IMAGE
COMMAND
CREATED
STATUS
PORTS
NAMES
cb1c098fbbf9
grpc-lab7:mpcs56600
"/bin/bash" 2
minutes ago Up 2
minutes
GRPC_CLIENT_GO
7f07214e3521
grpc-lab7:mpcs56600
"/bin/bash" 16
minutes ago Exited (0) 2 minutes
ago
GRPC_CLIENT_PYTHON
7e298f1b6e59
grpc-lab7:mpcs56600
"/bin/bash" 26
minutes ago Up 26
minutes
GRPC_SERVER
If
you ever want to start it again, all you have to do is execute:
docker
start GRPC_CLIENT_PYTHON in a terminal window and you're back in
it.
$
docker start GRPC_CLIENT_PYTHON
GRPC_CLIENT_PYTHON
From
another window:
$ docker ps
CONTAINER
ID
IMAGE
COMMAND
CREATED
STATUS
PORTS
NAMES
cb1c098fbbf9
grpc-lab7:mpcs56600
"/bin/bash" 3
minutes ago Up 3
minutes
GRPC_CLIENT_GO
7f07214e3521
grpc-lab7:mpcs56600
"/bin/bash" 18
minutes ago Up 6
seconds
GRPC_CLIENT_PYTHON
7e298f1b6e59
grpc-lab7:mpcs56600
"/bin/bash" 27
minutes ago Up 28
minutes
GRPC_SERVER
Then,
in another free terminal window you can just exec into
the running python container:
$
docker exec -it GRPC_CLIENT_PYTHON /bin/bash
root@grpc_client_python:/#
Ok,
back to our Go container. Get back into the window where
you executed the docker run command for GRPC_CLIENT_GO. It
will have the prompt "root@grpc_client_go:/#".
Now,
let's execute the Go client against our C++ server. First,
in the Go container, type once more:
root@grpc_client_go:/#
cat /etc/hosts
127.0.0.1 localhost
::1 localhost ip6-localhost
ip6-loopback
fe00::0 ip6-localnet
ff00::0 ip6-mcastprefix
ff02::1 ip6-allnodes
ff02::2 ip6-allrouters
172.17.0.2 grpc_server grpc_server
GRPC_SERVER
172.17.0.3 grpc_client_go
There
she is! grpc_server again! Excellent.
Now,
let's run the Go client against the C++ server:
Make sure we have our GOPATH set appropriately (should be...):
env |grep go
See:
PATH=/usr/local/go/bin:/usr/local/sbin:/usr/local/bin:/usr/sbin:/usr/bin:/sbin:/bin
GOPATH=/root/go
If you see your PATH includes /usr/local/go/bin and your GOPATH
set, you're "good to go".
cd to the go source directory:
cd ~/go/src
Now, do an "ls" on that directory, and you'll see several
directories, including google.golang.org/
That directory contains the go language examples.
Execute:
ls google.golang.org/grpc/examples/helloworld
Here, you'll see the greeter code. There's a little change
we need to make. cd to the
google.golang.org/grpc/examples/helloworld/greeter_client
directory:
root@grpc_client_go:~/go/src $ cd
google.golang.org/grpc/examples/helloworld/greeter_client
Then, change this code in main.go:
const
(
address = "localhost:50051"
defaultName = "world"
)
to
this:
const
(
/*address = "localhost:50051"*/
address = "grpc_server:50051"
defaultName = "world"
)
This way our go program will be hitting our C++ server in the
other container.
Now
build the go client:
go generate
google.golang.org/grpc/examples/helloworld/greeter_client
If all goes well (this is Unix of course), you'll see
nothing. That's good news.
Now, you can execute the go client:
root@grpc_client_go:~/go/src/google.golang.org/grpc/examples/helloworld/greeter_client#
go run main.go
2018/07/23 14:14:52 Greeting: Hello world
Hot
diggity dog. It worked. Pro.
Now, we'll run a Java client. Exit out of your Go container, and then execute:
docker run -it --hostname grpc_client_java --name
GRPC_CLIENT_JAVA --link GRPC_SERVER:grpc_server
grpc-lab7:mpcs56600 /bin/bash
root@grpc_client_java:/#
root@grpc_client_java:/# cat /etc/hosts
127.0.0.1
localhost
::1 localhost ip6-localhost
ip6-loopback
fe00::0 ip6-localnet
ff00::0 ip6-mcastprefix
ff02::1 ip6-allnodes
ff02::2 ip6-allrouters
172.17.0.2 grpc_server grpc_server
GRPC_SERVER
172.17.0.3 grpc_client_java
Note the actual IP address for the grpc_server
(above it is "172.17.0.2"). You'll need that in a
minute.
Now, we've got to go into the Java client and modify the
server address (similar to what we did in our Go example
above).
Edit the file: HelloWorldClient.java
In the main() method, we need to update the server
IP address with the IP address for the grpc_server from the
/etc/hosts file, so modify this line:
HelloWorldClient client = new
HelloWorldClient("localhost", 50051);
to this:
//HelloWorldClient client = new
HelloWorldClient("localhost", 50051);
HelloWorldClient client = new
HelloWorldClient("172.17.0.2", 50051);
Of course we're assuming your grpc_server address is
"172.17.0.2". You'll of course change it to whatever
YOUR server's IP address is.
Now, cd back into your ~/java/grpc-java/examples
directory, and rebuild the Java code:
Now, rebuild java client:
./gradlew installDist
Starting a
Gradle Daemon, 1 incompatible and 1 stopped Daemons could
not be reused, use --status for details
BUILD SUCCESSFUL in 12s
12 actionable tasks: 12 up-to-date
You're looking for that happy green BUILD SUCCESSFUL line.
Now, run the java client:
./build/install/examples/bin/hello-world-client
You should see something like this output from the java
client:
root@grpc_client_java:~/java/grpc-java/examples#
./build/install/examples/bin/hello-world-client
Jul 23, 2018
2:40:01 PM io.grpc.examples.helloworld.HelloWorldClient
greet
INFO: Will try to greet world ...
Jul 23, 2018 2:40:02 PM
io.grpc.examples.helloworld.HelloWorldClient greet
INFO: Greeting: Hello world
Whatever the date, it's that last "INFO" line that's
important. That's the greeting from the C++ server.
Feel free to examine the Java source code that is generated in
the following files and directories:
./src/main/java/io/grpc/examples/helloworld/*
./build/generated/source/proto/main/grpc/io/grpc/examples/helloworld/GreeterGrpc.java
This latter file is the java stub genereated by the protocol
compiler.
Now with all your containers from this
problem running (start them again if you've
stopped them), execute the following from a prompt on your
host system (NOT in a container):
$ docker ps >Problem2.out
$
docker diff GRPC_SERVER >>Problem2.out
$ docker diff GRPC_CLIENT_PYTHON>>Problem2.out
$ docker diff
GRPC_CLIENT_JAVA >>Problem2.out
$ docker diff GRPC_CLIENT_GO >>Problem2.out
Exit out of your Java container.
You can now stop your C++ server and exit out of the
GRPC_SERVER container.
Ensure you have your terminal logs and submit these. You may need to type exit to stop one or more runscript sessions.
REMEMBER: At any
point now you can simply start and stop your containers,
so, for example, if you wanted to restart your Java
container, and then stop it again, you'd just
execute:
$ docker ps
CONTAINER
ID
IMAGE
COMMAND
CREATED
STATUS
PORTS
NAMES
7f07214e3521
grpc-lab7:mpcs56600
"/bin/bash"
About an hour ago Up 45
minutes
GRPC_CLIENT_PYTHON
7e298f1b6e59
grpc-lab7:mpcs56600
"/bin/bash"
About an hour ago Up About an
hour
GRPC_SERVER
$ docker start
GRPC_CLIENT_JAVA
GRPC_CLIENT_JAVA
$ docker ps
CONTAINER
ID
IMAGE
COMMAND
CREATED
STATUS
PORTS
NAMES
61095b85983b
grpc-lab7:mpcs56600
"/bin/bash"
21 minutes ago Up 5
seconds
GRPC_CLIENT_JAVA
7f07214e3521
grpc-lab7:mpcs56600
"/bin/bash"
About an hour ago Up About an
hour
GRPC_CLIENT_PYTHON
7e298f1b6e59
grpc-lab7:mpcs56600
"/bin/bash"
About an hour ago Up About an
hour
GRPC_SERVER
$ docker stop
GRPC_CLIENT_JAVA
GRPC_CLIENT_JAVA
$ docker ps
CONTAINER
ID
IMAGE
COMMAND
CREATED
STATUS
PORTS
NAMES
7f07214e3521
grpc-lab7:mpcs56600
"/bin/bash"
About an hour ago Up About an
hour
GRPC_CLIENT_PYTHON
7e298f1b6e59
grpc-lab7:mpcs56600
"/bin/bash"
About an hour ago Up About an
hour
GRPC_SERVER
Same with any of the other containers.
This concludes Problem 2.
Problem 3: Distributing your Blockchain using Docker Networking and Docker Compose: Due: 6:00 pm, Tuesday, June 11, 2019 (revised 6/10)
BACKGROUND:
WHAT YOU NEED TO DO:
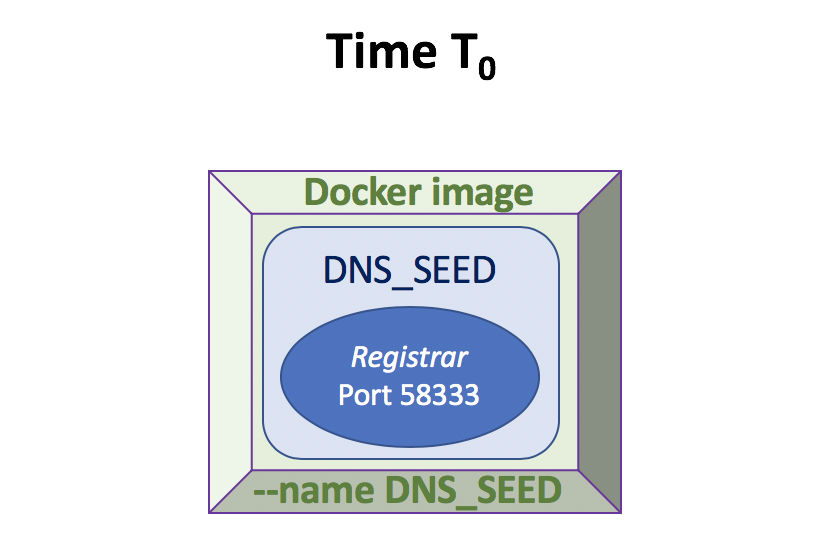
STEP 1 (Time T0):
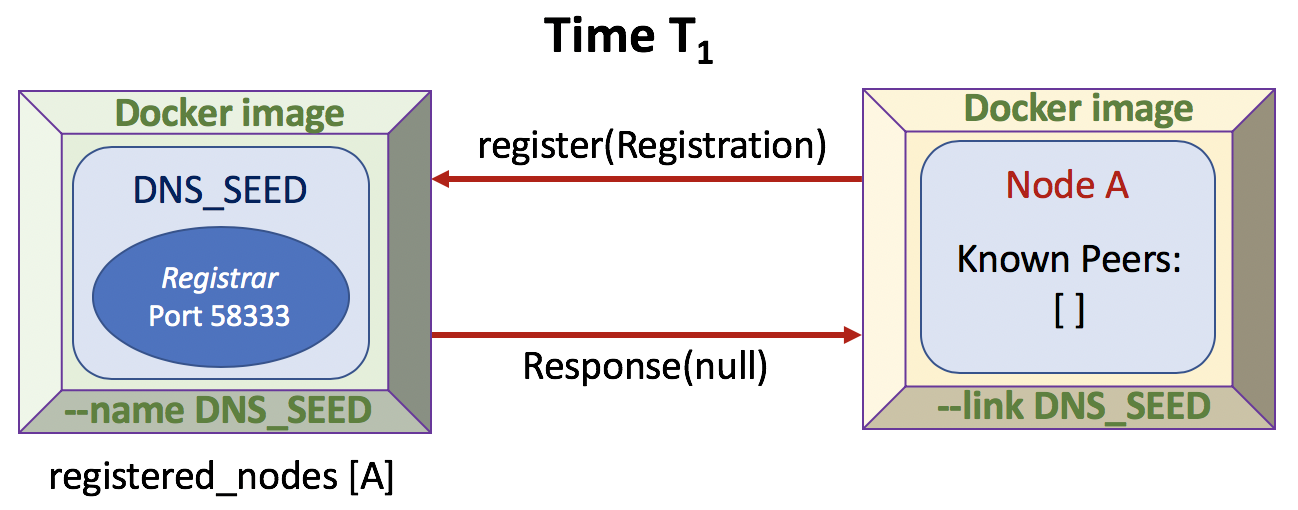
STEP 2 (Time T1):
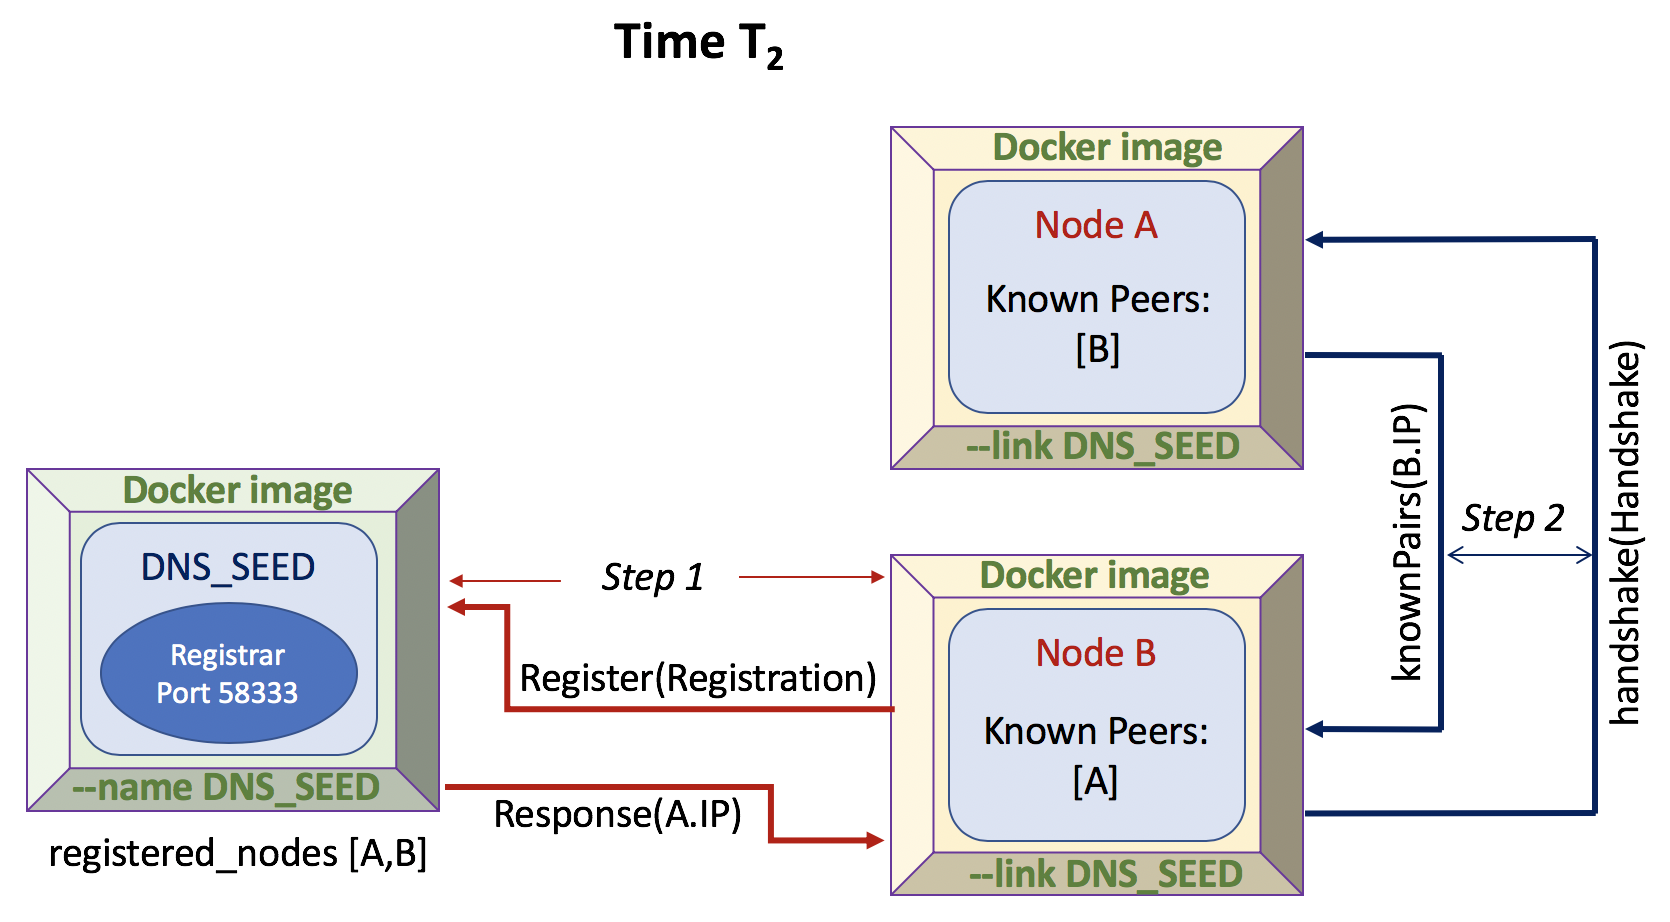
STEP 3 (Time T2):
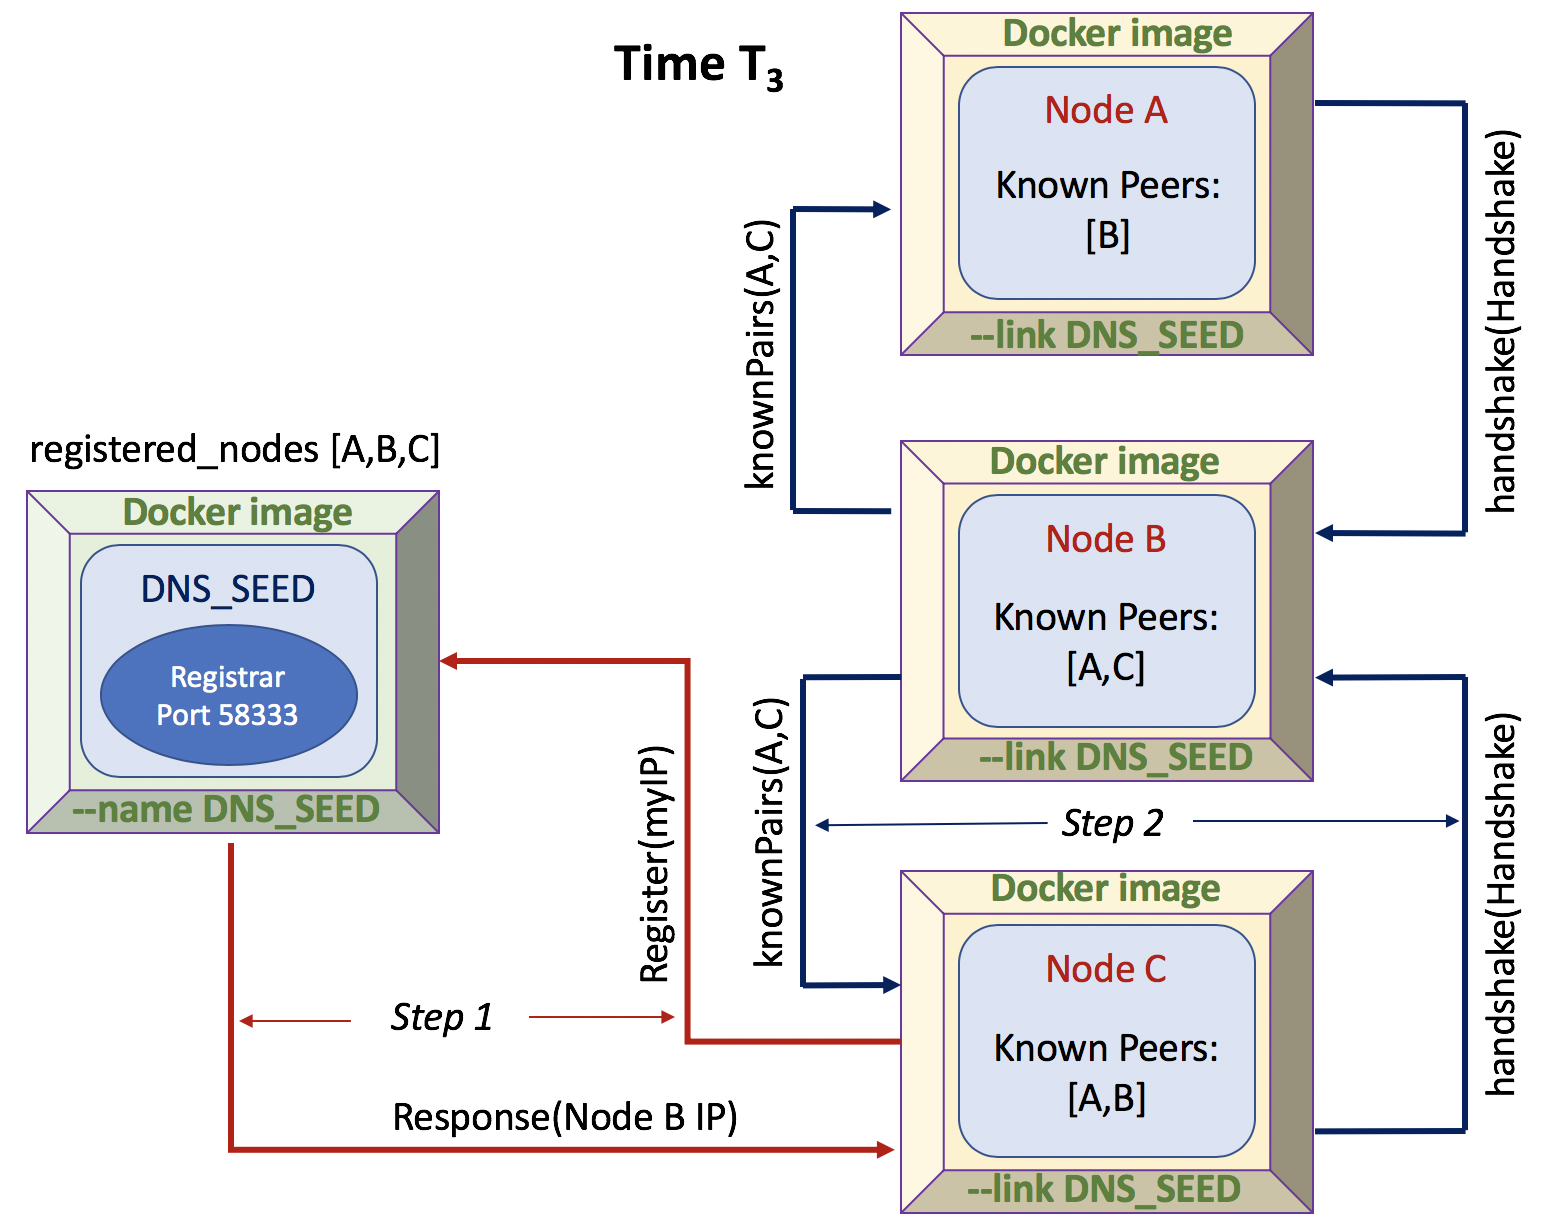
STEP 4 (Time T3):
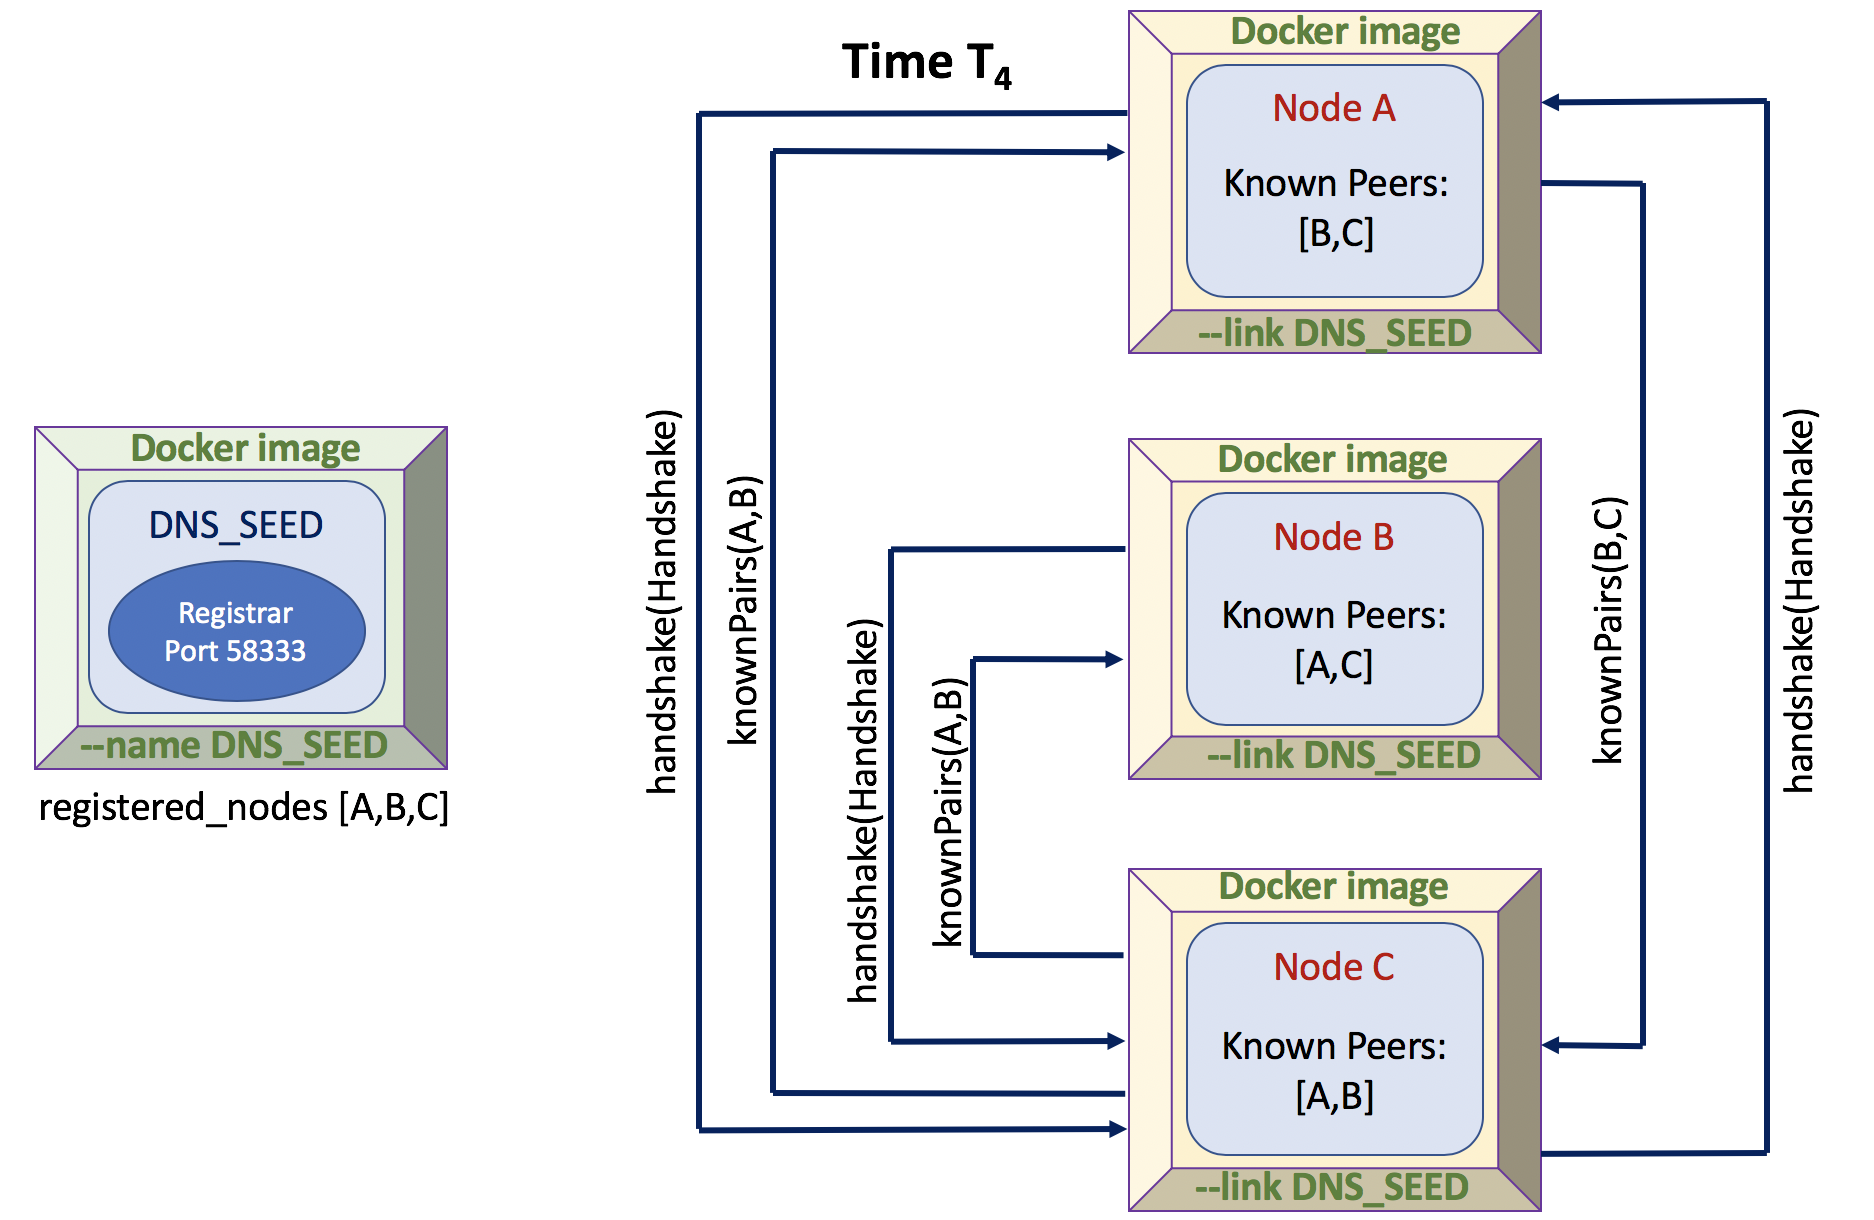
STEP 5 (Time T4):
STEP 6 (Time T5..n):
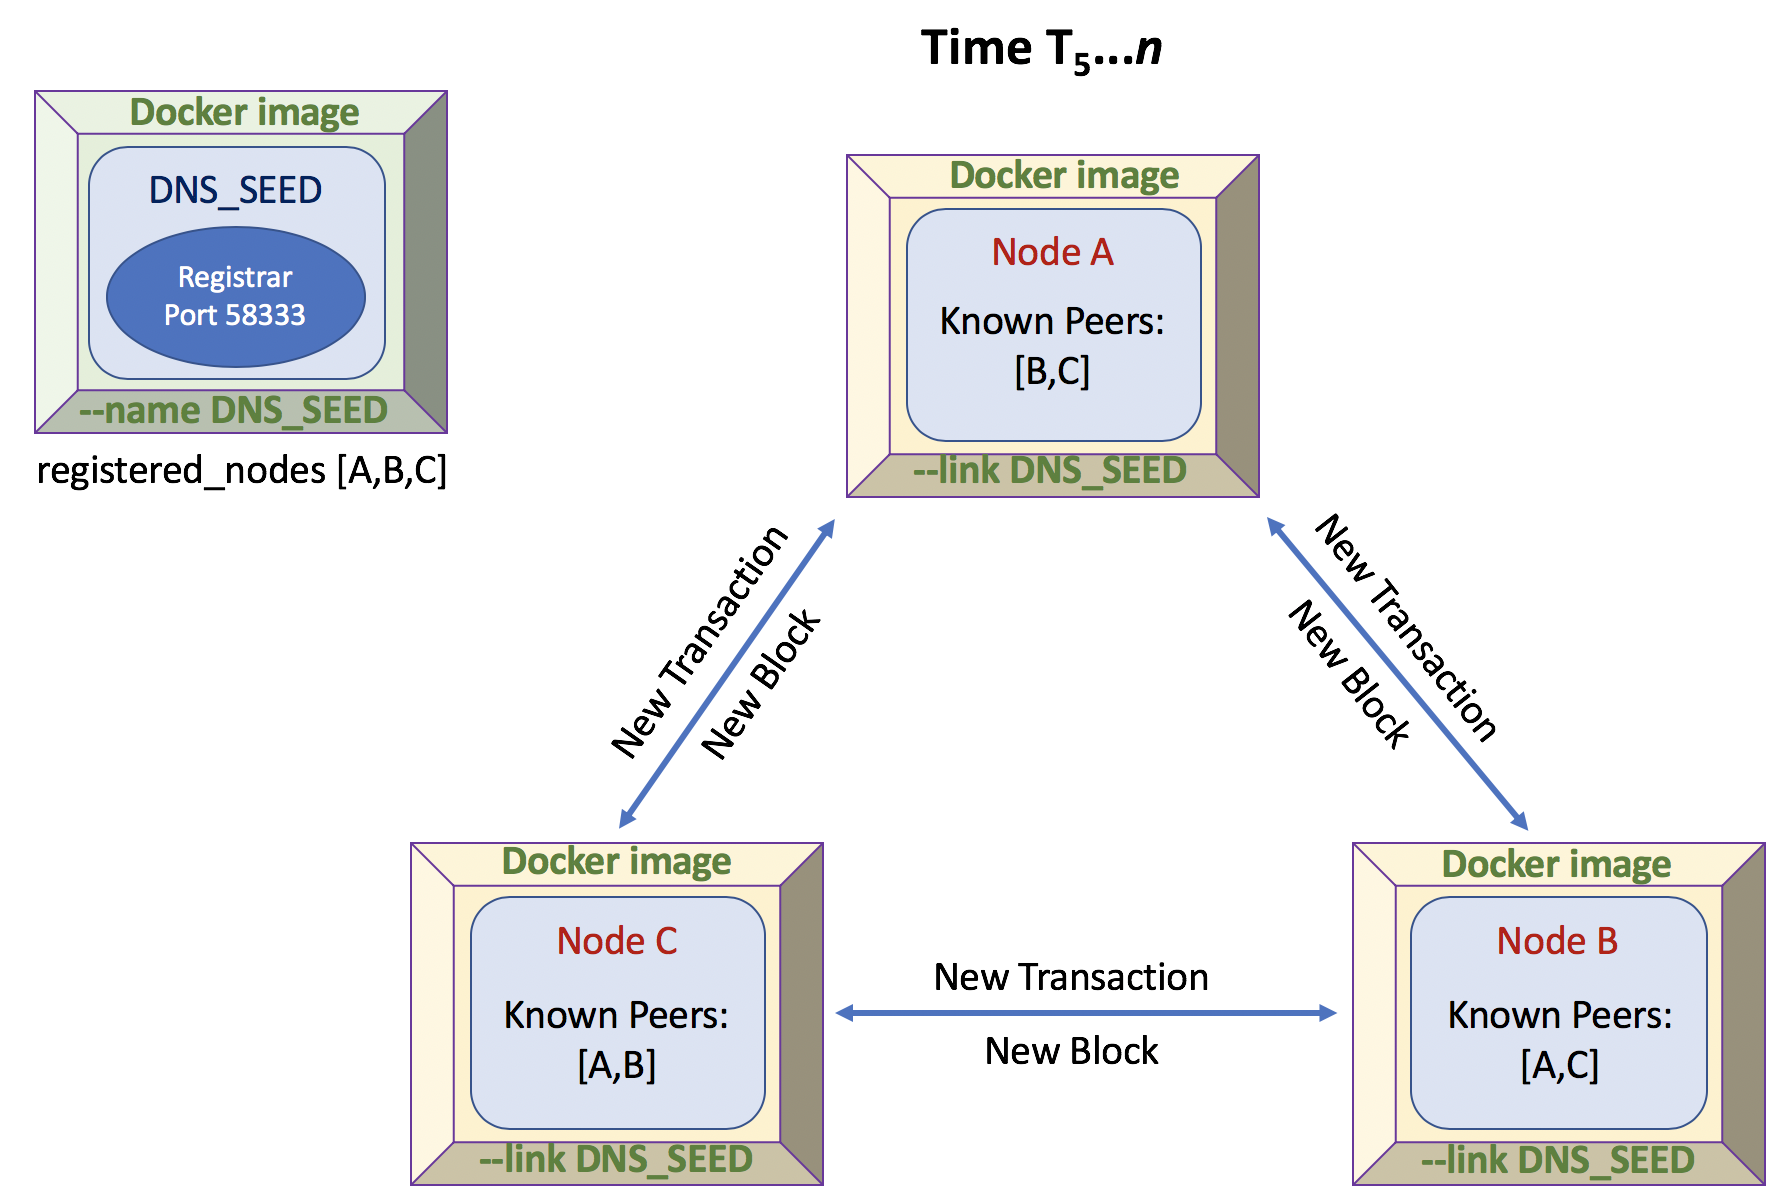
Once a miner publishes a newly-mined block, each
miner (including the miner that produced the
correct result) will sleep for a random number of seconds
(as integers) between 0 and 3 seconds, i.e., in the range
{0..3}. As an example, the python command
print(random.randint(0,3)) will produce this result.
This will reduce the chance that miners will all produce
blocks at "about the same time", since we assume all Full
Nodes are running on the same physical processor(s) (as
all containers are likely running on the same physical
machine) and they will tend (through the round-robin
load-balancing of the OS scheduler) to produce results at
about the same time. Adding this randomness will
reduce this likelihood and produce more "clean winners",
which should reduce the chance of forks, which we would
like to avoid in this lab.
You may feel free to add further nodes if you
wish, this is up to you if you're curious, but not
required. A Full Node is only to connect to a MAX of
two other nodes in your network.
FINAL STEP:
docker commit DNS_SEED dns_seed:lab7
docker commit FULL_NODE full_node:lab7
Then, save the images to a tarball:
$ docker save -o DNSSeed.tar dns_seed:lab7
$ docker save -o FullNode.tar full_node:lab7
Then, zip them up:
$ bzip2 DNSSeed.tar
[be patient...may take a few secs]
$ bzip2 FullNode.tar
[be patient...may take a few secs]
Now scp your two bzip'd files to your personal directory on the cluster under /stage/MPCS56600/[CNETIDHERE]. This directory has been created for you to use for large files. Here's an example command:
# example cluster scp command
$ scp whatever.tar.bz2 [CNETIDHERE]@linux.cs.uchicago.edu:/stage/MPCS56600/[CNETIDHERE]/
Submit source code and transcripts that you created as usual into your lab7 repo directory as described below but please do not submit container tar files to your Subversion repo. Use your cluster directory instead.
References:
You may find the following references helpful (in addition to the links from previous labs):
General gRPC
Tutorial Links
java [https://grpc.io/docs/tutorials/basic/java.html]
C++ [https://grpc.io/docs/tutorials/basic/c.html#generating-client-and-server-code]
go [https://grpc.io/docs/quickstart/go.html#install-protocol-buffers-v3]
python [https://grpc.io/docs/tutorials/basic/python.html]
Docker
Cheat Sheet
Learn
Docker in 12 Minutes Youtube
Demystifying
Docker Youtube
TutorialsPoint:
Docker Tutorial for Absolute Beginners
Docker
Overview
Ubuntu
package commands
Submitting:
Use the folder named "lab9" in your Subversion repository. See the syllabus for more info about submission using Subversion. Upload your Lab 9 code and any supporting materials to the repo. Please include a README text file to explain what parts of the work you are submitting, where the different parts of the work are located and please provide a little info on how to compile and run your code.