Project #2: An Image Processing System
Due: Thursday, November 18th at 11:59pm
This project is intended to provide you with exposure with using CSP style programming (i.e., channels) in Golang. You will also look at implementing more advance work distribution techniques in this assignment as well.
Getting started
For each assignment, a Git repository will be created for you on GitHub. However, before that repository can be created for you, you need to have a GitHub account. If you do not yet have one, you can get an account here: https://github.com/join.
To actually get your private repository, you will need this invitation URL:
When you click on an invitation URL, you will have to complete the following steps:
You will need to select your CNetID from a list. This will allow us to know what student is associated with each GitHub account. This step is only done for the very first invitation you accept.
Note
If you are on the waiting list for this course you will not have a repository made for you until you are admitted into the course. I will post the starter code on Ed so you can work on the assignment until you are admitted into the course.
You must click “Accept this assignment” or your repository will not actually be created.
After accepting the assignment, Github will take a few minutes to create your repository. You should receive an email from Github when your repository is ready. Normally, it’s ready within seconds and you can just refresh the page.
- You now need to clone your repository (i.e., download it to your machine).
Make sure you’ve set up SSH access on your GitHub account.
For each repository, you will need to get the SSH URL of the repository. To get this URL, log into GitHub and navigate to your project repository (take into account that you will have a different repository per project). Then, click on the green “Code” button, and make sure the “SSH” tab is selected. Your repository URL should look something like this: git@github.com:mpcs52060-aut21/proj2-GITHUB-USERNAME.git.
If you do not know how to use
git cloneto clone your repository then follow this guide that Github provides: Cloning a Repository
If you run into any issues, or need us to make any manual adjustments to your registration, please let us know via Ed Discussion.
Preliminaries
As I talked about in class, many algorithms in image processing benefit from parallelization. In this assignment, you will create an image processing system that reads in a series of images and applies certain effects to them using image convolution. If you are unfamiliar with image convolution then you should read over the following sources before beginning the assignment:
Assignment: Image Processing System
For this assignment, you will create image editor that will apply image effects on series of images using 2D image convolution. Please make sure to read over the articles presented in the Preliminaries section before beginning the assignment. Similar to project #1, The program will read in from a series of JSON strings, where each string represents an image along with the effects that should be applied to that image. Each string will have the following format,
{
  "inPath": string,
  "outPath": string,
  "effects": [string]
}
For example, processing an image of a sky may have the following JSON string,
{
  "inPath": "sky.png",
  "outPath": "sky_out.png",
  "effects": ["S","B","E"]
}
where each key-value is described in the table below,
Key-Value |
Description |
|---|---|
|
The |
|
The |
|
The |
The program will read in the images, apply the effects associated with an image, and save the images to their specified output file paths. How the program processes this file is described in the Program Specifications section.
Image Effects
The sharpen, edge-detection, and blur image effects are required to use image convolution to apply their effects to the input image. Again, you can read about how to perform image convolution here:
As stated in the above article, the size of the input and output image are fixed (i.e., they are the same). Thus, results around the border pixels will not be fully accurate because you will need to pad zeros where inputs are not defined. You are required to use the a zero-padding when working with pixels that are not defined. You may not use a library or external source to perform the convolution for you. You must implement the convolution code yourself. The grayscale effect uses a simple algorithm defined below that does not require convolution.
Each effect is identified by a single character that is described below,
Image Effect |
Description |
|---|---|
|
Performs a sharpen effect with the following kernel (provided as a flat go array): |
|
Performs an edge detection effect with the following kernel (provided as a flat go array): |
|
Performs a blur effect with the following kernel (provided as a flat go array): |
|
Performs a grayscale effect on the image. This is done by averaging the values of all three color numbers for a pixel, the red, green and blue, and then replacing them all by that average. So if the three colors were 25, 75 and 250, the average would be 116, and all three numbers would become 116. |
The data Directory
Inside the proj2 directory, You will need to download the data directory here:
Proj 2 Data : There should be a download arrow icon on the left side to download the zip folder.
Place this directory inside the proj2 directory that contains the subdirectories: editor and png. DO NOT COMMIT THIS DIRECTORY TO YOUR REPOSITORY. These are very large files and committing this directory will result in a penalty!
Here is the structure of the data directory:
Directory/Files |
Description |
|---|---|
|
This is the file that contains the string of JSONS that were described above. This will be the only file used for this program (and also for testing purposes). You must use a relative path to your |
|
This directory contains the expected filtered out image for each JSON string provided in the |
|
This directory contains three subdirectories called: |
|
This is where you will place the |
Working with Images in Go and Startup Code
As part of the Go standard library, an image package is provided that makes it easy to load,read,and save PNG images. I recommend looking at the examples from these links:
A helpful tutorial for working on png images. Make sure to cite this website, if you are going to use a similar structure to the code provided. The developer directly accesses the
Pixbuffer. I would recommend you use theAt()andSet()methods as specified by the Go PNG documentation.
Note
The image package only allows you to read an image data and not modify it in-place. You will need to create a separate out buffer to represent the modified pixels. We have done this for you already in the Image struct as follows:
type Image struct {
  in  *image.RGBA64  // Think about swapping these between effects
  out *image.RGBA64  // Think about swapping these between effects
  Bounds  image.Rectangle
  ...
}
You may want to rename this to ImageTask since you’ll be using that name later on in your parallel implementation. Remember these are pointers so you need to do is swap the pointers to make the old out buffer the new in buffer when applying one effect after another effect. This process is less expensive than copying pixel data after apply each effect.
To help you get started, I provide code for loading, saving, performing the grayscale effect on a png image. You are not required to use this code and you can modify it as you wish. This code is already inside the proj2 stater code.
Program Specifications
You will implement three versions of this image processing system inside the proj2/editor/editor.go file. The versions will include a sequential version and two parallel versions. The program has the following usage statement:
Usage: editor data_dir [mode] [number_of_threads]
data_dir = The data directories to use to load the images.
mode     = (bsp) run the BSP mode, (pipeline) run the pipeline mode
number_of_threads = Runs the parallel version of the program with the specified number of threads (i.e., goroutines).
The data_dir argument will always be either big, small, or mixture or a combination between them. The program will always read from the data/effects.txt file; however, the data_dir argument specifies which directory to use. The user can also add a + to perform the effects on multiple directories. For example, big will apply the effects.txt file on the images coming from the big directory. The argument big+small will apply the effects.txt file on both the big and small directory. The program must always prepend the data_dir identifier to the beginning of the outPath. For example, running the program as follows:
$: go run editor.go big bsp 4
will produce inside the out directory the following files:
big_IMG_2020_Out.png
big_IMG_2724_Out.png
big_IMG_3695_Out.png
big_IMG_3696_Out.png
big_IMG_3996_Out.png
big_IMG_4061_Out.png
big_IMG_4065_Out.png
big_IMG_4066_Out.png
big_IMG_4067_Out.png
big_IMG_4069_Out.png
Here’s an example of a combination run:
$: go run editor.go big+small pipeline 2
will produce inside the out directory the following files:
big_IMG_2020_Out.png
big_IMG_2724_Out.png
big_IMG_3695_Out.png
big_IMG_3696_Out.png
big_IMG_3996_Out.png
big_IMG_4061_Out.png
big_IMG_4065_Out.png
big_IMG_4066_Out.png
big_IMG_4067_Out.png
big_IMG_4069_Out.png
small_IMG_2020_Out.png
small_IMG_2724_Out.png
small_IMG_3695_Out.png
small_IMG_3696_Out.png
small_IMG_3996_Out.png
small_IMG_4061_Out.png
small_IMG_4065_Out.png
small_IMG_4066_Out.png
small_IMG_4067_Out.png
small_IMG_4069_Out.png
We will always provide valid command line arguments so you will only be given at most 3 specified identifiers for the data_dir argument. A single + will always be used to separate the identifiers with no whitespace.
The mode and number_of_threads arguments will be used to run one of the parallel versions. Parts 2 and 3 will discuss these arguments in more detail. If the mode and number_of_threads arguments are not provided then the program will default to running the sequential version, which is discussed in Part 1.
Assumptions: No error checking is needed to be done to the strings coming in from effects.txt. You can assume the JSON strings will contain valid values and provided in the format described above. We will always provide the correct command line arguments and in the correct order. The expected directory in proj2/data is based on only running the small dataset. Thus, the resolution for mixture and big modes will make the images appear slightly different. This is okay for this assignment. We will always run/grade your solutions by going inside the proj2/editor directory so loading in files should be relative to that directory.
Part 1: Sequential Implementation
The sequential version is ran by default when executing the editor program when the mode and number_of_threads are both not provided. The sequential program is relatively straightforward. This version should run through the images specified by the strings coming in from effects.txt, apply their effects and save the modified images to their output files inside the data/out directory. Make sure to prepend the data_dir identifier.
Note
You should implement the sequential version first. Make sure your code is modular enough such that you can potentially reuse functions/data structures later in your parallel version. Think about what libraries should be created (e.g., feed and lock libraries you created for project 1). We will be looking at code and design style more closely when grading this assignment.
You may find this code useful:
effectsPathFile := fmt.Sprintf("../data/effects.txt")
effectsFile, _ := os.Open(effectsPathFile)
reader := json.NewDecoder(effectsFile)
Part 2: Fan-Out Implementation
The first parallel implementation will use channels and must be implemented as follows:
For this version, all synchronization between the goroutines must be done using channels. You cannot use anything from the ``sync`` package for this implementation that include ``sync.Waitgroup``.
You must implement the following fan-in/fan-out scheme:
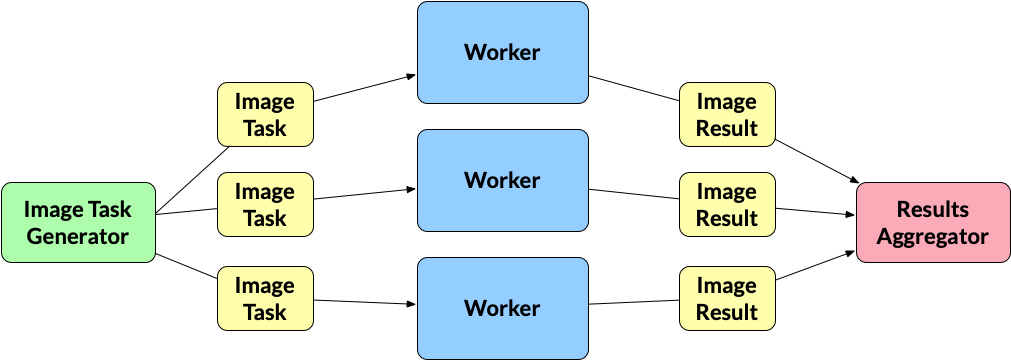
Image Task Generator: As stated earlier, the program will read in the images to process via
effects.txt. Reading is done by a single generator goroutine. The image task generator will read in the JSON strings and do any preparation needed before applying their effects. What “preparation” means is dependent on your implementation and how you plan to pass the images to the worker goroutines (described below), which handle the filtering. The output from this goroutine will be anImageTaskvalue. How you define theImageTaskstruct is up to you. The image task generator will write eachImageTaskto a channel and multiple workers will read from it.ImageTask: A value that holds everything needed to do filtering for a specific JSON string. Again, its up to you how you define the
ImageTaskstruct.Workers: The workers are the goroutines that are performing the filtering effects on the images. The number of workers is static and is equal to the
number_of_threadscommand line argument. A worker must use a pipeline pattern. The pattern must model the pipeline implemented inm6/discussion/patterns/fan-out-fan-in/fig-fan-out-naive-prime-finder.go. You must determine how to reshape the code provided in that file into the pipeline you are building in this project. EachWorkerof the pipeline, must have an internal data decomposition component, which must do the following:Spawn
Nnumber of goroutines, whereN = number_of_threads. We will call these “mini-workers”.Each mini-worker goroutine is given a section of the image to work on.
Each mini-worker goroutine will apply the effect for that stage to its assigned section.
You should give approximately equal portions to all mini-workers.
Visually the splitting could look something like this if
number_of_threads=6: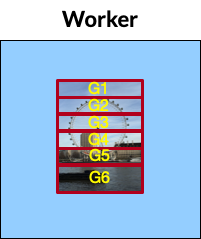
This means that if there will be a total of 6
Workerswith each having 6 mini-workers running, which totals to 36 “worker” goroutines running in parallel. One question you may have is “should the worker be spawning N new mini-workers for each effect, or should it spawn N new mini-workers once when it gets an image and reuse those same goroutines at each stage of the pipeline for that image?” You can do either in this specific case. However, I recommend that you spawn new ones because it’s easier to manage.The output of a worker is an
ImageResult. This can be same as anImageTask. There is no need to create a a new struct that represents the final image after applying its effects. However, you can define a newImageResultstruct that holds that final image. Each worker writes itsImageResultto a channel that is read by a Results Aggregator gorountine (described below).ImageResult: the final image after applying its effects. Again you do not need to define a new
ImageResultstruct but instead can reuse the sameImageTaskstruct.Results Aggregator: The results aggregator gorountine reads from the channel that holds the
ImageResultsand saves the filtered image to its"outPath"file. Make sure to prepend thedata_diridentifier.
If all the images have been processed then the main goroutine can exit the program. You cannot make the main goroutine handle the Image Task Generator and/or the Results Aggregator.
The
modecommand line argument value for executing this version is"pipeline".
Another way of stating the above breakdown is the following:
X images to process
P number of threads (which is supplied by the
number_of_threadsflag)N workers (N = P)
ImageTaskGeneratorproduces XImageTasksand dumps them all into a channel.A worker w1 tries to grab a single
ImageTaskx1 from the channel. This worker is SOLELY responsible for performing all E effects for this one image.The worker w1 splits up this single
ImageTaskx1 into P roughly equal portions and spawns P goroutines to apply effect e1 to the image. Once all goroutines have applied effect e1, they can begin applying e2, e3, … , until all E effects have been applied in order.Meanwhile, other workers w2, w3, … all the way up to N are concurrently grabbing images of their own, and performing step (3) on their own images.
If X > N, then a worker w will go back up to step (2), grab another
ImageTaskx, and perform step (3) on it. We repeat this process until all X images have been processed.
Part 3: BSP Implementation
In the second parallel implementation, you must implement the bulk synchronous parallel (BSP) model technique as follows:
For this version, all synchronization between the goroutines must be done using only the
syncpackage (i.e, only using mutexes,condition variables, or atomics). Channels cannot be used for this implementation. You cannot use ``sync.Waitgroup`` anywhere in this implementation.For this version, You must use the following template for the design of the BSP,
func ExecuteBSP(... arguments needed ...) {
  for {
    // Implement the BSP model here.
    // No additional loops can be used in this implementation. T
    // This goes to calling other functions. No other called
    // function you define or are using can have looping being done for you.
  }
}

func RunBSP(... arguments needed ....) {
  ctx := initBSPContext(...) // Initialize your BSP context
  for idx := 0; idx < numOfThreads-1; idx++ {
    go ExecuteBSP(... might be helpful to pass in "idx", "ctx" ...)
  }
  ExecuteBSP(... might be helpful to pass in "idx", "ctx" ...)
}
You should define a function RunBSP that will be called from the main function to run the BSP implementation. You can pass in any arguments you need. You will then initialize a BSP context. You can decide what to define in this specific context. Next, you will spawn off number_of_threads - 1 goroutines upfront to run ExecuteBSP that will run the entire BSP model for all images. You must pass number_of_threads in as an argument. You need to think about what should be done at each super-step and global synchronization point inside ExecuteBSP. You can only use a single infinite for-loop as shown above. No other function call can do any additional iteration for you. How you decompose the work at each super-step and synchronization point is up to you to decide. You have more freedom to express your parallel programming abilities in this one so really think about the parallel decomposition. The main goroutine must be one of the goroutines in the BSP model. All spawned goroutines must be doing an equal amount of work during a super-step and can only be idle after their work is complete. Once all the images have been completed then the goroutines should break from the loop and exit.
If all the images have been processed then the main goroutine can exit the program.
The
modecommand line argument value for executing this version is"bsp".
How you read in the images, process the images in the super-step/synchronization point, and save the image is for you to determine. I would sit down first and map out the design before coding anything for this version.
Aside: Performance Benchmarking
We will look at the the performance and analysis for this project in homework 6. However, you must have a working version of this project in order to complete a portion of the last homework assignment. Keep this in mind and plan out your time wisely for this assignment.
Grading
Programming assignments will be graded according to a general rubric. Specifically, we will assign points for completeness, correctness, design, and style. (For more details on the categories, see our Assignment Rubric page.)
The exact weights for each category will vary from one assignment to another. For this assignment, the weights will be:
Sequential Version 15%
Pipeline Version: 35%
BSP Version: 35%
Design & Style: 15%
There are no automated tests for this assignment. We will manually run your programs to verify visually with comparing your results to the expected output directory. You will be provided with partial credit if your program is not deterministic.
Design, Style and Cleaning up
Before you submit your final solution, you should, remove
any
Printfstatements that you added for debugging purposes andall in-line comments of the form: “YOUR CODE HERE” and “TODO …”
Think about your function decomposition. No code duplication. This homework assignment is relatively small so this shouldn’t be a major problem but could be in certain problems.
Go does not have a strict style guide. However, use your best judgment from prior programming experience about style. Did you use good variable names? Do you have any lines that are too long, etc.
As you clean up, you should periodically save your file and run your code through the tests to make sure that you have not broken it in the process.
Submission
Before submitting, make sure you’ve added, committed, and pushed all your code to GitHub. You must submit your final work through Gradescope (linked from our Canvas site) in the “Project #2” assignment page via two ways,
Uploading from Github directly (recommended way): You can link your Github account to your Gradescope account and upload the correct repository based on the homework assignment. When you submit your homework, a pop window will appear. Click on “Github” and then “Connect to Github” to connect your Github account to Gradescope. Once you connect (you will only need to do this once), then you can select the repsotiory you wish to upload and the branch (which should always be “main” or “master”) for this course.
Uploading via a Zip file: You can also upload a zip file of the homework directory. Please make sure you upload the entire directory and keep the initial structure the same as the starter code; otherwise, you run the risk of not passing the automated tests.
As a reminder, for this assignment, there will be no autograder on Gradescope. We will run the program the CS Peanut cluster and manually enter in the grading into Gradescope. However, you must still submit your final commit to Gradescope.