Class Meeting 07: SLAM
Today's Class Meeting
- Covering a brief overview of Simultaneous Localization and Mapping (SLAM) - here's a link to the slides
- Learning about making ROS launch files, saving & loading Gazebo worlds, and saving & loading recorded maps of the environment
- Using our new knowledge about ROS to build a new world file, map it using built-in ROS SLAM methods, and loading the saved map
What You'll Need for Today's Class
For today's class, you'll need the following tools/applications ready and running:
- The class Zoom room
- Your Ubuntu 20.04 programming environment
Class Exercise: Creating & Mapping Gazebo Environments Using SLAM
Please head into these breakout rooms for this class exercise.
In this class exercise, you will 1) build a new world in Gazebo for your Turlebot3 to navigate, 2) use SLAM to generate a map of the world you've created, and 3) save & load the map - visualizing it in RViz.
Setup
To start out today's class exercise, we'll want to create a new ROS package:
$ cd ~/catkin_ws/src/intro_robo
$ catkin_create_pkg class_meeting_07_build_and_map_new_world rospy std_msgs geometry_msgs sensor_msgs
$ cd ~/catkin_ws && catkin_make
$ source devel/setup.bash
Just to keep everything organized, we'll want to create directories called launch, map, worlds within the class_meeting_07_build_and_map_new_world directory:
~/catkin_ws/src/intro_robo/class_meeting_07_build_and_map_new_world/launch
~/catkin_ws/src/intro_robo/class_meeting_07_build_and_map_new_world/map
~/catkin_ws/src/intro_robo/class_meeting_07_build_and_map_new_world/worlds
Building & Saving a New Gazebo World
Your first objective is to build a new Gazebo world. We'll use the building editor to create an enclosed room (that's the only constraint we'll ask you to follow) - anything else you want to add is up to you!
Please start up Gazebo (run gazebo in a new terminal) and utilize the building editor (here's a helpful page detailing how to use the building editor) to build your own custom Gazebo world. You can see what using the building editor should look like in the gif below.

Once you've finished creating your enclosed room (in whatever shape and texture you like):
- Save your enclosed room model by clicking on
File/Save(you can name it whatever you like) - Exit the building editor -
File/Exit Building Editor - Save your Gazebo world by clicking on
File/Save World As. You can name it whatever you like as long as:- You don't include any whitespaces in your world filename
- You use the
.worldfile extension - You put it within the
~/catkin_ws/src/intro_robo/class_meeting_07_build_and_map_new_world/worldsdirectory
- Exit Gazebo (Ctrl+C in the terminal where you ran gazebo)
Incorporating Your New Gazebo World into a New ROS Lauchfile
What we want to do next is start up a world file that has our Turtlebot3 within it, so we can use SLAM to map the environment. We'll do this by building a roslaunch file. roslaunch is a tool that easily enables you to launch multiple ROS nodes from the same terminal and also set various parameters.
Copy and paste the following code and put it in a file named turtlebot3_in_enclosed_room.launch within the ~/catkin_ws/src/intro_robo/class_meeting_07_build_and_map_new_world/launch directory. The one edit you'll want to make to this file is replacing your_gazebo_world_name.world with the name of the world file you saved in the last step.
<launch>
  <arg name="model" default="$(env TURTLEBOT3_MODEL)" doc="model type [burger, waffle, waffle_pi]"/>
  <arg name="x_pos" default="0.0"/>
  <arg name="y_pos" default="0.0"/>
  <arg name="z_pos" default="0.0"/>

  <include file="$(find gazebo_ros)/launch/empty_world.launch">
    <arg name="world_name" value="$(find class_meeting_07_build_and_map_new_world)/worlds/your_gazebo_world_name.world"/>
    <arg name="paused" value="false"/>
    <arg name="use_sim_time" value="true"/>
    <arg name="gui" value="true"/>
    <arg name="headless" value="false"/>
    <arg name="debug" value="false"/>
  </include>

  <param name="robot_description" command="$(find xacro)/xacro --inorder $(find turtlebot3_description)/urdf/turtlebot3_$(arg model).urdf.xacro"/>

  <node pkg="gazebo_ros" type="spawn_model" name="spawn_urdf" args="-urdf -model turtlebot3_$(arg model) -x $(arg x_pos) -y $(arg y_pos) -z $(arg z_pos) -param robot_description"/>

</launch>
Now we'll go through each part of this roslaunch file to understand what's going on:
-
First, for roslaunch files, we use the XML format and always start and end roslaunch files with the
<launch>and</launch>tags at the beginning and end of our file. -
Next we define several arguments for our roslaunch file:
model,x_pos,y_pos, andz_pos:<arg name="model" default="$(env TURTLEBOT3_MODEL)" doc="model type [burger, waffle, waffle_pi]"/> <arg name="x_pos" default="0.0"/> <arg name="y_pos" default="0.0"/> <arg name="z_pos" default="0.0"/>TURTLEBOT3_MODELenvironment variable set towaffle_pi) as well as the x, y, and z specifications for where the Turtlebot3 robot should spawn in the Gazebo world. -
Next, the
<include>tag serves the purpose of launching a different roslaunch file (empty_world.launchfrom the built-in ROS simulator library ROS packages) from within this roslaunch file.<include file="$(find gazebo_ros)/launch/empty_world.launch"> <arg name="world_name" value="$(find class_meeting_07_build_and_map_new_world)/worlds/your_gazebo_world_name.world"/> <arg name="paused" value="false"/> <arg name="use_sim_time" value="true"/> <arg name="gui" value="true"/> <arg name="headless" value="false"/> <arg name="debug" value="false"/> </include>empty_world.launch, we also give it several arguments, including the name of the world file we want it to launch. In order to make this file runnable from any directory, we use a handy$(find class_meeting_07_build_and_map_new_world)command to grab the full file path of theclass_meeting_07_build_and_map_new_worldROS package. From the ROS package path, we specify the path to the world file that we created:/worlds/your_gazebo_world_name.world. -
Finally, the
<param>and<node>tags within this roslaunch file enable the Turlebot3 robot to 1) spawn within the Gazebo world and 2) start publishing and subscribing to all of the topics we expect it to (e.g.,/cmd_vel,/scan).<param name="robot_description" command="$(find xacro)/xacro --inorder $(find turtlebot3_description)/urdf/turtlebot3_$(arg model).urdf.xacro"/> <node pkg="gazebo_ros" type="spawn_model" name="spawn_urdf" args="-urdf -model turtlebot3_$(arg model) -x $(arg x_pos) -y $(arg y_pos) -z $(arg z_pos) -param robot_description"/>turtlebot3_waffle_pi.urdf.xacro, is located within the ROS packages we cloned when we setup our computer environment for Turtlebot3 robot programming (if you're really curious, you can check out the file's contents on ROBOTIS-GIT's git repo). It's also worth pointing out that the<node>tag is used when you want to run a ROS node (when you would want to rosrun in a new terminal). Each ROS node must have a uniquenameparameter and you must specify the ROS package the script (specified by thetypeparameter) is found within (in this case it's found in thegazebo_rospackage). You can also see that we can pass arguments into this ROS node, where we're passing in the arguments we set at the top of the roslaunch file as well as therobot_descriptionparameter.

x = -3.95, y = -2.09, z = 0.0.

x_pos, y_pos, and z_pos to ensure that when I run the roslaunch file, my Turtlebot3 appears within the enclosed space (see below).

my_ros_node.py within the class_meeting_07_build_and_map_new_world ROS package and you want to add it to your launchfile. You would add the following line to your launchfile:
<node pkg="class_meeting_07_build_and_map_new_world" type="my_ros_node" name="my_ros_node_1"/>pkg and type fields are specific to the ROS package and Python script you want to run, the name field can be anything you want (as long as no other ROS node running on the same network has the same name).
Testing Out Other Turtlebot3 Worlds
Thus far in this class, we've experienced a few different Gazebo worlds: the Turlebot3 house (for the PFL project), the empty world, the world with just a square room (for the warmup project wall follower), the world with the yellow line for the line follower, and the world with a single brick wall (for the class exercise of stopping just in front of the wall).
We want to encourage you to check out the other built-in Turtlebot3 worlds that you can use. You can either:
-
launch them from the command line using roslaunch turtlebot3_gazebo name_of_launchfile.launch, where the following are your roslaunch file options:
turtlebot3_world.launchturtlebot3_autorace_2020.launchturtlebot3_autorace.launchmulti_turtlebot3.launch
-
modify your roslaunch file
world_nameargument to"$(find turtlebot3_gazebo)/worlds/your_gazebo_world_name.world", where the following are your world file options:turtlebot3_world.worldturtlebot3_autorace_2020.worldturtlebot3_autorace.worldturtlebot3_house.worldempty.world
Using SLAM to Create a Map of Your Gazebo Environment
The Turtlebot3 ROS packages have nodes that can perform SLAM and output a map of an environment that the Turtlebot3 navigates. For more details on executing Turtlebot3's SLAM nodes, feel free to check out the Turtlebot3 SLAM documentation.
Now, let's run SLAM and generate a map of your Turtlebot3's environment. Do this by executing the following:
Terminal 1: roscore
roscoreTerminal 2: Launch the roslaunch file we've been working on
roslaunch class_meeting_07_build_and_map_new_world turtlebot3_in_enclosed_room.launchTerminal 3: Run the slam node
roslaunch turtlebot3_slam turtlebot3_slam.launch slam_methods:=gmappingTerminal 4: Teleoperate the Turtlebot3 around the environment until you get a complete map
roslaunch turtlebot3_teleop turtlebot3_teleop_key.launch
Terminal 5: After you have created a full map of your environment (exploring the entire space), you can save your map (please save it in the ~/catkin_ws/src/intro_robo/class_meeting_07_build_and_map_new_world/map directory) using the following command (do not add a file extension, it will do so automatically):
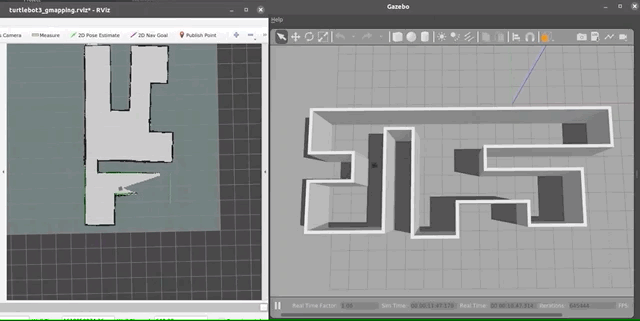
rosrun map_server map_saver -f filepath_and_filenameHere's an example of what you should see in RViz when you're generating your map (my computer was lagging a bit during the recording of this gif, yours should look a bit more continuous):
Loading a Saved Map
If you want to load a map that you've saved and visualize it in RViz, you'll need to create a new roslaunch file (visualize_map.launch) that contains the following:
<launch>

  <arg name="open_rviz" default="true"/>
  <arg name="model" default="$(env TURTLEBOT3_MODEL)" doc="model type [burger, waffle, waffle_pi]"/>
  <arg name="map" default="$(find class_meeting_07_build_and_map_new_world)/map/your_map_file.yaml" />

  <!-- Map server -->
  <node pkg="map_server" name="map_server" type="map_server" args="$(arg map)"/>

  <!-- Run a transformation between the map and odom frames -->
  <node pkg="tf" type="static_transform_publisher" name="link1_broadcaster" args="0 0 0 0 0 0 /map /odom 100" />

  <include file="$(find turtlebot3_bringup)/launch/turtlebot3_remote.launch">
    <arg name="model" value="$(arg model)"/>
  </include>

  <!-- rviz -->
  <node name="rviz" pkg="rviz" type="rviz" args="-d $(find turtlebot3_gazebo)/rviz/turtlebot3_gazebo_model.rviz"/>

</launch>
In the launch file code above, you'll either need to 1) change your default map location in your launchfile code to the location where you saved your map or 2) set the map argument when you run the launchfile, e.g., roslaunch class_meeting_07_build_and_map_new_world visualize_map.launch map:=map_location.
Once you've saved visualize_map.launch, you'll need to have running in your terminals:
Terminal 1:
roscoreTerminal 2:
roslaunch class_meeting_07_build_and_map_new_world turtlebot3_in_enclosed_room.launchTerminal 3:
roslaunch class_meeting_07_build_and_map_new_world visualize_map.launch
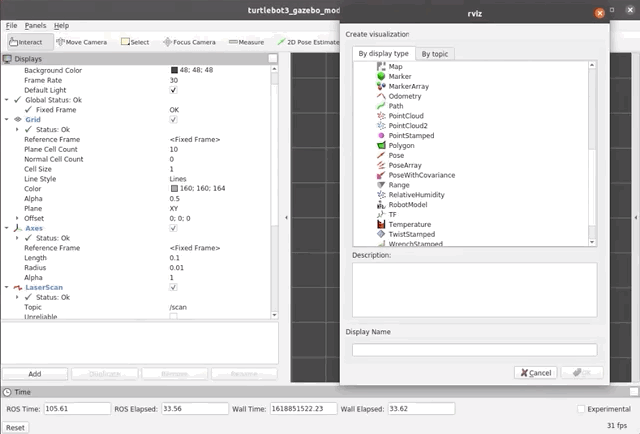
Once you have RViz open, you will also need to add a map object and have it subscribe to the /map topic in order to visualize the map. To do that you'll need to hit the Add button at the bottom left and specify the /map topic (see gif below).
Further SLAM Learning Materials
If you're interested in learning more about SLAM, feel free to check out:
- Krunal Kshirsagar's blog post on Figure SLAM: Guide to simultaneous localization and mapping of Noob
- Grisetti et al. (2010) A Tutorial on Graph-Based SLAM
- Sebastian Thrun's Graph SLAM 4 minute video
- A Columbia University SLAM tutorial slide deck
Particle Filter Project Studio (Work) Time
Once you've finished having fun exploring the built-in SLAM Turtlebot3 ROS packages, please head to a breakout room with your particle filter project partner, where you can continue working on your particle filter project.
The teaching team will check in with each particle filter project team today. When one of us comes to your Zoom breakout room, please be ready to communicate the following with us:
- Project update: Where are you in implementing your particle filter? What components are complete? Which ones are you currently working on?
- Celebration of progress: What is one thing that you are proud of having learned/implemented in your particle filter project at this point?
- Sticking points: What is one current challenge you are facing with respect to the particle filter project? Is there any help we (the teaching team) can give you to help you overcome this challenge?
Once a member of the teaching team has checked in with your team, you and your partner are free to either:
- stay in your breakout room and continue working on the project until the end of class time or
- leave and either work with your partner outside of an Intro Robotics Zoom breakout room or simply leave.