Class Meeting 2: Sensory-Motor Control, ROS Recap, and an Introduction to Gazebo
Today's Class Meeting
- Learning about sensory-motor control and PID control - here's a link to today's slides
- Reviewing ROS concepts and the fundamentals of controlling a turtlebot3 in ROS
- Introduction to the Gazebo simulator
- Learning about ROS launch files and how to use them
- Gaining experience with Gazebo and launch files by creating your own Gazebo world, saving it, and launching it from a ROS launch file
What You'll Need for Today's Class
- Your Ubuntu 20.04 programming environment
Sensory-Motor Control and PID Control
The content in this section summarizes the main points covered in today's lecture.
One foundational concept in robotics is sensory-motor loops and control. The robot's sensor readings inform how it moves in its environment, which will then influence the next sensor readings from the robot, and the loop goes on. One of the most well known sensory-motor control methods is PID (Proportional Integral Derivative) control, which is depicted in the block diagram below:

The PID control function can be represented as follows:
\( u_t = K_P \cdot e(t) + K_I \cdot \int_0^1 e(\tau)d\tau + K_D \cdot \frac{d}{dt} e(t) \)
Where KP, KI, and KD, are the constant coefficients for the proportional, integral, and derivative terms; e(t) represents the difference between the goal (setpoint) and the sensor measurement (process variable). The three following graphs display how a system responds to a step change in the setpoint to each component of the PID controller separately and all the components combined at different values of KP, KI, and KD.

Response of the process variable to a step change of the setpoint for different values of KP. Source: Wikipedia.
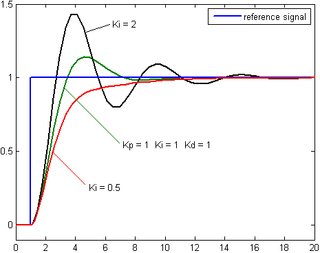
Response of the process variable to a step change of the setpoint for different values of KI. Source: Wikipedia.
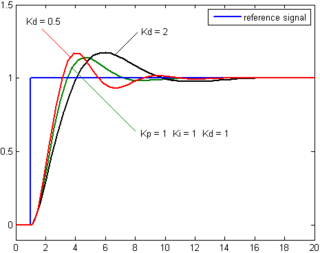
Response of the process variable to a step change of the setpoint for different values of KD. Source: Wikipedia.
This YouTube video by Brian Douglas is a great resource providing a clear explanation of the PID controller.
Looking Ahead
In our next lab, you'll have the opportunity to implement proportional control on the turtlebots by programming them to follow a line on the floor.
Gazebo Simulator Initial Instructions and Overview of Class Exercises
For these class exercises, please work alongside one partner. Each of you will work individually on your own computers, but feel free to communicate and collaborate with your partner as you work.
Today, we will be completing the same exercises you did in Lab A, but this time, we'll be doing it in simulation. You'll learn:
- how to use the Gazebo simulator,
- how to create a Gazebo world and save it,
- how to load a Gazebo world from a ROS launch file, and
- how to run code to control a robot in Gazebo.
Feel free to use the Gazebo simulator when working on your projects throughout the quarter. Often using Gazebo can be more convenient than physically coming to CSIL, so feel free to use that to your advantage. However, please note that your final project deliverables must be run on the physical Turtlebot3.
Class Exercise #1: Turtlebot3 Spinning in Circles - in Simulation
In this exercise, you will recreate the spin in circles exercise from Lab A in the Gazebo simulator.
Setting the ROS_MASTER_URI and ROS_HOSTNAME
When you are planning to use Gazebo and are not planning to connect with a physical turtlebot you'll need to make sure that your ROS_MASTER_URI and ROS_HOSTNAME environment variables are set to http://localhost:11311 and localhost respectively. This will ensure that the ROS environment you are launching is independent of whatever network you are connected to, and will enable you to use Gazebo on a different network than intro-robo, enabling you to program the turtlebot from home or on uchicago-secure.
Starting the Gazebo Simulator
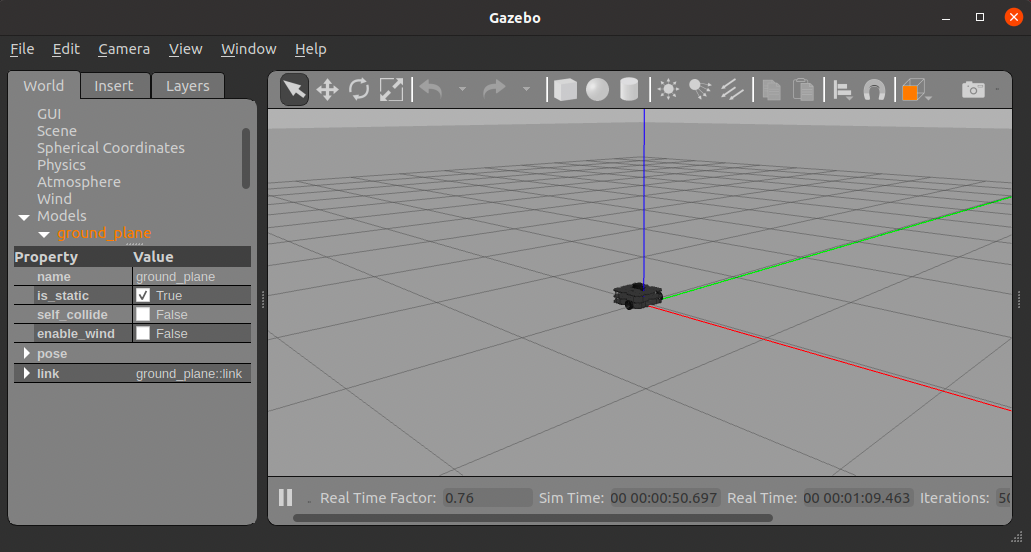
Bring up an empty world in the Gazebo simulator. Run:
$ roscore$ roslaunch turtlebot3_gazebo turtlebot3_empty_world.launchYou should now see a virtual Turtlebot3 in an empty room, as pictured below.
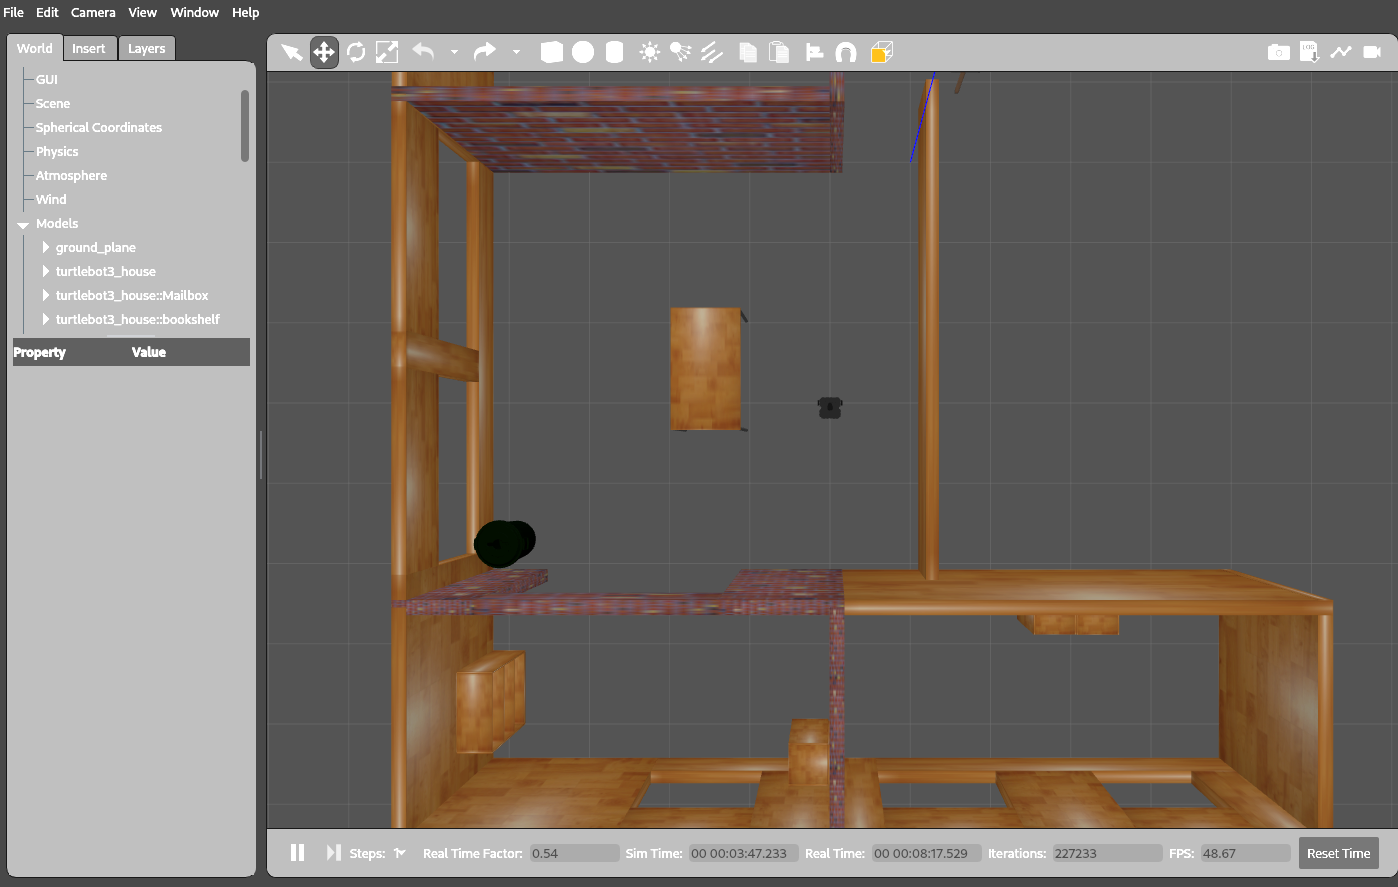
$ roslaunch turtlebot3_gazebo turtlebot3_tab, which should offer you a list of possible launch files that will load different
simulated worlds. For instance, if we use the turtlebot3_gazebo_house.launch launch file, you will
some terminal output and a visualization like the following will pop up.
Now run:
$ rostopic listRun Your Spin in Circles Code
Now, let's get that simulated turtlebot moving! You'll run the same spin in circles code you developed in lab A:
$ rosrun lab_a_spin_circles spin_in_circles.pyYou should see the turtlebot spinning in circles now!
As you can see here, that aren't too many differences between running your code on the simulated versus physical turtlebot:
- For the physical robot, you need to SSH into the robot, set the
ROS_MASTER_URIenvironment variable, and run bringup. - For the simulated robot, you need to run a ROS launch file that loads the Gazebo world and instantiates a turtlebot in that world.
Class Exercise #2: Turtlebot3 Stopping in Front of a Wall in a Custom Gazebo World
In this exercise, you will recreate the stop in front of a wall exercise from Lab A in the Gazebo simulator. This will involve building a new Gazebo world, saving it, loading it from a launch file, and running your code to have the robot move to and stop in front of a wall.
Setup
To start out today's class exercise, we'll create a new ROS package:
$ cd ~/catkin_ws/src/intro_robo
$ catkin_create_pkg class_meeting_02_custom_gazebo_world rospy std_msgs geometry_msgs sensor_msgs
$ cd ~/catkin_ws && catkin_make
$ source devel/setup.bash
Just to keep everything organized, we'll want to create directories called launch and
worlds within the class_meeting_02_custom_gazebo_world directory:
~/catkin_ws/src/intro_robo/class_meeting_02_custom_gazebo_world/launch
~/catkin_ws/src/intro_robo/class_meeting_02_custom_gazebo_world/worlds
Building & Saving a New Gazebo World
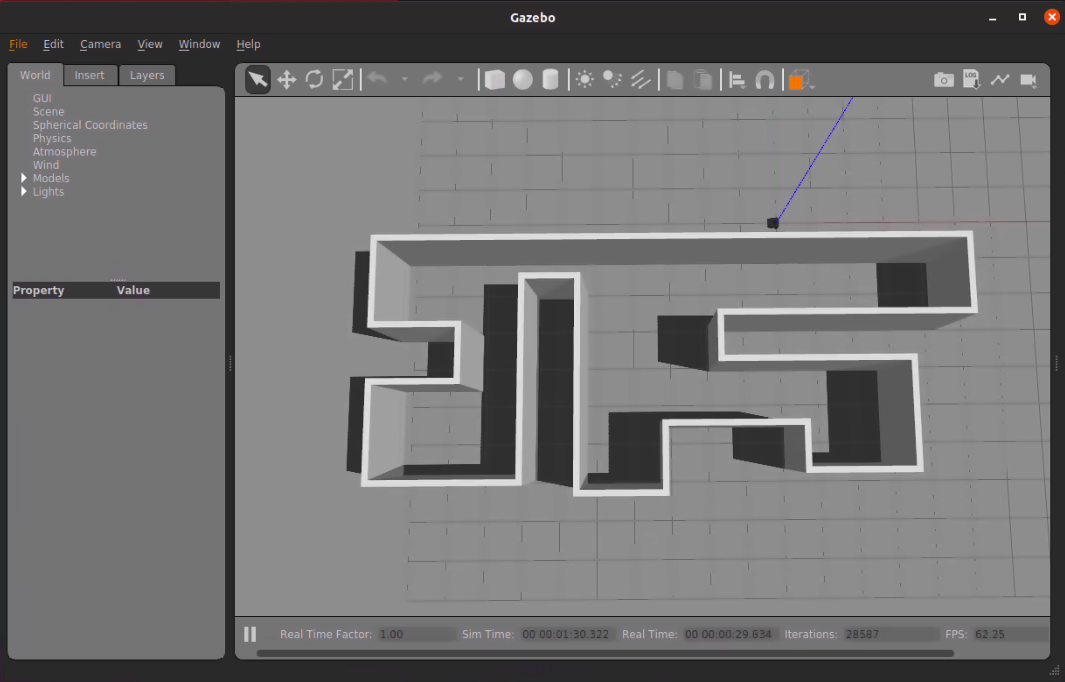
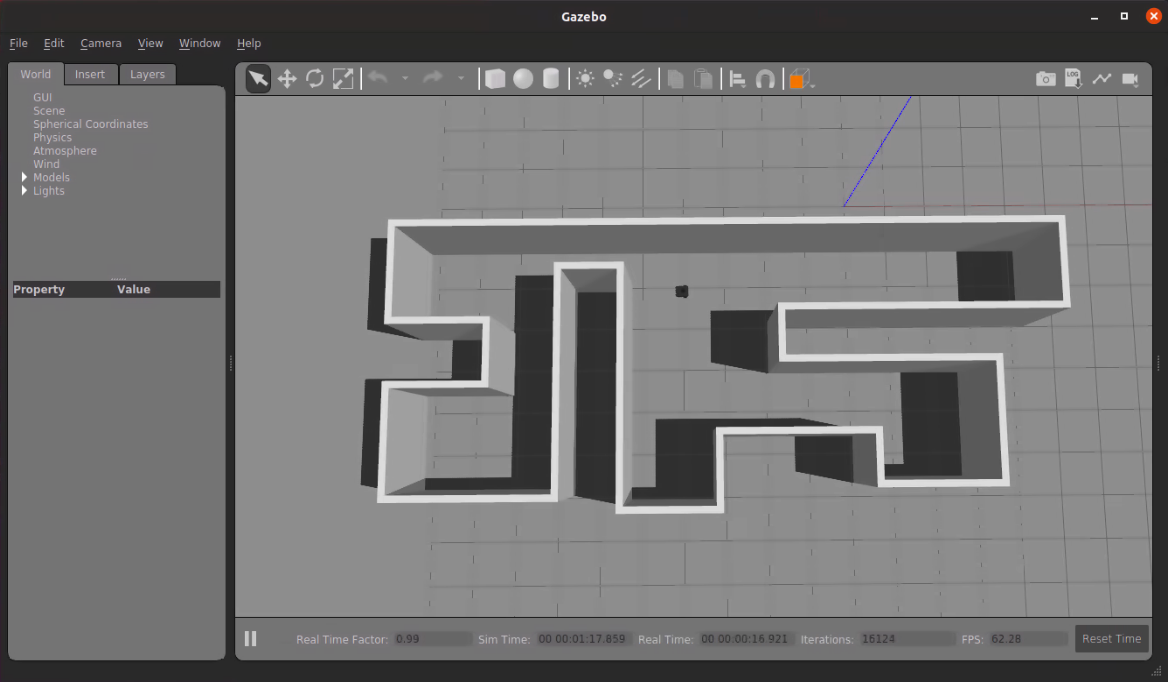
Your first objective is to build a new Gazebo world. We'll use the building editor to create an enclosed room (that's the only constraint we'll ask you to follow) - anything else you want to add is up to you!
Please start up Gazebo (run gazebo in a new terminal) and utilize the building editor (here's a helpful page detailing how to use the building editor) to build your own custom Gazebo world. You can see what using the building editor should look like in the gif below.
Once you've finished creating your enclosed room (in whatever shape and texture you like):
- Save your enclosed room model by clicking on
File/Save(you can name it whatever you like) - Exit the building editor -
File/Exit Building Editor - Save your Gazebo world by clicking on
File/Save World As. You can name it whatever you like as long as:- You don't include any whitespaces in your world filename
- You use the
.worldfile extension - You put it within the
~/catkin_ws/src/intro_robo/class_meeting_02_custom_gazebo_world/worldsdirectory
- Exit Gazebo (Ctrl+C in the terminal where you ran gazebo)
Incorporating Your New Gazebo World into a New ROS Lauchfile
What we want to do next is start up a world file that has our Turtlebot3 within it, so we can run our
stop_at_wall.py code. We'll do this by building a roslaunch file. roslaunch is a tool that easily enables you to launch multiple
ROS nodes from the same terminal and also set various parameters.
Copy and paste the following code and put it in a file named turtlebot3_in_enclosed_room.launch
within the ~/catkin_ws/src/intro_robo/class_meeting_02_custom_gazebo_world/launch directory. The
one edit you'll want to make to this file is replacing your_gazebo_world_name.world with the name
of the world file you saved in the last step.
<launch>
      <arg name="model" default="$(env TURTLEBOT3_MODEL)" doc="model type [burger, waffle, waffle_pi]"/>
      <arg name="x_pos" default="0.0"/>
      <arg name="y_pos" default="0.0"/>
      <arg name="z_pos" default="0.0"/>

      <include file="$(find gazebo_ros)/launch/empty_world.launch">
        <arg name="world_name" value="$(find class_meeting_02_custom_gazebo_world)/worlds/your_gazebo_world_name.world"/>
        <arg name="paused" value="false"/>
        <arg name="use_sim_time" value="true"/>
        <arg name="gui" value="true"/>
        <arg name="headless" value="false"/>
        <arg name="debug" value="false"/>
      </include>

      <param name="robot_description" command="$(find xacro)/xacro --inorder $(find turtlebot3_description)/urdf/turtlebot3_$(arg model).urdf.xacro"/>

      <node pkg="gazebo_ros" type="spawn_model" name="spawn_urdf" args="-urdf -model turtlebot3_$(arg model) -x $(arg x_pos) -y $(arg y_pos) -z $(arg z_pos) -param robot_description"/>

    </launch>
Now we'll go through each part of this roslaunch file to understand what's going on:
-
First, for roslaunch files, we use the XML format and always start and end roslaunch files with the
<launch>and</launch>tags at the beginning and end of our file. -
Next we define several arguments for our roslaunch file:
model,x_pos,y_pos, andz_pos:<arg name="model" default="$(env TURTLEBOT3_MODEL)" doc="model type [burger, waffle, waffle_pi]"/> <arg name="x_pos" default="0.0"/> <arg name="y_pos" default="0.0"/> <arg name="z_pos" default="0.0"/>TURTLEBOT3_MODELenvironment variable set towaffle_pi) as well as the x, y, and z specifications for where the Turtlebot3 robot should spawn in the Gazebo world. -
Next, the
<include>tag serves the purpose of launching a different roslaunch file (empty_world.launchfrom the built-in ROS simulator library ROS packages) from within this roslaunch file.<include file="$(find gazebo_ros)/launch/empty_world.launch"> <arg name="world_name" value="$(find class_meeting_02_custom_gazebo_world)/worlds/your_gazebo_world_name.world"/> <arg name="paused" value="false"/> <arg name="use_sim_time" value="true"/> <arg name="gui" value="true"/> <arg name="headless" value="false"/> <arg name="debug" value="false"/> </include>empty_world.launch, we also give it several arguments, including the name of the world file we want it to launch. In order to make this file runnable from any directory, we use a handy$(find class_meeting_02_custom_gazebo_world)command to grab the full file path of theclass_meeting_02_custom_gazebo_worldROS package. From the ROS package path, we specify the path to the world file that we created:/worlds/your_gazebo_world_name.world. -
Finally, the
<param>and<node>tags within this roslaunch file enable the Turlebot3 robot to 1) spawn within the Gazebo world and 2) start publishing and subscribing to all of the topics we expect it to (e.g.,/cmd_vel,/scan).<param name="robot_description" command="$(find xacro)/xacro --inorder $(find turtlebot3_description)/urdf/turtlebot3_$(arg model).urdf.xacro"/> <node pkg="gazebo_ros" type="spawn_model" name="spawn_urdf" args="-urdf -model turtlebot3_$(arg model) -x $(arg x_pos) -y $(arg y_pos) -z $(arg z_pos) -param robot_description"/>turtlebot3_waffle_pi.urdf.xacro, is located within the ROS packages we cloned when we setup our computer environment for Turtlebot3 robot programming (if you're really curious, you can check out the file's contents on ROBOTIS-GIT's git repo). It's also worth pointing out that the<node>tag is used when you want to run a ROS node (when you would want to rosrun in a new terminal). Each ROS node must have a uniquenameparameter and you must specify the ROS package the script (specified by thetypeparameter) is found within (in this case it's found in thegazebo_rospackage). You can also see that we can pass arguments into this ROS node, where we're passing in the arguments we set at the top of the roslaunch file as well as therobot_descriptionparameter.
x = -3.95,
y = -2.09, z = 0.0.
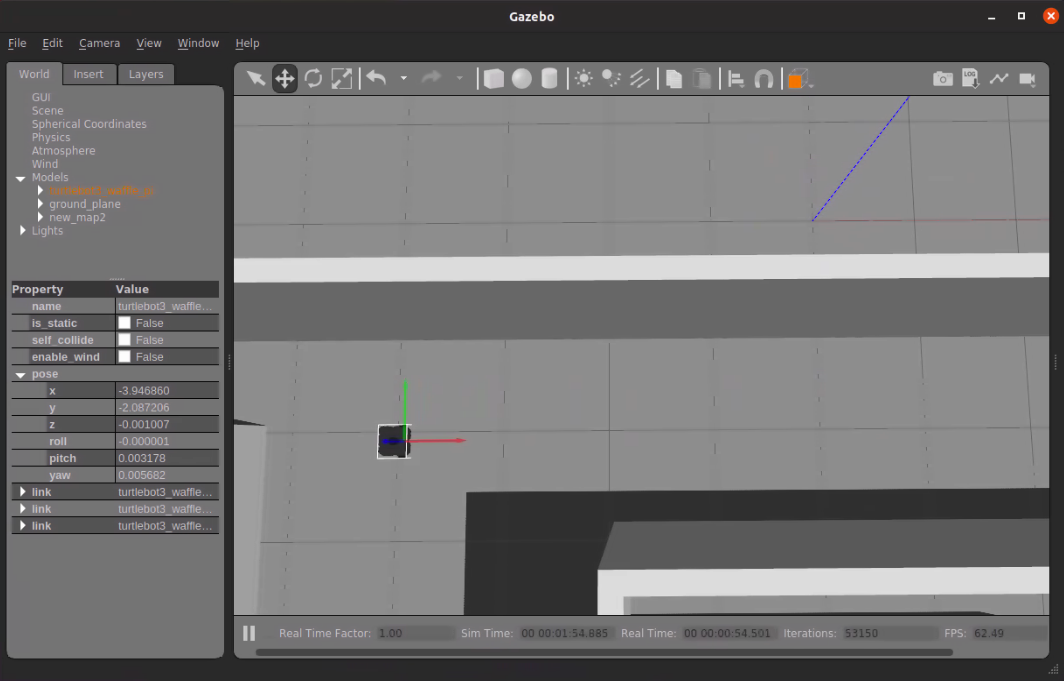
x_pos,
y_pos, and z_pos to ensure that when you run the roslaunch file, your Turtlebot3
appears within the enclosed space (see below).
my_ros_node.py within the
class_meeting_02_custom_gazebo_world ROS package and you want to add it to your launchfile. You would
add the following line to your launchfile:
<node pkg="class_meeting_02_custom_gazebo_world" type="my_ros_node" name="my_ros_node_1"/>pkg and type fields are specific to the ROS package and Python script you want
to run, the name field can be anything you want (as long as no other ROS node running on the same
network has the same name).
Now after all that, run your turtlebot3_in_enclosed_room.launch ROS launch file:
roslaunch class_meeting_02_custom_gazebo_world turtlebot3_in_enclosed_room.launchRunning Your Stop at Wall Code
Now that you have your turtlebot on and running in your enclosed Gazebo room, let's run your
stop_at_wall.py code. You can either run:
$ rosrun lab_a_stop_at_wall stop_at_wall.pyturtlebot3_in_enclosed_room.launch file, where the:
pkgspecifies the name of the ROS package where the.pyfile is located that you want to run,typespecifies the name of the.pyfile that you want to run, andnamespecifies the name of the ROS node (you can call it anything, as long as it's unique).
<node pkg="my_ros_package" type="my_ros_node" name="my_ros_node_1"/>Depending on how you implemented your algorithm, you may find that the simulated robot does not exhibit the same behavior as the physical one. Unlike the physical robot, which reports ranges where nothing is detected as having distances of 0, the simulated robot will instead report ranges of infinity. This is just one example of how running your code in Gazebo can produce different results, so it's usually a good idea to make your algorithm robust to both platforms.
Once you've taken the new LiDAR measurements into account, you should now see your robot stop in front of one of the walls in your enclosed room.
Once you've finished getting your simulated turtlebot to spin in circles and stop in front of a wall in your Gazebo world with an enclosed room, you are free to either:
- Work on your warmup project either in simulation or using the physical robots in CSIL5 (the course staff is more than happy to answer any questions you might have on the warmup project), or
- Leave and continue on with the rest of your day.