Lab 3: Hello Misty
Learning Goals
- Students will learn how to connect to the Misty robot and program robot behaviors from their laptop using Python and the Misty Python SDK.
- Students will gain experience programming the Misty robot's verbal and nonverbal behaviors by writing a program where the robot introduces itself to a new user.
To Complete Before Lab
Preparing Your Development Environment
To allow you to start programming Misty right away, we are asking all of you to prepare your software development environment in advance of class. Please follow the steps below.
Note: Throughout this course, you will use your own laptop to program Misty and run all code locally.
Important: Before reaching out to the teaching team for help, please read the Common Errors & Troubleshooting section at the end of this lab. Most setup issues can be resolved using those instructions.
-
Python version: Ensure that your Python version is >= 3.10. You can check your Python version by running in your terminal:
If your version is lower than 3.10, install a newer version from python.org.python3 --version -
Create
hri_course_misty_programming: Create one folder where you will keep all of your Misty work for this course.In the terminal, you can create this folder by running:
mkdir hri_course_misty_programming -
Create your virtual environment (follow this exactly): We use a virtual environment so everyone installs the same Python packages for Misty in one isolated place, which makes setup and debugging much easier. In the terminal,
cdintohri_course_misty_programmingand create a virtual environment namedvenv:
After activation, you should seecd hri_course_misty_programming python3 -m venv venv source venv/bin/activate(venv)in your terminal.
When you're done coding: To deactivate your virtual environment, run:deactivate
Important: Please name your virtual environmentvenv, not.venv. A folder that starts with a dot is hidden on macOS/Linux, so it will not appear when you typels. Hidden folders only show up withls -a, which has caused confusion for students in the past. -
Install dependencies: With your virtual environment activated, install only the packages needed for this lab and the Misty Python SDK by running the following commands in the terminal:
Important: Do not runpip install requests pip install --force-reinstall -v websocket-client==0.57.0 pip install --force-reinstall -v urllib3==1.26.20 pip install Pillowpip install misty. That is not the SDK we are using for this course, and past students have gotten confused by this. -
Clone Misty's Python SDK: Run in the terminal (while in
hri_course_misty_programming):git clone https://github.com/MistyCommunity/Python-SDK.git -
Create your Lab 3 folder and add the starter code: Inside
hri_course_misty_programming, either:-
Use our template repo:
- Open the template repo: lab_3_misty_introduction
- Click the Code button on GitHub and copy the HTTPS clone URL
- In the terminal, change into
hri_course_misty_programming(where you want the lab folder to live) - Clone your copy so the folder is named
lab_3_misty_introductionand sits directly insidehri_course_misty_programming. Example:git clone https://github.com/your-username/lab_3_misty_introduction.git
-
Manually copy the starter code: In the terminal, create the folder and file with:
Then copy the following starter code intocd hri_course_misty_programming mkdir lab_3_misty_introduction touch lab_3_misty_introduction/misty_introduction.pylab_3_misty_introduction/misty_introduction.py:
This starter code assumes thatimport sys, os, time sys.path.append(os.path.join(os.path.join(os.path.dirname(__file__), '..'), 'Python-SDK')) from mistyPy.Robot import Robot from mistyPy.Events import Events if len(sys.argv) != 2: print("Usage: python3 misty_introduction.py <Misty's IP Address>") sys.exit(1) ip_address = sys.argv[1] misty = Robot(ip_address) misty.speak("Hi!") # TODO: Complete Misty's introductionlab_3_misty_introductionandPython-SDKare both directly insidehri_course_misty_programming.How to run: With your virtual environment activated and while inside
lab_3_misty_introduction, run:
Replacepython3 misty_introduction.py <MISTY-IP-ADDRESS><MISTY-IP-ADDRESS>with your robot's IP address.
-
Use our template repo:
-
Use this folder structure: To make debugging easier, everyone should organize their files in the same way:
Important:hri_course_misty_programming/ ├── venv/ ├── Python-SDK/ ├── lab_3_misty_introduction/ │ └── misty_introduction.pyPython-SDKshould be directly insidehri_course_misty_programming- Your Lab 3 folder should also be directly inside
hri_course_misty_programming - Do not put
Python-SDKinside your lab folder
Working in Groups
During this lab, you will work at a table with 3 students and 1 Misty robot. Each individual within the group is expected to write their own code and implement their own robot introduction. While each student is completing their own work on the robot, we highly encourage your groups to collaborate with one another by sharing ideas and helping each other debug your code.
You will work with this same group for all of the robot programming labs (Labs 3-5). Group assignments can be found on the tables in CSIL 1/2 when you arrive.
Lab 3 Deliverables & Submission
Your work on Lab 3 will involve programming the Misty robot to introduce itself using our starter code as a starting point. Your are expected to upload the following to Canvas after you have completed the lab:
- A video of Misty performing your introduction
- Your source code:
misty_introduction.py
To receive credit for this lab, you will need to submit your video and code to Canvas by Thursday, April 9, 2026 at 11:59pm.
Connecting to Misty
Follow these instructions to connect to Misty. We used the Misty II documentation to create these instructions.
Turning Misty On
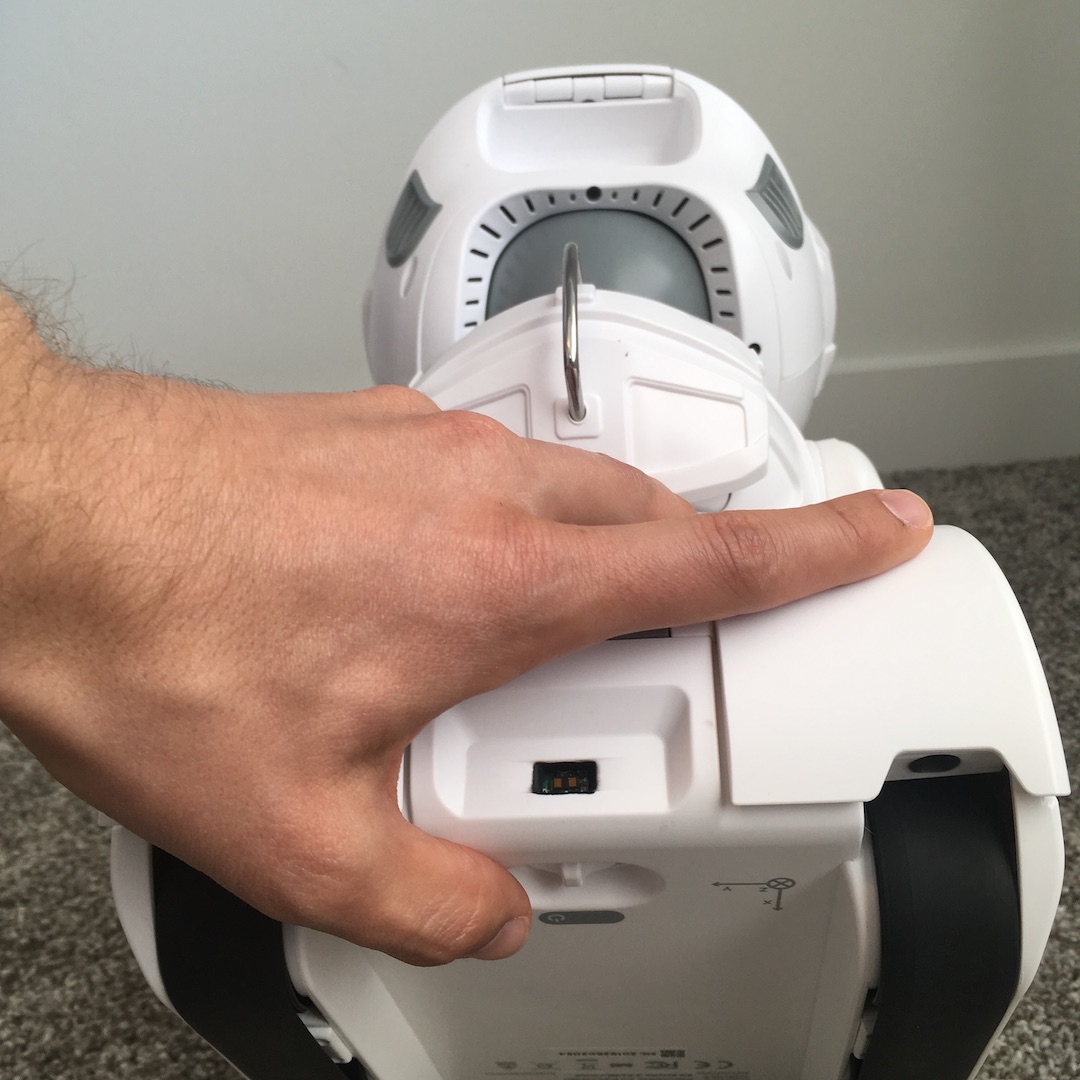
Toggle the power switch on Misty's base (located between the treads at the back of the robot). The robot will take a little bit to fully boot up. The eyes will be fully open once Misty has finished the booting process. To turn Misty off, toggle this same switch.
Connecting to Wi-Fi
In order to program Misty, both your computer, your Misty app, and the robot will need to be connected to the same Wi-Fi network.
Follow these instructions to connect Misty to Bluetooth and Wi-Fi. To connect to Misty, you'll need to have either an iPhone or Apple tablet download the Misty app from the Apple App store and use this app to connect Misty to the same Wi-Fi network.
Misty Studio
Open up the Misty Studio by entering http://{MISTY-IP-ADDRESS}/ in a browser window. If you cannot open Misty Studio, please read the instructions below in HTTP Connection Errors. Play around with Misty Studio! You can have Misty speak, move, change its facial expression and more. Misty Studio should look like the following image:

Misty Python API
In this class, we recommend that you use the Misty Python API to program Misty. For today's lab, the pages that you'll likely find most useful are:
Labs 3-5 Context
In our robot programming labs (labs 3-5), you will be programming the Misty robot to act as a facilitator of a positive psychology exercise called the "Three Good Things." This is a well-known exercise from positive psychology research. The idea is simple: at the end of the day (or week), a person reflects on three good things that happened and briefly thinks about why they happened. Research has shown that doing this regularly can improve mood, increase well-being, and reduce stress. In this exercise, both the robot and the participant will take turns sharing three things that they are grateful for that have happened to them in the past week. If you want to learn more about this exercise, you can read more here: Three Good Things – Greater Good Science Center (UC Berkeley)
Here are a few simple examples of "Three Good Things":
- I had a good conversation with a friend this week.
- I finished an assignment that I had been worried about.
- I got to enjoy a nice meal or take a relaxing break.
For this lab sequence, Misty will eventually help guide the user through sharing these kinds of positive reflections.
We will be programming a different part of this interaction in the three labs:- Lab 3: You will program the robot to introduce itself to the participant as well as the "Three Good Things" exercise the robot will be facilitating.
- Lab 4: You will create a Wizard-of-Oz GUI interface for a human experimenter to control the robot during this interaction, allowing the robot to express both pre-scripted utterances (e.g., introduction, things it is grateful for) and responsive utterances and responses with a text box and other buttons.
- Lab 5: You will leverage an LLM to allow the robot to have a flexible and responsive conversation with the participant through the "Three Good Things" exercise.
Lab 3 Exercise: Robot Introduction
Your Goal
Your goal for this lab is to program a Misty to introduce itself to a new human participant and also introduce the "Three Good Things" exercise (see above). Your introduction needs to make use of all of the following components:
- Verbal speech
- Head movement(s)
- Arm movement(s)
- Tread/wheel movement(s)
- LED change(s)
- Facial expression change(s)
- Playing audio expression(s)
- While most of the instructions for the other Misty API functions are easier to find, those for playing audio expressions is less so. There is information on this page about the
play_audiofunction that you can use to figure out how to play these audio expressions.
- While most of the instructions for the other Misty API functions are easier to find, those for playing audio expressions is less so. There is information on this page about the
The following video is a simple example of a Misty introduction that uses all of the components listed above:
Extra Challenge
If you find yourself wanting to take on an extra challenge, you can try to incorporate the Misty events to allow the user to start the Misty's introduction only when it's bump sensor is pressed. We recommend checking out the following resources to implement this:
Common Errors & Troubleshooting
HTTP Connection Errors
If you see an error like the one below, or if you cannot open Misty Studio in your web browser, your computer is usually blocking the connection to Misty:
requests.exceptions.ConnectionError: HTTPConnectionPool(host='192.168.0.182', port=80): Max retries exceeded with url: /api/tts/speak (Caused by NewConnectionError('<urllib3.connection.HTTPConnection object at 0x101d5a310>: Failed to establish a new connection: [Errno 65] No route to host'))Before troubleshooting your laptop settings, make sure that:
- Your computer and Misty are connected to the same Wi-Fi network
- You are using the correct Misty IP address
- Misty has fully booted up
This error usually means your computer is blocking the connection. Follow the instructions below for your operating system:
For Mac users
If you're running from VS Code Terminal
- Open System Settings → Privacy & Security → Local Network.
- If Visual Studio Code appears and is unchecked, check it to allow network access.
- If Visual Studio Code is not listed, run your code once. macOS often prompts on first use and will then show the app here.
- Restart Visual Studio Code after changing the setting, then try again.
If you're running from your local Terminal (outside VS Code)
- Open System Settings → Network → Firewall → Options… (you may need to enter your password).
- If Terminal or Python is listed, set it to Allow incoming connections.
- If it's not listed, temporarily disable the firewall to test: toggle the Firewall switch to Off, run your code, then re-enable the firewall.
- If disabling the firewall fixes the issue, add a permanent allow rule for Terminal or Python via Options… rather than leaving the firewall off.
For Windows users
If you're running from VS Code Terminal
- Open Windows Security → Firewall & network protection → Allow an app through firewall.
- Click Change settings, then look for Visual Studio Code.
- If it appears, make sure it is allowed on the network you are using. For most students, allowing it on Private networks is enough.
- If Visual Studio Code is not listed, run your code once and watch for a Windows Firewall pop-up. If prompted, allow access on your current network.
- Restart Visual Studio Code after changing the setting, then try again.
If you're running from Command Prompt, PowerShell, or Windows Terminal
- Open Windows Security → Firewall & network protection → Allow an app through firewall.
- Look for your terminal app or for Python. If it is listed, allow it on your current network.
- If Python is not listed, run your code once and watch for a Windows Firewall pop-up asking whether to allow access.
- If you do not get a pop-up, temporarily turn off the firewall for your current network to test, run your code once, and then immediately turn the firewall back on.
- If disabling the firewall fixes the issue, add a permanent allow rule for Python or your terminal app rather than leaving the firewall off.
For Linux users
If you're running from VS Code Terminal
- Check whether your system firewall is enabled. On Ubuntu, many students can do this with
sudo ufw status. - If a firewall is active, allow outgoing and local network traffic for Visual Studio Code or for Python, depending on how your Linux setup manages application rules.
- If Visual Studio Code was installed as a Snap or Flatpak, also check that sandboxed app permissions are not blocking local network access.
- Restart Visual Studio Code after changing the setting, then try again.
If you're running from your local Terminal
- Check whether your firewall is enabled. For example, on Ubuntu you can run
sudo ufw status. - If it is active, temporarily disable it to test with
sudo ufw disable, run your code once, and then re-enable it withsudo ufw enable. - If disabling the firewall fixes the issue, add a more specific allow rule for local network traffic or for Python rather than leaving the firewall off.
- If your distribution does not use
ufw, check your firewall tool's documentation, such asfirewalldoriptables, and allow the relevant local network traffic there.
Security note: Do not leave your firewall disabled — only use disabling briefly for testing. Prefer adding a specific allow rule for the app that needs network access.
Module Not Found Errors
Even after running pip install, you might still see errors like these:
ModuleNotFoundError: No module named 'requests'
ModuleNotFoundError: No module named 'websocket'
ModuleNotFoundError: No module named 'PIL'
For this lab, the most common causes are:
- your virtual environment is not activated
- the required packages were installed under a different Python interpreter
- Python cannot find your
Python-SDKfolder
Here's how to fix it:
- Check which Python you're using
- Run in the terminal: which python3
- If you see
/opt/homebrew/bin/python3, that means you're using Homebrew's Python - Ideally, your Python should be installed from the official website or through pyenv, and located at something like
/usr/local/bin/python3or/Library/Frameworks/Python.framework/Versions/3.x/bin/python3
- Check where your package was installed
- For example, to check the
requestspackage, run in the terminal: pip3 show requests - Look at the
Location:line. If it says something like/opt/homebrew/lib/python3.10/site-packages, then the package was installed into Homebrew's Python and may not be accessible from your current interpreter
- For example, to check the
- Uninstall the package from the Homebrew location
- Run in the terminal: /opt/homebrew/bin/pip3 uninstall PACKAGE_NAME, replacing
PACKAGE_NAMEwith the package you want to remove (for example,requests,websocket-client, orPillow)
- Run in the terminal: /opt/homebrew/bin/pip3 uninstall PACKAGE_NAME, replacing
- Reinstall the package using the Python you actually want to use
- First, check where
pip3is located by running: which pip3 - If it still points to
/opt/homebrew/..., you can directly run in the terminal something like: /Library/Frameworks/Python.framework/Versions/3.10/bin/pip3 install --user PACKAGE_NAME - Or force the install to your user directory with: pip3 install --user PACKAGE_NAME
- First, check where
- Make sure the package is now installed in the right place
- Run in the terminal: pip3 show PACKAGE_NAME
- Check that the
Location:line now shows something like/Users/yourname/Library/Python/3.10/lib/python/site-packages
Once your packages are installed in the correct location, they should be properly recognized by your Python installation.
Misty SDK Import Errors
If you see the following error:
from mistyPy.Robot import Robot
ModuleNotFoundError: No module named 'mistyPy.Robot'
This usually means Python cannot find the Misty Python SDK.
Step 1: Verify your folder structure
Make sure your folders look like this:
hri_course_misty_programming/
├── Python-SDK/
├── lab_3_misty_introduction/
Step 2: Check the path in your code
If your Python file is inside lab_3_misty_introduction, then the path to the SDK should usually be:
import sys, os
    sys.path.append(os.path.join(os.path.join(os.path.dirname(__file__), '..'), 'Python-SDK'))
Step 3: Print the path if you still cannot locate the SDK
Add the following debugging code and check whether the printed path matches where your Python-SDK folder is actually located on your computer:
import sys, os

    sdk_path = os.path.join(os.path.join(os.path.dirname(__file__), '..'), 'Python-SDK')
    print("SDK path:", sdk_path)

    sys.path.append(sdk_path)
    print("Python path:")
    for p in sys.path:
        print(p)
If the printed SDK path is wrong, update the path in your code so it matches your actual folder location.
Common causes:
- The SDK was cloned into the wrong directory
- Your lab folder is not where you think it is
- You are running the script from a different working directory than expected
Quick Debug Checklist
- Is Misty powered on and fully booted?
- Are your computer and Misty on the same Wi-Fi network?
- Did you activate your virtual environment? (
(venv)) - Did you create your virtual environment as
venvrather than.venv? - Is your file inside the correct lab folder?
- Did you clone
Python-SDKin the correct location? - Does the path in your code actually point to your local copy of the SDK?