Homework #1
Due: Friday, October 6th at 11:59pm
This homework is intended to server as an introduction to bash shell scripting, basic Unix commands, and using filtering (i.e., text processing) commands to process text. This assignment is not meant to cover everything in the bash scripting language or to use a large number of built-in utility commands. It solely serves as a way for you to get familiar with working with the shell, Bash syntax, and basic utility commands.
Getting started
The following two sections explain the process of setting up your homework workspace for the course and how to retrieve your private Github repository.
Linux Basics Tutorial
If you have already taken the MPCS Unix Bootcamp then you can skip this sections; otherwise, before beginning this assignment you must complete the following Unix tutorials:
These tutorials or the MPCS Unix Bootcamp is a prerequisite for taking this course and the information provided in these tutorials is required knowledge in order for you to complete this assignment.
CS Linux Machine
You will need access to an Linux based machine when working on your homework assignments. You should not test your programs on macOS or Windows Linux because these operating systems do not provide all utility commands necessary for completing this and possibly future assignments. Additionally, if they do provide a command then it may not contain all options that a Unix-like system provides. We will use and grade all assignments on the CS Linux machines and all programming assignments must work correctly on these machines. However, you can work locally on a Unix or Unix-like machine but ensure that you test your final solutions on a CS Linux machine.
Please follow the instructions provided here
Creating Your Private Repository
For each assignment, a Git repository will be created for you on GitHub. However, before that repository can be created for you, you need to have a GitHub account. If you do not yet have one, you can get an account here: https://github.com/join.
To actually get your private repository, you will need this invitation URL:
HW1 invitation (Please check the Post “HW 1 is ready” Ed)
When you click on an invitation URL, you will have to complete the following steps:
You will need to select your CNetID from a list. This will allow us to know what student is associated with each GitHub account. This step is only done for the very first invitation you accept.
Note
If you are on the waiting list for this course you will not have a repository made for you until you are admitted into the course. I will post the starter code on Ed so you can work on the assignment until you are admitted into the course.
You must click “Accept this assignment” or your repository will not actually be created.
After accepting the assignment, Github will take a few minutes to create your repository. You should receive an email from Github when your repository is ready. Normally, it’s ready within seconds and you can just refresh the page.
- You now need to clone your repository (i.e., download it to your machine).
Make sure you’ve set up SSH access on your GitHub account.
For each repository, you will need to get the SSH URL of the repository. To get this URL, log into GitHub and navigate to your project repository (take into account that you will have a different repository per project). Then, click on the green “Code” button, and make sure the “SSH” tab is selected. Your repository URL should look something like this: git@github.com:mpcs51082-aut23/hw1-GITHUB-USERNAME.git.
If you do not know how to use
git cloneto clone your repository then follow this guide that Github provides: Cloning a Repository
If you run into any issues, or need us to make any manual adjustments to your registration, please let us know via Ed Discussion.
IMPORTANT: Eligible Commands & Bash
For this homework assignment, you are only allowed to use the following commands with or without using their options in your scripts.
Commands used in Module #1 slides
seq
touch
mkdir
readarray
eval
rm
read
exit
Using any other command not specified in this list will result in a major penalty for that specific problem. I know there might be some better
commands out there such as awk, and sed but we will first learn the basics and then use more advanced commands as we move along in the course.
You are free to use the entirety of the bash scripting language but are restricted to using only the above commands within your script files.
If you have any questions about using a command ask on Ed before you use it!
You must code all problems in the Bash scripting language. No other programming language or scripting language is allowed.
Warm-Up
Warm-up exercises are not graded and are meant to give you hints towards solving the actual homework problems. All solutions to warm-up problems that require coding are already in your repositories. Do not just look at the solution! Try to solve the problem before looking at the solution. Please look in the hw1/warmup_solns directory to find these solutions.
Warm-Up #0
Before beginning the actual warm-up and homework problems, make sure you watch the prerecorded videos for module 1 and experiment with the devhints cheat sheet code-snippets while logged into a CS Linux machine.
Warm-Up #1
In a file named warmup1.sh, write a bash script that takes in a file as a command line argument. This file will only contain positive integers.
The script must find the maximum integer in the file. You can use the hw1/warmup/numbers.txt to test your script.
You can assume the file will only contain positive integers. The script should be ran as bash warmup1.sh FILE where FILE is the name of a file that contains only positive numbers.
For example
bash warmup1.sh numbers.txt
If the user forget to supply the file argument then print the error message "Error: no numbers file entered" and exit from the script immediately by running the command
exit 1.
Warm-Up #2
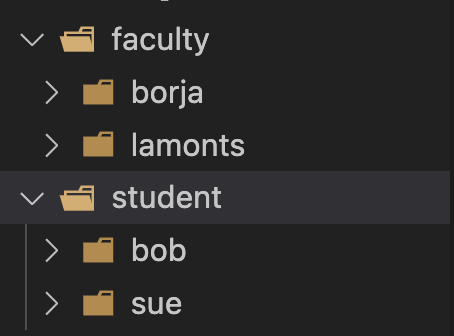
In a file named warmup2.sh, write a bash script that reads in a series of command line arguments that represent individuals associated with Uchicago.
Each command line argument has the following format: CNET:POSITION, where CNET is a Uchicago CNET identifier and POSITION is the position of the individual at the university. For example,
lamonts:faculty
borja:faculty
bob:student
For example, running the script as such
bash warmup2.sh lamonts:faculty bob:student borja:faculty sue:student
creates the directory shown in the image below
Problem 1
For Problem 1, watch the following video about creating a shell script to list specific street schedules cleaning schedules based on ward and section
1.3: Demo Shell Scripting and Street Cleaning
Your task for Problem 1 is to produce the same exact output with the following updates:
Take in the CSV file as a command line argument. For example, the script will now be run as follows:
bash p1.sh CSV_FILE WARD SECTION
where
CSV_FILEwill include the same data assweepSched.csv; however, the lines may be randomized and some lines will be excluded that were in the original file.The script must
exit 1if the user forgets to include all three command-line arguments in this order: file, ward, and section. Specifically, execute the following commands if the command-line arguments are not supplied as specified:echo "error: incorrect command line arguments" echo "usage p1.sh FILE WARD SECTION" exit 1
Ensure that the
WARDcommand-line argument is within the range of the minimum and maximum ward number in theFILE(inclusive). Similarly, ensure that theSECTIONcommand-line argument is within the range of the minimum and maximum section number in theFILE(inclusive).Display the output in a date format as such:
"MM/DD/YY"in increasing month order. Each date must be on its own line. For example,$ bash p1.sh sweepSched.csv 1 1 04/04/23 04/05/23 05/30/23 05/31/23 08/01/23 08/02/23 09/05/23 09/06/23 10/03/23 10/04/23 11/01/23 11/07/23
You can assume the year will always be
2023.
Place your solution in hw1/p1.sh.
Problem 2
Inside the p2 directory, you will see a plain file called students.txt. This file is a space separated file that has the format
USERNAME CLASS_CAT COURSE_ID GRADE
Each line in this file, contains information about a student’s grade in a specific MPCS course. Please note that this data is all random and fake students and MPCS courses.
Each MPCS course is categorized (CLASS_CAT) into either theory, systems or elective class and has a unique integer identifier (COURSE_ID). USERNAME is a student’s username (e.g., CNETID) along
with their final numeric grade (GRADE) for the course.
Inside the p2.sh file, write a script that takes in a single plain text file as an argument, which has the student information described above.
Create a home directory under the p2 directory (i.e., p2/home). Inside this p2/home/ directory, the script creates a directory for each USERNAME in the file and for each class makes a plain text file with the format
MPCS{COURSE_ID}.txt. Each file contains the numeric grade for that student and must be placed in a subdirectory based on the CLASS_CAT for that class.
when running bash p2.sh students.txt the following image shows a partial view of the directory structure using the provided students.txt file.
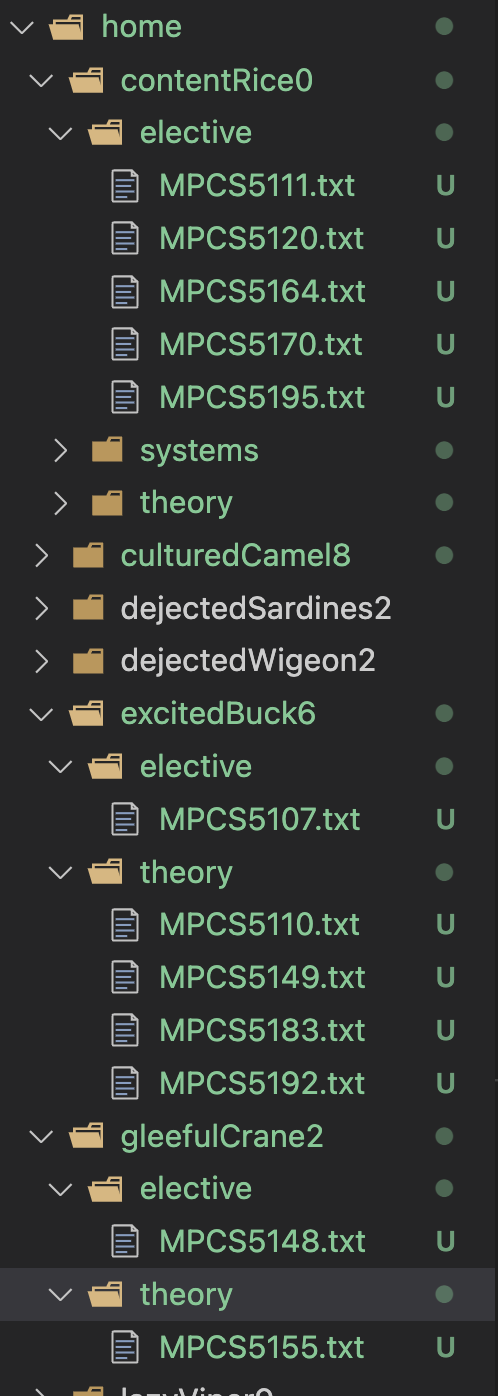
The script must exit 1 if the one command-line argument is not provided or does not exist.
Problem 3
Inside the p3 directory, you will see a file called log.csv. This file contains fake logging information about users interacting with a company’s Microsoft server machines.
For this problem, we will be working with the deviceProduct, name, start, suser columns.
Inside the p3.sh file, write a script that takes in the log file followed by a series of suser names from that file. The script must create a p3/logs/ directory and create subdirectories for each suser specified on the command line. For each suser name provided as a command line argument, you will do the following
Find all entries of that user inside the log file and retrieve their information specified in the
deviceProduct,name, andstartcolumns.Place a new entry into a
log.csvthat lives undersuser/deviceProductdirectory. The entries inside of these log files will have the data ordered bystart,name. You must also include this header inside the CSV files.
For example, if we ran the script bash p3.sh logs.csv AEstep then the hierarchy will look as follows
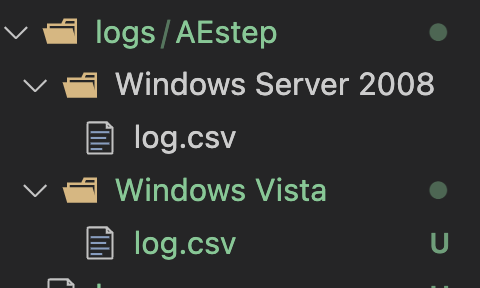
and inside p3/logs/AEstep/Windows Server 2008/logs.csv will contain
start,name
2022-09-26T05:00:56.475000Z,An account was successfully logged on.
2022-09-26T05:19:52.770000Z,An account was successfully logged on.
and inside p3/logs/AEstep/Windows Vista/logs.csv will contain
start,name
2022-09-26T04:09:44.270000Z,An account was successfully logged on.
The script created Windows Server 2008 and Windows Vista directories under the logs/AEstep directory because the three entries had a deviceProduct value equal to one of them.
The logs.csv file provided contains about 1000 entries but for testing purposes you can make it smaller to easily test your script. However, we will test it on the larger file.
The script must exit 1 if the log file argument (e.g., logs.csv) is not provided or the file does not exist.
Grading
Programming assignments will be graded according to a general rubric. Specifically, we will assign points for completeness, correctness, design, and style. (For more details on the categories, see our Assignment Rubric page.)
The exact weights for each category will vary from one assignment to another. For this assignment, the weights will be:
Problem 1: 33%
Problem 2: 33%
Problem 3: 34%
There are no automated-tests for this first homework assignment. We will combine completeness and correctness together and just verify manually that your code is working according to the specification of the problem.
Submission
Before submitting, make sure you’ve added, committed, and pushed all your code to GitHub. You must submit your final work through Gradescope (linked from our Canvas site) in the “Homework #1” assignment page via two ways,
Uploading from Github directly (recommended way): You can link your Github account to your Gradescope account and upload the correct repository based on the homework assignment. When you submit your homework, a pop window will appear. Click on “Github” and then “Connect to Github” to connect your Github account to Gradescope. Once you connect (you will only need to do this once), then you can select the repsotiory you wish to upload and the branch (which should always be “main” or “master”) for this course.
Uploading via a Zip file: You can also upload a zip file of the homework directory. Please make sure you upload the entire directory and keep the initial structure the same as the starter code; otherwise, you run the risk of not passing the automated tests.
Note
For either option, you must upload the entire directory structure; otherwise, your automated test grade will not run correctly and you will be penalized if we have to manually run the tests. Going with the first option will do this automatically for you. You can always add additional directories and files (and even files/directories inside the stater directories) but the default directory/file structure must not change.
Depending on the assignment, once you submit your work, an “autograder” will run. This autograder should produce the same test results as when you run the code yourself; if it doesn’t, please let us know so we can look into it. A few other notes:
You are allowed to make as many submissions as you want before the deadline.
Please make sure you have read and understood our Late Submission Policy.
Your completeness score is determined solely based on the automated tests, but we may adjust your score if you attempt to pass tests by rote (e.g., by writing code that hard-codes the expected output for each possible test input).
Gradescope will report the test score it obtains when running your code. If there is a discrepancy between the score you get when running our grader script, and the score reported by Gradescope, please let us know so we can take a look at it.