Computer Setup
Setup Checklist
These instructions are intended to setup Intro Robotics students with a simulated Turtlebot3 Waffle in an Ubuntu 20.04 environment.
Ubuntu 20.04 Environment
There are many ways to configure an Ubuntu 20.04 programming environment (virtual machines, an Ubuntu 20.04 partition on your laptop, Docker) or even use ROS outside Ubuntu (ROS for Windows, ROS2, ROS through Windows Subsystem for Linux). For this class, we strongly recommend you pursue one of the following options:
- Remote Access to the UChicago CSIL Computer Lab [recommended option]: For those of you who do not already use the Ubuntu 20.04 as the default OS on your computer or already have an Ubuntu 20.04 partition, this is the highly recommended option for you. Please follow the steps we outline in the "Remote Access to the UChicago CSIL Computer Lab" and "Setting Up Your Catkin Workspace" sections below to setup and use remote access to the CSIL computer lab, ROS, and Turtlebot3 in simulation.
- Ubuntu 20.04 as your computer's default OS: If you already have an Ubuntu distribution as your computer's main OS, you can upgrade to 20.04 if you haven't already (here's a helpful link with instructions for upgrading from Ubuntu 18.04 to 20.04). Then follow the ROS installation and ROS packages & dependences installation instructions as well as the "Setting Up Your Catkin Workspace" instructions below.
- Set Up a Dual Boot: Setting up a dual boot will partition your computer's hard drive where one part will run a Ubuntu 20.04 OS and the other will run your computer's default OS. The advantage of a dual boot is that you might experience better performance and less lag than if you use the remote access option. The disadvantage is that you're making a pretty big change to your host computer and it may not be worthwhile for you in the long run. It's also worth pointing out that setting up a dual boot is significantly easier on a Windows machine than a Mac. If you choose this option, please follow the steps we outline in the "Ubuntu 20.04 as your primary OS or within a partition" and "Setting Up Your Catkin Workspace" sections below to setup and use your Ubuntu 20.04 partition, ROS, and Turtlebot3 in simulation.
Remote Access to the UChicago CSIL Computer Lab
Setup
To get started with remote access to the CSIL computer lab, you'll need the computer host name (e.g., spongebob.cs.uchicago.edu) that's been assigned to you for this course. Then, follow these steps:
1. Download and install the NoMachine Enterprise Client
2. Follow the steps on this page to configure your host using the NoMachine application with your given host name (e.g., spongebob.cs.uchicago.edu).
Connecting to Your Ubuntu 20.04 Host via Remote Access
Follow these steps each time you connect to your Ubuntu 20.04 remote access host:
- Open the NoMachine client app and you should see your connection listed (that you setup in the prior section). Click on your connection and hit the "Connect" button.
- You'll have to authenticate a couple of times using your UChicago credentials (CNet ID + password). You'll also be able to scroll through some settings and helpful tips.
- Now you should be logged into to your Ubuntu 20.04 host and can do your work for Intro Robotics.
- When you're done with your session, log out like you normally would on a computer and then terminate your NoMachine window.
ROS on Your Remote Access Host
ROS should already be installed on your remote host. You can check by running the roscore command in a terminal window. You should see an output that looks like the following:
... logging to ~/.ros/log/9cf88ce4-b14d-11df-8a75-00251148e8cf/roslaunch-machine_name-13039.log
Checking log directory for disk usage. This may take awhile.
Press Ctrl-C to interrupt
Done checking log file disk usage. Usage is <1GB.

started roslaunch server http://machine_name:33919/
ros_comm version 1.15.8

SUMMARY
======

PARAMETERS
 * /rosdistro: noetic
 * /rosversion: 1.15.8

NODES

auto-starting new master
process[master]: started with pid [13054]
ROS_MASTER_URI=http://machine_name:11311/

setting /run_id to 9cf88ce4-b14d-11df-8a75-00251148e8cf
process[rosout-1]: started with pid [13067]
started core service [/rosout]
It is possible that instead of seeing the output above, you might see one of the following two errors:
-
bash: roscore: command not found -
WARNING: unable to configure logging. No log files will be generated
Checking log directory for disk usage. This may take awhile.
Press Ctrl-C to interrupt
Done checking log file disk usage. Usage is <1GB.

Resource not found: roslaunch
The traceback for the exception was written to the log file
Traceback (most recent call last):
  File "/usr/lib/python3/dist-packages/roslaunch/__init__.py", line 322, in main
    p.start()
  File "/usr/lib/python3/dist-packages/roslaunch/parent.py", line 277, in start
    self._start_infrastructure()
  File "/usr/lib/python3/dist-packages/roslaunch/parent.py", line 226, in _start_infrastructure
    self._load_config()
  File "/usr/lib/python3/dist-packages/roslaunch/parent.py", line 137, in _load_config
    self.config = roslaunch.config.load_config_default(self.roslaunch_files, self.port,
  File "/usr/lib/python3/dist-packages/roslaunch/config.py", line 447, in load_config_default
    load_roscore(loader, config, verbose=verbose)
  File "/usr/lib/python3/dist-packages/roslaunch/config.py", line 92, in load_roscore
    f_roscore = get_roscore_filename()
  File "/usr/lib/python3/dist-packages/roslaunch/config.py", line 84, in get_roscore_filename
    return os.path.join(r.get_path('roslaunch'), 'resources', 'roscore.xml')
  File "/usr/lib/python3/dist-packages/rospkg/rospack.py", line 207, in get_path
    raise ResourceNotFound(name, ros_paths=self._ros_paths)
rospkg.common.ResourceNotFound: roslaunch
If you do see one of these two errors or are otherwise unable to run roscore, run the following commands:
$ echo "source /opt/ros/noetic/setup.bash" >> ~/.bashrc
$ source ~/.bashrc
Now, you should be able to run roscore and it should show the correct output.
Additionally, if you see the following warning when you open a new terminal or terminal tab:
bash: ~cs/intro_robo_21/catkin_ws/devel/setup.bash: No such file or directory
Open up your .bashrc file, atom ~/.bashrc, and remove that line (for me, this was located at line 38).
If you are still not seeing the correct output when you run roscore, please reach out to the teaching team for help by posting in the #computer-setup-help channel in our course Slack.
Ubuntu 20.04 as your primary OS or within a partition
(Skip this section you're using Remote Access)
Setting Up an Ubuntu 20.04 Partition (Dual Boot)
First, you'll need to create a bootable USB thumb drive with Ubuntu 20.04 on it, follow the instructions on this "Create a bootable USB stick on Windows" Ubuntu Tutorial. Then install Ubuntu 20.04 on your machine from the USB thumb drive. I found it helpful to follow itzgeek's Ubuntu Dual Boot Alongside Windows instructions starting from Step 3.
ROS Installation
Follow these instructions to install ROS Noetic, following the steps to install the Ubuntu version and installing ros-noetic-desktop-full.
Installing the Necessary Dependencies for ROS and Turtlebot3
These instructions are based on those found on the ROBOTIS website. Install these necessary ROS dependencies:
$ sudo apt-get install ros-noetic-joy ros-noetic-teleop-twist-joy ros-noetic-teleop-twist-keyboard ros-noetic-laser-proc ros-noetic-rgbd-launch ros-noetic-rosserial-arduino ros-noetic-rosserial-python ros-noetic-rosserial-client ros-noetic-rosserial-msgs ros-noetic-amcl ros-noetic-map-server ros-noetic-move-base ros-noetic-urdf ros-noetic-xacro ros-noetic-compressed-image-transport ros-noetic-rqt-image-view ros-noetic-gmapping ros-noetic-navigation ros-noetic-interactive-markers
$ sudo apt-get install ros-noetic-ros-control*
$ sudo apt-get install ros-noetic-control* -o Dpkg::Options::="--force-overwrite"
$ sudo apt-get install ros-noetic-moveit*
(Optional) Zoom Install
If you are dual booting Ubuntu 20.04 or are running Ubuntu 20.04 natively on your laptop, make sure you have installed and can use Zoom in Ubuntu. The following are the steps you can take to install Zoom:
$ sudo apt-get install wget
$ wget https://zoom.us/client/latest/zoom_amd64.deb -O zoom_amd64.deb
$ sudo apt install ./zoom_amd64.deb
Setting Up Your Catkin Workspace
Creating Your catkin_ws
These instructions are based on this ROS tutorial page. Carry out the following commands:
$ source /opt/ros/noetic/setup.bash
$ mkdir -p ~/catkin_ws/src
$ cd ~/catkin_ws/
$ catkin_make
Then, add the source catkin_ws/devel/setup.bash command to your ~/.bashrc file.
$ echo "source ~/catkin_ws/devel/setup.bash" >> ~/.bashrccatkin_make command or open a new terminal, you'll need to source the catkin_ws/devel/setup.bash file, which is why we're adding it to the ~/.bashrc file.
To ensure that you've set up your catkin workspace properly: 1) close your current terminal window, 2) open a new terminal window, and 3) enter the command roscd. If you've set up your catkin workspace correctly, you should now be in the directory ~/catkin_ws/devel.
Turtlebot3 ROS Setup
Next, navigate to your catkin workspace's src folder and clone the necessary git repositories used for the Turtlebot3:
$ cd ~/catkin_ws/src
$ git clone https://github.com/ROBOTIS-GIT/turtlebot3_msgs.git
$ git clone -b noetic-devel https://github.com/ROBOTIS-GIT/turtlebot3.git
$ git clone https://github.com/ROBOTIS-GIT/turtlebot3_simulations.git
$ git clone https://github.com/ROBOTIS-GIT/turtlebot3_manipulation.git
$ git clone https://github.com/ROBOTIS-GIT/turtlebot3_manipulation_simulations.git
$ git clone https://github.com/ROBOTIS-GIT/open_manipulator_dependencies.git
Finally, run the catkin_make command within your catkin workspace, source the devel/setup.bash file, and set your default turtlebot3 model to the waffle pi.
$ cd ~/catkin_ws && catkin_make
$ source devel/setup.bash
$ echo "export TURTLEBOT3_MODEL=waffle_pi" >> ~/.bashrc
You can test to ensure that you've installed all of the Turtlebot3 packages and dependencies by trying out a built-in teleoperation demo of the Turtlebot3 in a simulated house environment. You'll need to run the following commands in 3 separate terminal windows (or terminal tabs).
Terminal 1:
$ roscoreTerminal 2:
$ roslaunch turtlebot3_gazebo turtlebot3_house.launchYou should now see a turtlebot3 waffle (without the arm) within a simulated house environment:

Terminal 3:
$ roslaunch turtlebot3_teleop turtlebot3_teleop_key.launchFollow the directions in the terminal to teleoperate your simulated turtlebot3!
Class Repo/Package Setup
In the last step, we setup the the class repository. The class package is where you will place your scripts and use common course utilities. Navigate to your catkin workspace's src folder, clone the class repository and pull all of its submodules:
$ cd ~/catkin_ws/src
$ git clone https://github.com/Intro-Robotics-UChicago-Spring-2021/intro_robo
$ cd intro_robo
$ git submodule update --init --recursive
Then, similar to before, run the catkin_make command within your catkin workspace and source the devel/setup.bash file.
$ cd ~/catkin_ws && catkin_make
$ source devel/setup.bash
The class repository contains several important catkin packages:
intro_robo_utils: This packages is intended for common scripts, programs, launch files, and worlds that we think will help you throughout this course.class_meeting_number_exercise: These packages contain the necessary files for conduction class activities. The number specifies the class meeting and the exercise specifies the specific exercise the package is addressing. For instance theclass_meeting_02_stop_at_wallis for the stop at wall exercise in class meeting 02.
We will update the class package throughout the course to add new class meeting packages. Hence, you should update this package and build it prior to each class meeting. You can do so via the following commands,
$ cd ~/catkin_ws/src/intro_robo
$ git submodule update --init --recursive
$ cd ~/catkin_ws && catkin_make
$ source devel/setup.bash
Setting Up Your IDE
Recommended IDE
We recommend using VSCode to develop ROS applications. The autocomplete features from VSC extensions are very helpful when first learning rospy.
These are the extensions that we found helpful:
Here's also a guide to managing extensions in VSCode.
Hints & Tricks
If you are unfamiliar with Ubuntu or Gnome, we recommend that you take some time to familiarize with the user interface and the functionalities. Here is a short intro the gnome desktop. Additionally, students in the past have found the following tidbits helpful,
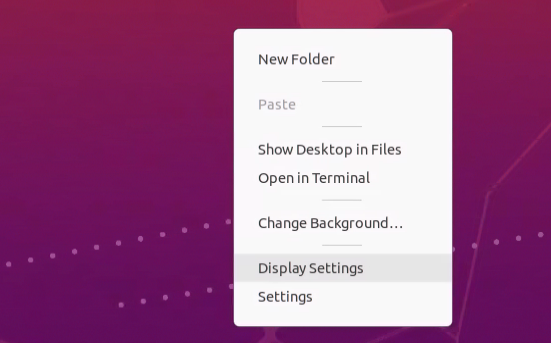
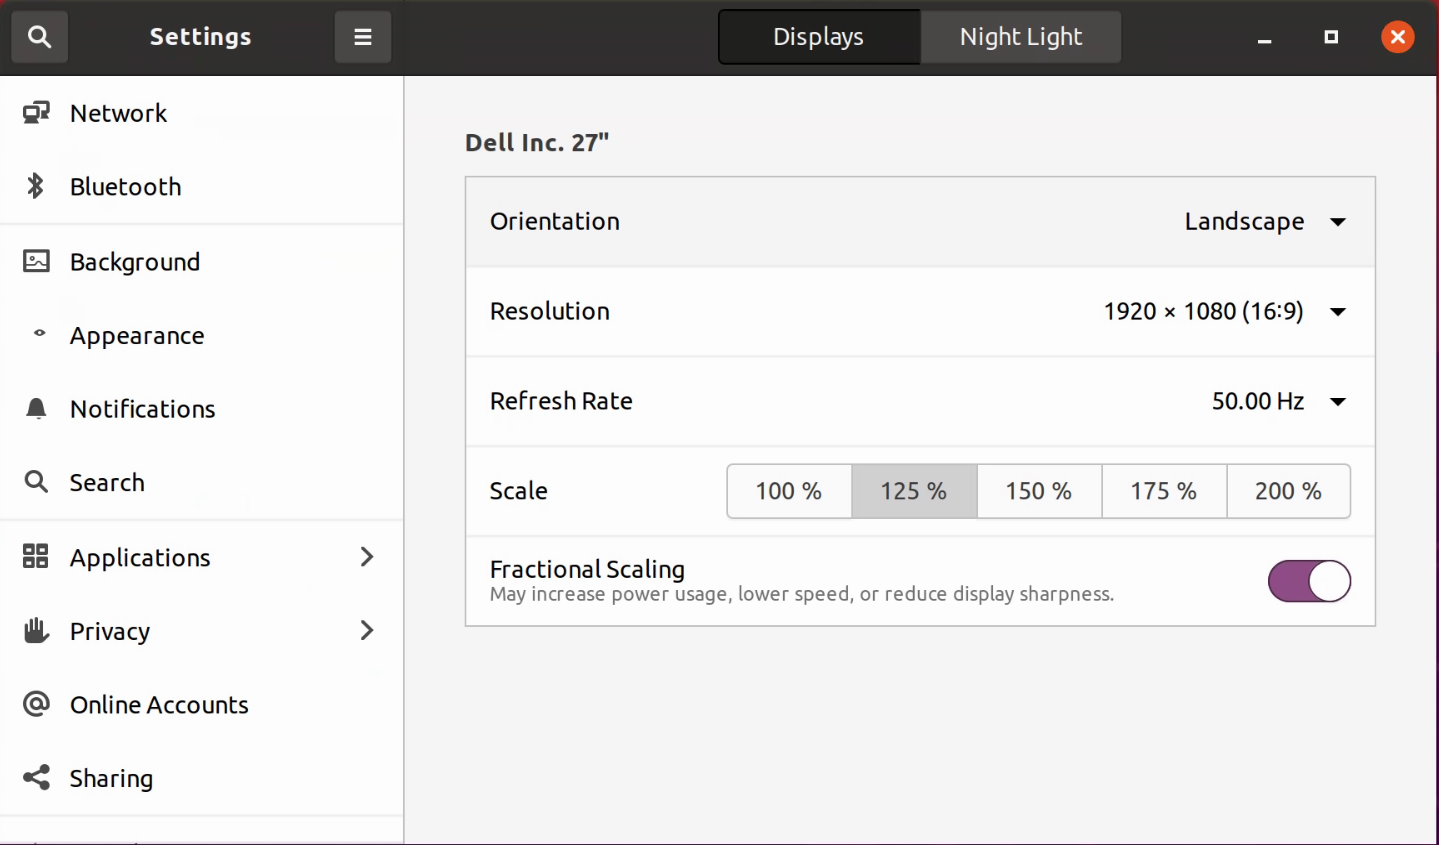
- Adjusting the resolution and Scale: You can adjust your NoMachine window's resolution by clicking on Display Settings in the right click pop up menu. This will bring up the display settings, in which you can adjust the screen resolution and scale your window.
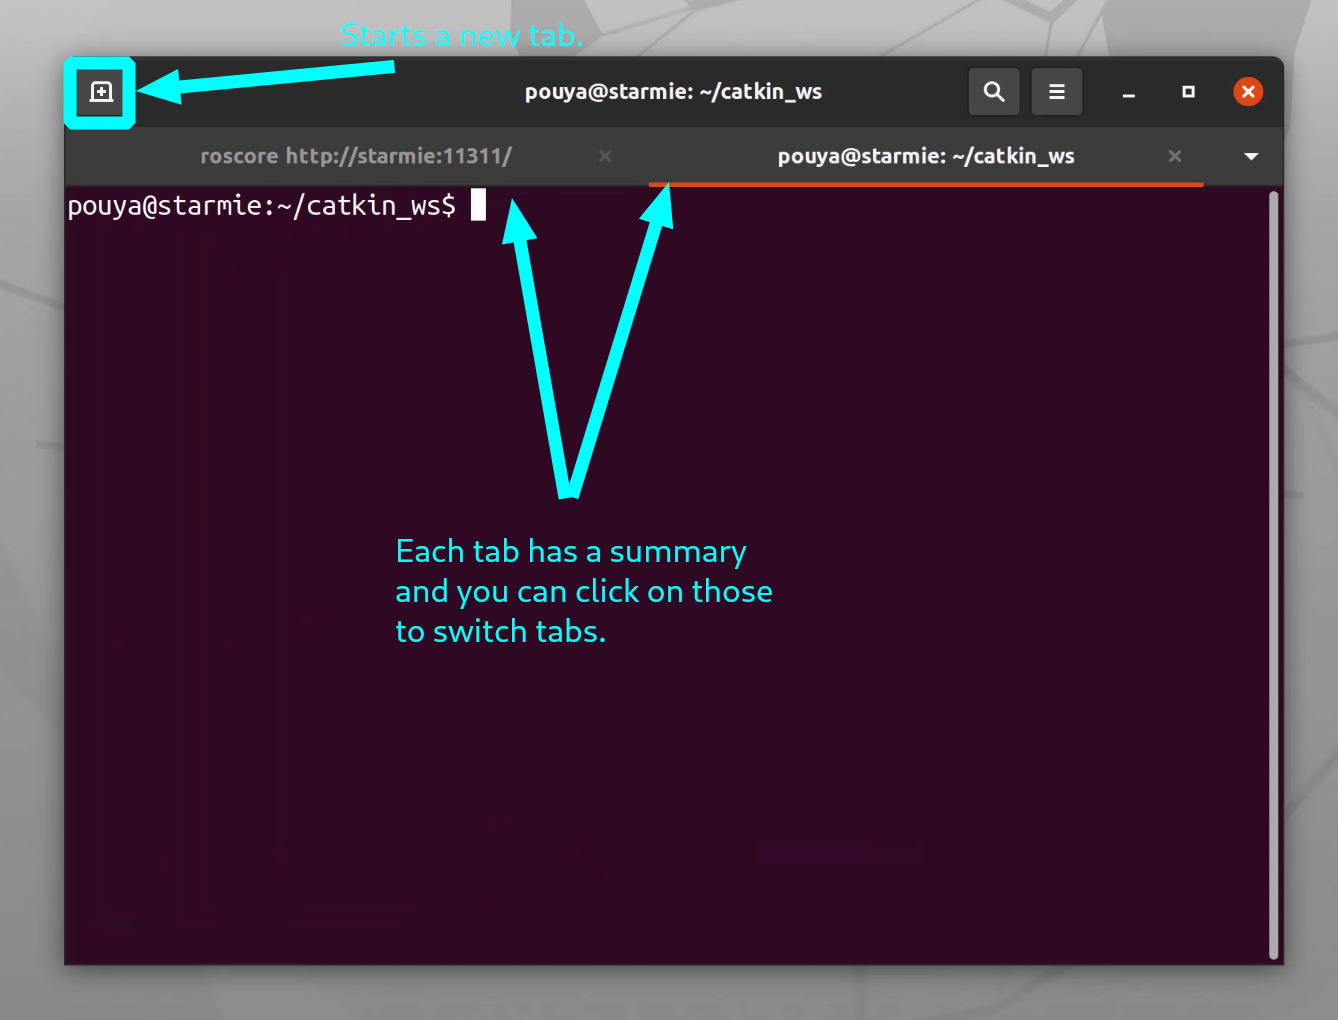
- Terminal Tabs: As you familiarize yourself with ROS and gazebo, you will find yourself in need of running multiple terminals at the same time. Having one window per terminal usually leads to clutter. Another approach would be to only open one terminal window and use terminal tabs.
Acknowledgments
We give a BIG thank you to Colin Hudler and UChicago CS techstaff for their help and support in setting up remote access for this class to the UChicago CSIL Computer Lab as well as their ongoing support for ensuring that each student in the class get a working programming environment for Intro Robotics.